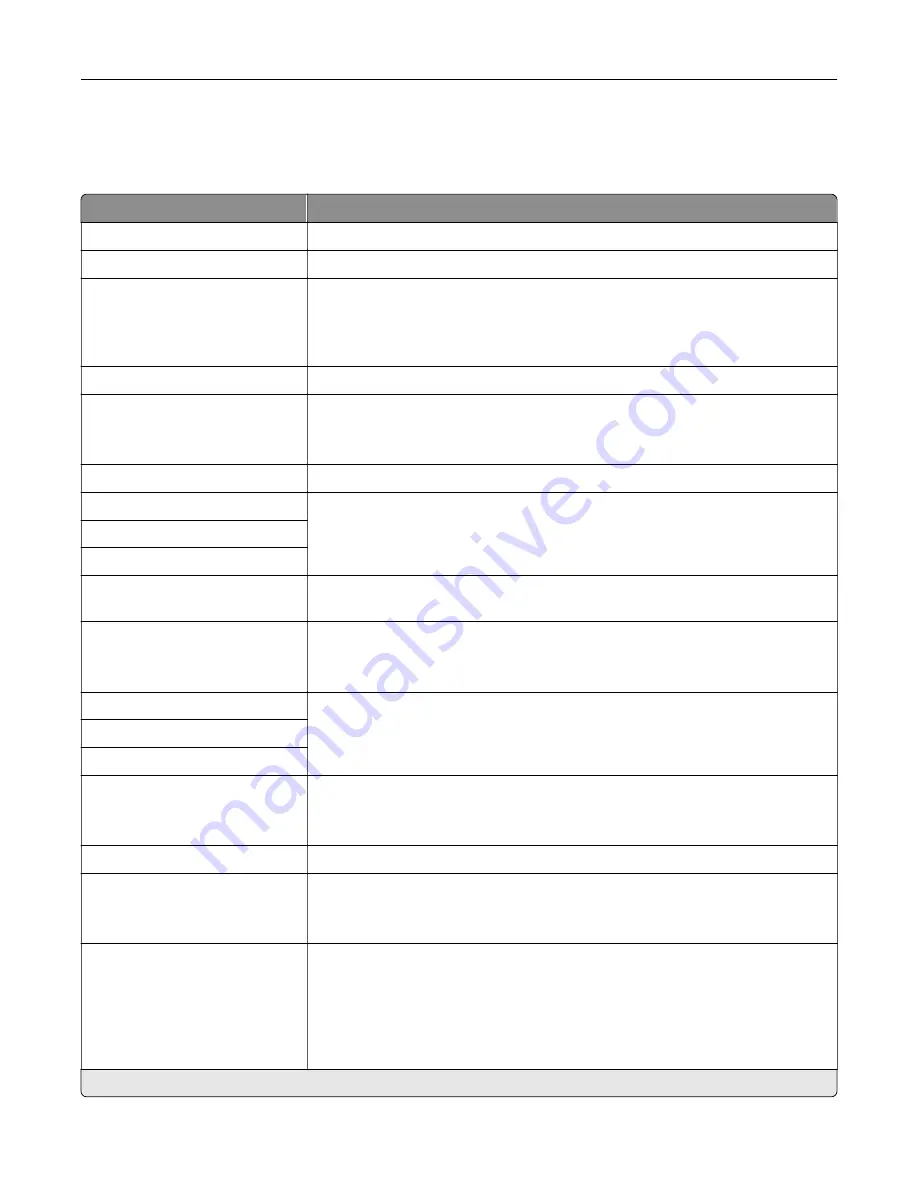
TCP/IP
Note:
This menu appears only in network printers or printers attached to print servers.
Menu item
Description
Set Hostname
Set the current TCP/IP host name.
Domain Name
Set the domain name.
Allow DHCP/BOOTP to update
NTP server
On*
Off
Allow the DHCP and BOOTP clients to update the NTP settings of the printer.
Zero Configuration Name
Specify a service name for the zero configuration network.
Enable Auto IP
Off*
On
Assign an IP address automatically.
DNS Server Address
Specify the current Domain Name System (DNS) server address.
Backup DNS Address
Specify the backup DNS server addresses.
Backup DNS Address 2
Backup DNS Address 3
Domain Search Order
Specify a list of domain names to locate the printer and its resources that reside
in different domains on the network.
Enable DDNS
Off*
On
Update the Dynamic DNS settings.
DDNS TTL
Specify the current DDNS settings.
Default TTL
DDNS Refresh Time
Enable mDNS
Off
On*
Update the multicast DNS settings.
WINS Server Address
Specify a server address for Windows Internet Name Service (WINS).
Enable BOOTP
Off*
On
Allow the BOOTP to assign a printer IP address.
Restricted Server List
Specify the IP addresses that are allowed to communicate with the printer over
TCP/IP.
Notes:
•
Use a comma to separate each IP address.
•
You can add up to 50 IP addresses.
Note:
An asterisk (*) next to a value indicates the factory default setting.
Understanding the printer menus
61
Содержание MX-C607P
Страница 1: ...DIGITAL FULL COLOR PRINTER MX C607P User s Guide October 2021 Machine type 5063 Model 53H ...
Страница 85: ...Replacing parts and supplies Replacing a developer unit 1 Open door A Maintaining the printer 85 ...
Страница 86: ...2 Remove the waste toner bottle Maintaining the printer 86 ...
Страница 88: ...7 Insert the imaging unit 8 Insert the waste toner bottle 9 Close door A Maintaining the printer 88 ...
Страница 91: ...Replacing a photoconductor unit 1 Open door A Maintaining the printer 91 ...
Страница 92: ...2 Remove the waste toner bottle Maintaining the printer 92 ...
Страница 94: ...7 Insert the imaging unit 8 Insert the waste toner bottle 9 Close door A Maintaining the printer 94 ...
Страница 95: ...Replacing an imaging unit 1 Open door A Maintaining the printer 95 ...
Страница 96: ...2 Remove the waste toner bottle Maintaining the printer 96 ...
Страница 100: ...2 Remove the waste toner bottle 3 Unpack the new waste toner bottle Maintaining the printer 100 ...
Страница 101: ...4 Insert the new waste toner bottle 5 Close door A Maintaining the printer 101 ...
Страница 102: ...Replacing the transfer belt 1 Turn off the printer 2 Open door A Maintaining the printer 102 ...
Страница 103: ...3 Remove the waste toner bottle 4 Open door A1 Maintaining the printer 103 ...
Страница 105: ...8 Close door A1 9 Insert the waste toner bottle 10 Close door A 11 Turn on the printer Maintaining the printer 105 ...
Страница 107: ...4 Insert the new transfer roller 5 Remove the white packing material 6 Close door B Maintaining the printer 107 ...
Страница 129: ...Staple jam in door G 1 Open door G 2 Pull out the staple cartridge holder Clearing jams 129 ...
Страница 131: ...5 Insert the staple cartridge holder 6 Close door G Clearing jams 131 ...


