background image

Chapter 1 Section 3 Using Special Features for Improved Photography

68

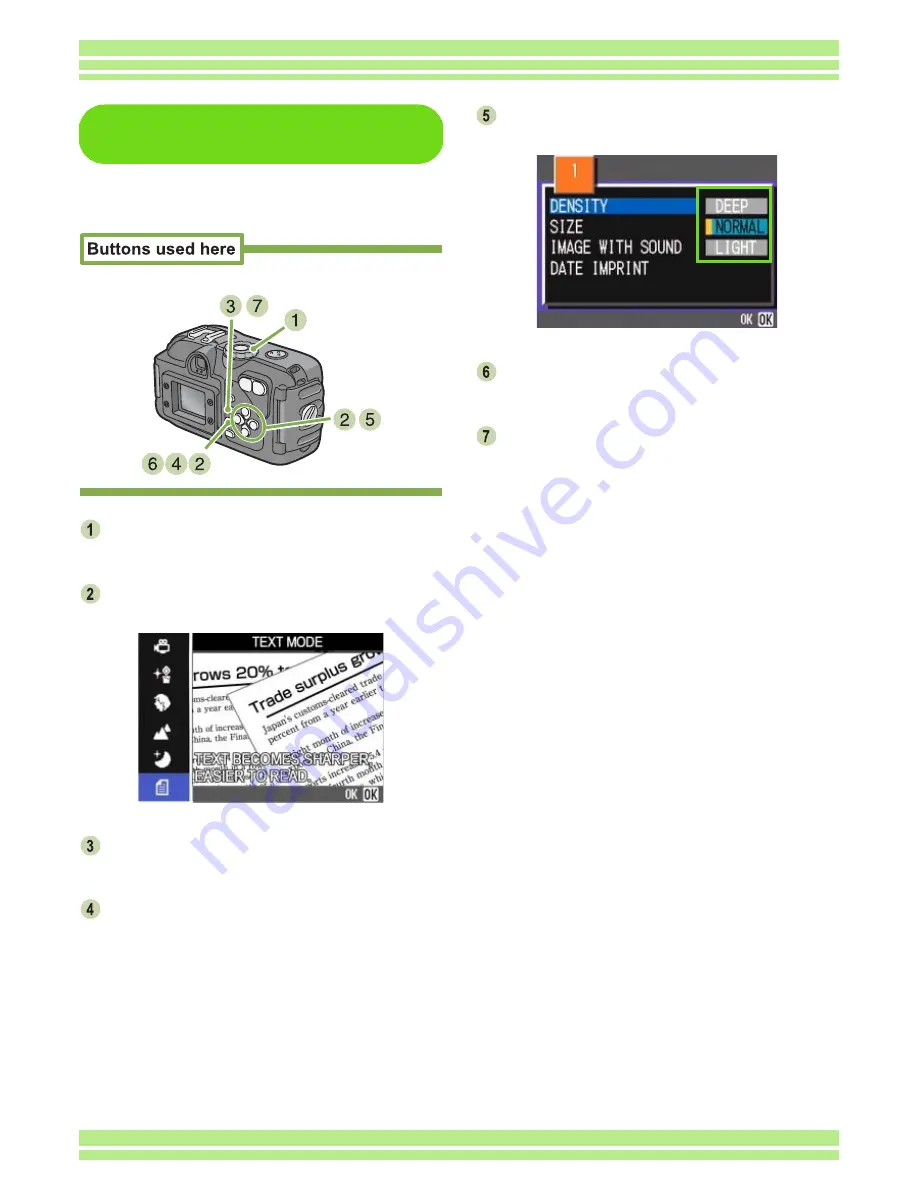
Using the Shooting Menu 

(Text Density)

To change the Text Density setting using the
Shooting Menu, follow the steps below.

Turn the Mode Dial to 

4

4

4

4

 (Scene Mode).

The Scene selection screen appears.

Press the 

!"

!"

!"

!"

 buttons to select the text

mode and then press the 

O

O

O

O

 button.

Press the 

M

M

M

M

 button.

The Shooting menu appears.

Select  [DENSITY] and then press the 

O

O

O

O

button.

Press the 

!"

!"

!"

!"

 buttons to select the 

desired density setting.

Press the 

O

O

O

O

 button.

Text Density settings are completed.

Press the 

M

M

M

M

 button.

The display returns to the shooting screen.

The Text Density setting value does not appear on the
screen.
This setting will be used for shooting until you change
it.

Содержание Caplio 400G wide F

Страница 1: ...For the safe use of your camera be sure to read the Safety Precautions thoroughly before use Operation Manual...

Страница 2: ...cessary Using This Guide Display examples This manual gives examples of LCD monitor display from Caplio G4 Wide that has shooting functions equivalent to those of this camera The LCD Monitor Display e...

Страница 3: ...hite Balance 61 Using the Shooting Menu White Balance 63 Sensitivity Settings ISO SETTING 65 Using the ADJ Button ISO Sensitivity 65 Using the Shooting Menu ISO Sensitivity 66 Changing Shading for Sho...

Страница 4: ...RICOH Gate La 144 The RICOH Gate La Window 144 How to Use the Optional Settings 145 How to Use the Background Illustration Settings 146 Downloading Images from an SD Memory Card 147 Images in an SD M...

Страница 5: ...ra Memo 197 Displaying a camera memo 197 Displaying and Confirming a Camera Memo Attached to a Still Image and Correcting It 199 Viewing a Camera Memo on the Computer 199 Editing a Camera Memo 199 Sea...

Страница 6: ...Section 1 Getting Started Chapter 1 Using Your Camera This section explains how to get your camera ready from taking it out of the package to preparing to shoot...

Страница 7: ...ything was packed Caplio 400G wide AA Alkaline Batteries 2 Neck Strap LCD Hood AV Cable Used to connect the camera to a TV unit USB Cable Used to connect the camera to a personal computer or Direct Pr...

Страница 8: ...e play or image transfer to a personal computer Other products sold separately PC Card Adapter FM SD53 Soft Case SC 40 Rechargeable Battery Set BS 3 Includes the Rechargeable Battery DB 43 and Battery...

Страница 9: ...1 AV Output Terminal 12 Speaker 13 Microphone 14 Strap Attachment Pegs 15 Auto Focus Lamp 16 Viewfinder 17 Flash Lamp 18 ADJ Button 19 Z Wide angle 9 Thumbnail Display Button 20 z Telephoto 8 Enlarged...

Страница 10: ...tings for movies and five different scenes 5 Shooting Mode Allows you to shoot still images 6 Playback Mode Allows you to playback and delete still images and movies CALS In the CALS mode the picture...

Страница 11: ...ailable in stores These batteries are not rechargeable However they last a long time as compared with AA Alkaline Batteries when used with a digital camera Nickel Hydrogen Battery available in stores...

Страница 12: ...out is displayed on the LCD Monitor When this happens replace the batteries with a fresh set Before opening or closing the cover make sure that no contaminants adhere on the camera Remove water sand o...

Страница 13: ...knob toward the mark label Before opening or closing the cover make sure that any contaminants adhering to the camera such as water sand or mud are removed from it Do not open and close the cover in...

Страница 14: ...outlet Be sure to firmly attach cables and plug in cords When you are not using the camera unplug the AC Adapter from the camera and the power outlet While in use if you detach the AC Adapter or unplu...

Страница 15: ...d 15 Removing the AC Adapter Make sure the camera s power is off Unplug the power plug from the outlet Turn the battery card cover s knob toward the mark to open the cover Close the battery card cover...

Страница 16: ...se the Auto Power off function is set to one minute The Auto Power off function does not work when connected to your computer Power Save Mode You can reduce the power consumption of the LCD Monitor an...

Страница 17: ...Time format Check the display on the bottom of the screen and then press the O O O O button Once you have set the date and time the display returns to the Setup screen If the batteries are removed for...

Страница 18: ...LOCK after recording important images Note that you cannot shoot images in the LOCK state because no data can be recorded on the card Unlock the card when shooting The internal memory capacity is 8MB...

Страница 19: ...clicks Close the battery card cover and turn the knob toward the mark Removing the SD Memory Card Make sure the camera s power is off Turn the battery card cover s knob toward the mark to open the co...

Страница 20: ...ting Pictures Symbol Display Contents Refer to 1 Flash Flash Off Current flash mode P 51 Auto Red eye reduction Forced Flash Slow Synchro 2 WHITE BALANCE No Display AUTO White Balance set value P 60 D...

Страница 21: ...ke Indicates camera shake Hold the camera still and shoot again P 34 8 Picture Quality Fine Picture Quality setting P 71 Normal 9 Remaining Number of Still Images Value Number of photos that can be ta...

Страница 22: ...Value Aperture size 24 Shutter Speed Shutter speed 25 Remaining Recording Time Value Length of time remaining for shooting with the current settings 26 Recording Time Value Amount of time recorded The...

Страница 23: ...Files The number of the file being played back 7 Total number of files Total number of files recorded 8 Image Size Setting Value Image size P 71 9 Folder No Number of the folder in which the file is s...

Страница 24: ...CD Monitor is tuned on and you can confirm composition After you finish shooting with Full Press the LCD Monitor will automatically turn off Press the Q Quick Review button You can view the photo you...

Страница 25: ...s the still image or movie on the right left above or below in Thumbnail Display mode see P 96 Moves the frame left right up and down see P 25 Z Wide angle 9 Thumbnail Display Button If you press the...

Страница 26: ...ect the desired item Press the O O O O button To implement a confirmation screen shooting menu Press the button to select YES Press the O O O O button To select an item you want to implement playback...

Страница 27: ...item To select a setting value Press the buttons to select the desired item When you have selected EXE CUTE Press the O O O O button The following screen is displayed so make the necessary settings To...

Страница 28: ...light One Push P 60 PIC QUALITY SIZE F2048 N2048 F1280 N1280 N640 P 71 FOCUS AF MF SNAP P 75 CONT MODE OFF CONT SCONT MCONT P 42 PHOTOMETRY MULTI CENTRE SPOT P 77 ISO SETTING AUTO 25 200 400 800 P 65...

Страница 29: ...a screen with the buttons Setting Option Refer to MOVIE SIZE 320 160 P 71 WHITE BALANCE Daylight Overcast Tungsten light Fluorescent light One Push P 60 FOCUS AF MF SNAP P 75 Setting Option Refer to E...

Страница 30: ...g the M button Setting Option Refer to DENSITY DEEP NORMAL LIGHT P 67 SIZE 2048 1280 P 73 IMAGE WITH SOUND ON OFF P 54 DATE IMPRINT OFF DATE TIME P 85 Setting Option Refer to SLIDE SHOW ON OFF P 99 PR...

Страница 31: ...rted 31 Scene Selection Screen Scene Mode In Scene Mode the screen is displayed when you select a scene Symbol Setting Content Refer to 3 MOVIE P 39 HIGH SENSITIVITY P 39 PORTRAIT P 39 LANDSCAPE P 39...

Страница 32: ...elect a screen with the buttons Setting Option Refer to CARD FORMAT P 121 IN FORMAT P 122 DATE SETTINGS P 17 AUTO POWER OFF OFF 1 5 30 Minutes P 123 BEEP SOUND ON OFF P 124 SEQUENTIAL NO ON OFF P 125...

Страница 33: ...Chapter 1 Section 2 Basic Shooting The basics of shooting are explained here from how to hold your camera to how to shoot still images and movies...

Страница 34: ...u shoot or use a tripod Consider using a tripod to prevent camera shake in the following situations When shooting in a dark place if you do not use the flash or if you use the Slow Synchro mode When y...

Страница 35: ...appears the crosshairs do not appear in the middle of the LCD monitor With the auto focus lamp check that the shot is in focus There is another shooting method which is to fully press the shutter once...

Страница 36: ...er left of the Viewfinder Check one of these to make sure the subject is in focus Gently press the shutter button all the way The still image you have taken freezes for a moment on the LCD Monitor and...

Страница 37: ...ontrast the sky a white wall the hood of a car etc Flat two dimensional objects with only horizontal lines and no significant protrusions Quickly moving objects Things in poorly lit places Areas with...

Страница 38: ...of the LCD Monitor turns green as does the auto focus lamp in the lower left of the Viewfinder Check one of these to make sure the subject is in focus With the shutter half pressed compose your shot G...

Страница 39: ...jects like printed docu ments These still images are recorded as TIFF format files You can set White Balance while in Scene Mode as well see P 60 but it may not be possible to get the effect that matc...

Страница 40: ...e the mode If you press M button the shooting menu appears Press the shutter release button For how to shoot movies in the Movie Mode see P 45 If you return to Scene Mode again the scene selection scr...

Страница 41: ...en in normal shooting mode Refer to the table below Mode Name Flash Macro Shooting MOVIE Fixed on Flash Offf Enabled HIGH SENSITIVITY Fixed on Flash Off Enabled PORTRAIT Initial setting Flash Off Disa...

Страница 42: ...one image file If you release the shutter button within two seconds from the time you first pressed it the shots from the time you pressed the shutter until you released it will be recorded the numbe...

Страница 43: ...yed Press the buttons to select CONT MODE and press the O O O O button Press the buttons to select CONT S CONT or M CONT Press the O O O O button Press the M M M M button The Shooting Menu closes and...

Страница 44: ...but ton shooting stops Shooting with S Multi Shot Operation continued from the previous page Compose your picture then press the shutter button 16 pictures are taken automatically Shooting with M Mul...

Страница 45: ...ressing the shutter button again stops recording While shooting movies operation sounds may be recorded The flash cannot be used While shooting movies only Digital Zoom can be used At the time you pre...

Страница 46: ...Compose your picture while viewing either the LCD Monitor or the Viewfinder and zoom by pressing either the z z z z but ton or the Z Z Z Z button A bar is displayed in the LCD Monitor indicating Zoom...

Страница 47: ...d down The digital zoom is activated and the subject becomes larger Press the shutter button The more you enlarge with the digital zoom the lower the picture quality becomes When using the digital zoo...

Страница 48: ...ups up to the following distances In Wide Angle Wide Closest 1 cm In Telephoto Tele Closest 4 cm To get out of Macro Mode press the N Macro button again During Macro Shooting the Viewfinder cannot be...

Страница 49: ...s on the capacity of the SD memory card The internal memory allows the same recording time as an 8MB SD memory card Recorded data is stored as a WAV file Capacity Recording time 8MB 14 min 02 s 32MB 6...

Страница 50: ...Chapter 1 Section 3 Using Special Features for Improved Photography This section describes how to change the various shooting related set tings...

Страница 51: ...You can check your Flash Mode setting by the symbol displayed on the upper left of the LCD Monitor The table below shows the distance that the light from the flash can reach From the end in front of...

Страница 52: ...saved until you press the F Flash button to change them When shooting movies or in Multi Shot mode the setting becomes Flash Off When the camera is set to Flash Off or Slow Synchro Mode the shutter s...

Страница 53: ...it shoots the time interval between blinks begins to shorten and the audio tone begins to beep After shooting Self timer mode switches off Each press of the T Self timer button it selects a function...

Страница 54: ...ress the O O O O button The setting for shooting with sound is complete Press the M M M M button The Shooting menu disappears and the cross hair shooting mark appears Shooting a Still Image with Sound...

Страница 55: ...e the recording status Press the shutter release button to stop recording At purchase your camera is set to OFF When the shooting mode is set to Multi Shot excluding S Multi Shot and M Multi Shot soun...

Страница 56: ...t density using the Shooting Menu In addition to the above the ADJ button can be used for the camera memo function For instructions on using the ADJ button to adjust exposure white balance ISO sensiti...

Страница 57: ...take photos of people in a spot light Exposure compensation setting can be adjusted by using the ADJ Button or using the Shooting Menu Using the ADJ Button Exposure To change the exposure compensation...

Страница 58: ...until you change it Using the Shooting Menu Exposure To change the exposure compensation set ting using the Shooting Menu follow the steps below Turn the Mode Dial to 5 5 5 5 Shooting Mode Press the...

Страница 59: ...it to the minus side makes darker Moving it to the plus side makes it brighter Press the O O O O button Exposure Compensation settings are completed Press the M M M M button The Shooting Menu closes...

Страница 60: ...ed to change the setting but if the camera is having difficulty adjusting please change the setting Types of Modes you can Select Symbol Mode Name Description Auto Make adjustments automatically Dayli...

Страница 61: ...etting using the ADJ Button follow the steps below Turn the Mode Dial to 5 5 5 5 Shooting Mode Press the ADJ Button The White Balance menu appears If you select Press the buttons to select a mode You...

Страница 62: ...e symbol appears in the upper left of the screen This setting will be used for shooting until you change it If you press the button in step the screen refreshes to show the White Balance settings made...

Страница 63: ...ie Mode Press the M M M M button The Shooting menu or the Movie menu appears Press the button to select WHITE BAL ANCE and then press the O O O O button If you select Press the buttons to select a mod...

Страница 64: ...Menu closes and the setting value is displayed on the upper left of the screen This setting will be used for shooting until you change it If you press the button in step the screen refreshes showing t...

Страница 65: ...e ADJ Button ISO Sensitivity To change the ISO sensitivity setting using the ADJ Button follow the steps below Turn the Mode Dial to 5 5 5 5 Shooting Mode Press the ADJ Button three times The ISO Sens...

Страница 66: ...g Mode Press the M M M M button The Shooting menu appears Press the buttons to switch between displays as required Select ISO SETTING and then press the O O O O button Press the buttons to select an I...

Страница 67: ...Text Density setting using the ADJ Button follow the steps below Turn the Mode Dial to 4 4 4 4 Scene Mode The Scene selection screen appears Press the buttons to select the text mode and then press th...

Страница 68: ...he buttons to select the text mode and then press the O O O O button Press the M M M M button The Shooting menu appears Select DENSITY and then press the O O O O button Press the buttons to select the...

Страница 69: ...Bracket and press the O O O O button Press the buttons to select WB BKT Press the O O O O button White Balance Bracket settings are complete Shooting Consecutively with Different White Balance WHITE B...

Страница 70: ...ual to the cur rent white balance are automatically recorded The three still images displayed on the LCD monitor immediately after shooting are reddish equal to the current setting and bluish from lef...

Страница 71: ...but the picture quality is better than in Normal Mode About Image Size Image size relates to how large the image is A small image is best for sending via email and using on Web sites When printing pi...

Страница 72: ...to 4 Scene Mode and select a mode to prepare the camera Press the M M M M button The Shooting menu appears Select PIC QUALITY SIZE and then press the O O O O button Press the buttons to select a pict...

Страница 73: ...ns to select TEXT Mode Press the O O O O button The display changes to the Shooting screen in SCENE Mode with the TEXT Mode mark at the upper part of the screen Press the M M M M button The Shooting m...

Страница 74: ...to select the Movie mode Press the O O O O button The display changes to the shooting screen and the movie mode mark appears at the top of the screen Press the M M M M button The Shooting menu appear...

Страница 75: ...the upper part of the screen Press the buttons to focus the cam era If you press the button the focus moves closer If you press the button the focus moves further away Manual Focus is used for shooti...

Страница 76: ...s the M M M M button The Shooting menu appears Select FOCUS and then press the O O O O button Press the buttons to select SNAP or Infinity Press the O O O O button Focus settings are complete Press th...

Страница 77: ...the central part Use this setting when you want to use the brightness of the center It is useful if there is marked difference in con trast or backlighting To select light metering method follow the s...

Страница 78: ...ss the O O O O button Light Metering Method setting is complete Press the M M M M button The Shooting Menu closes and the specified value is displayed on the left side of the screen This setting will...

Страница 79: ...Select SHARPNESS and then press the O O O O button Press the buttons to select the desired setting Press the O O O O button Sharpness settings are complete Press the M M M M button The Shooting Menu c...

Страница 80: ...hen press the O O O O button Select ON and then press the O O O O but ton Press the M M M M button The Shooting Menu closes and AB is displayed on the left side of the screen At purchase this feature...

Страница 81: ...with the specified Exposure Compensation value as the standard at 0 5EV 0 and 0 5EV After shooting three still images are displayed on the LCD Monitor They are from the left at 0 5EV darker standard...

Страница 82: ...yed on the bottom of the screen This setting will be used for shooting until you change it At purchase the setting is OFF When the camera is set to Exposure Time the shutter speed is slowed so the cam...

Страница 83: ...o move to the min utes setting then use the button to set the minutes Press the button to move to the sec onds setting then press the buttons to set the seconds Press the O O O O button Interval Shoot...

Страница 84: ...is turned off In steps to if you press the buttons you can quickly raise or lower the setting value If you use batteries for power you may exhaust the batteries Using the AC Adapter sold separately is...

Страница 85: ...e O O O O button The Date Imprint settings are completed Press the M M M M button The Shooting Menu closes and is displayed on the bottom right of the screen This setting will be used for shooting unt...

Страница 86: ...S and then press the O O O O button Press the button to select YES Press the O O O O button The display indicates the camera is restoring the initial settings once it is finished the Mode screen retur...

Страница 87: ...Sounds You can display still images or movies on the LCD Monitor to check them and delete unwanted ones You can also hear a recorded sound from the speaker It is recommended that you plug in the AC A...

Страница 88: ...dy to shoot Once the power is turned off the Quick Review function can no longer recall the most recently taken image During a quick review press the shutter button to return to the Shooting screen Fr...

Страница 89: ...View button To view still images in the enlarged display mode follow the steps below Press the 8 8 8 8 Enlarged View button The still image is enlarged One part of the still image is displayed on the...

Страница 90: ...deleted by pressing the D D D D DELETE button To delete a still image or movie that is dis played follow the steps below While using the Quick Review function press the D D D D Delete button Press th...

Страница 91: ...ew the previous still image or movie If you press and hold either the or the button you can move quickly between images For information displayed on the screen during plays back see P 23 When an SD me...

Страница 92: ...the memory card and turn the power back on Turn the Mode Dial to 6 6 6 6 Playback Mode The last still image taken is displayed For movies the first frame is displayed as a still image Move to the stil...

Страница 93: ...lume To adjust the volume follow the steps below Press the buttons The volume adjustment bar appears Press the buttons to adjust the vol ume The volume can be set to nine levels The setting will be us...

Страница 94: ...le for playback speaker icon Press the button to display the next file Press the button to display the previous file Hold the buttons down for fast positioning Press the shutter button The sound is pl...

Страница 95: ...ith sound for viewing Press the button to display the next file Press the button to display the previous file Hold the buttons down for fast movement Press the shutter button Playback starts To stop p...

Страница 96: ...8 8 8 8 Enlarged View button The still image or movie you selected is displayed In Thumbnail Display mode text files are displayed in blue For how to select and delete still images in the Thumbnail D...

Страница 97: ...ne part of the still image is displayed on the LCD Monitor Press the buttons to move to the part you want to display To return to the original display press the O button Movies cannot be displayed enl...

Страница 98: ...d Display Mode The shot position bar appears at the lower part of the LCD monitor Press the buttons to feed the shot To return to the 16 shot display press the O button Press the DISP button to turn o...

Страница 99: ...button The slide show starts and files are played back in order If you want to stop the slide show in progress press any button on the camera Until stopped the slide show will repeat itself Still ima...

Страница 100: ...l to 6 6 6 6 Play back Mode Turn your camera on by pressing the power button Video input terminal yellow Audio input terminal white If you connect the AV cable to your video recorder s In terminal you...

Страница 101: ...e P 88 For how to display still images or movies see P 91 For how to playback sounds see P 94 For how to protect still images or movies or sounds see P 111 Deleting Unwanted Still Images Movies Sounds...

Страница 102: ...ken is displayed Press the D D D D Delete button Press the button to select DELETE ALL and press the O O O O button A screen appears to confirm the deletion Press the button to select YES Press the O...

Страница 103: ...he buttons to select the still images movies or sounds you want to delete Press the D D D D Delete button The trash symbol appears in the upper left of the still image movie or sound Repeat Steps and...

Страница 104: ...Chapter 1 Section 5 Direct Printing PictBridge is a registered trademark...

Страница 105: ...s AVI with the function For still images with sounds JPG and WAV only the still images JPG are printed This camera uses PictBridge an industry standard for Direct Printing Your printer must be PictBri...

Страница 106: ...wer is off Check that the printer power is off Load paper into the printer and check that the printer is ready to print Connect one end of the USB cable pro vided to the USB port of your printer Conne...

Страница 107: ...t playback mode screen appears For some printers the Connecting screen automati cally appears before you press the ADJ button The LCD monitor displays the last image you shot Press the ADJ button The...

Страница 108: ...J button The LCD monitor displays the last image you shot Press the 9 9 9 9 Thumbnail Display button The screen is split into six sections and each image is displayed at a reduced size Press the butto...

Страница 109: ...ent from the camera to the printer the camera display returns to the Direct Print playback mode screen Item Name Function PAPER SIZE Sets the paper size PAPER TYPE Sets the paper type LAYOUT Sets the...

Страница 110: ...The camera has functions to protect still images and movies from being inadvertently deleted to copy those from the internal memory onto a mem ory card and to set still images for a Print Service Thes...

Страница 111: ...he Playback menu is displayed Press button to select PROTECT and then press the O O O O button Press the button to select 1 FILE Write protecting Your Images PROTECT You can protect still images from...

Страница 112: ...en The procedure for releasing protection from one file at a time is the same as that for setting protection For how to display still images or movies see P 91 For how to playback sounds see P 94 To s...

Страница 113: ...O O O button Press the button to select ALL FILES Confirm you are choosing SELECT and then press O O O O When set to Protect the Protect symbol appears in the upper left corner of the screen To remove...

Страница 114: ...age movie or sound you wish to protect and press the O O O O button The Protect symbol appears in the upper right corner of the first still image movie or sound Repeat Step to select all the still ima...

Страница 115: ...once fin ished the playback screen returns If the capacity of the SD Memory Card you are copying to is insufficient a message will be displayed indicating there is not enough capacity To copy only th...

Страница 116: ...portion of the screen Removing the DPOF setting for one photo at a time is done in the same way as setting it You can specify one print per still image with this func tion To display a still image see...

Страница 117: ...s the O O O O button Press the button to select ALL FILES Confirm that you have chosen SELECT Once the DPOF setting is made the DPOF symbol appears in the upper left portion of the screen To remove th...

Страница 118: ...DPOF symbol appears in the upper right portion of the first still image Press the buttons to select the next still image you wish to set to DPOF and then press the O O O O button The DPOF symbol appea...

Страница 119: ...changed and the resized still image is displayed You can resize only still images and still images with voice memos Movies cannot be resized The following types of resizing are possible F2048 N2048 to...

Страница 120: ...Chapter 1 Section 7 Changing Camera Settings This section explains how to make changes to the camera s settings...

Страница 121: ...tally erased and the card cannot be formatted If you return the switch to the former position it is once again possible to erase images and format the card Formatting Formatting is the process of prep...

Страница 122: ...ct YES and press the O O O O button Formatting starts When it finishes the SETUP screen returns Formatting Internal Memory IN FORMAT If an error message Format the internal memory is displayed it will...

Страница 123: ...l you change it When Auto Power Off turns off the camera just press the power button again to turn it on and resume use The Auto Power off function does not work when the camera is connected to a comp...

Страница 124: ...een appears Press the button to select BEEP SOUND Press the buttons to select the desired setting This setting will be used until you change it Beep at Recording BEEP SOUND When you shoot an image it...

Страница 125: ...is set to OFF When transferring images to a computer if a file already exists with the same name in the destination folder your image is renamed before saving to avoid overwrite problem When transferr...

Страница 126: ...p Mode The Setup Screen appears Press the button to select LCD CON FIRM Press the buttons to select the desired setting This setting will be used for shooting until you change it Changing Image Confir...

Страница 127: ...s Adjustment bar appears Press the buttons to adjust the brightness Moving it to the side makes it darker Moving it to the side makes it brighter The brightness of the screen behind the bar changes as...

Страница 128: ...n the LCD Monitor Display off If you have activated Power Save mode power consumption will be reduced but there are the following limitations Processing time may be slower It works only in Shooting Mo...

Страница 129: ...racters To change the display language follow the steps below Turn the Mode Dial to 1 1 1 1 Setup Mode The Setup Screen appears Press the button to select LAN GUAGE Press the buttons to select the des...

Страница 130: ...s off the LCD monitor display For how to view still images on your television screen see P 100 Changing the Playback Method for Viewing on TV VIDEO OUT MODE You can view your still images and movies o...

Страница 131: ...happened to connect your camera to computer resulting in the Add New Hardware Wizard screen appearing simply click Can cel and after disconnecting your camera install the software on your computer Fo...

Страница 132: ...camera to a computer WIA driver Used to download images for Windows XP ListEditor Used to create a camera memo list Caplio Setting Used to create a communication list communication settings Caplio Ser...

Страница 133: ...2000 10MB or more Windows Me 10MB or more Windows XP 10MB or more Display resolution 640 480 pixels or greater 800 600 or greater recommended Display colors 256 colors or greater 65000 or greater rec...

Страница 134: ...M drive of your com puter and the screen shown on the right appears The screen shown here is from Windows XP Install the software Windows 98 98SE Me 2000 XP P 135 Windows XP P 137 Install the followin...

Страница 135: ...CD ROM in the CD ROM drive The following screen appears automatically Click Install Software Select a language and then click OK Click Next Confirm where you want to install and then click Next Confir...

Страница 136: ...s and then Control Panel The control panel screen appears Double click the Add Remove Pro grams icon Select Caplio Software and then click Change Remove A message appears to confirm whether you want t...

Страница 137: ...Click Next After a few moments the Choose Destination Loca tion screen appears Confirm where you want to install the software and then click Next After a few moments the Select Components screen appe...

Страница 138: ...een appears Click the Add Remove Programs icon Select Caplio Software and then click Change Remove A message appears to confirm whether you want to remove the program click OK The uninstallation proce...

Страница 139: ...appears Click Browse CD ROM List of files included on the CD ROM appears Double click the Acrobat folder Double click the English folder Double click ar500enu ar500enu exe Install Acrobat Reader by f...

Страница 140: ...Chapter 2 Section 2 Downloading Images to a Computer This section explains how to display still images and movies you have downloaded to your computer...

Страница 141: ...r Windows XP In Windows XP the first time you connect your camera to the computer using a USB cable the Found New Hardware Wizard screen will appear Select Install from a list or specific loca tion Ad...

Страница 142: ...th assistance from the Windows XP Scanner and Camera Wizard select Scanner and Camera Wizard Leaving the Always use this program for this action check box unchecked will cause the Caplio 400G wide scr...

Страница 143: ...ow will be displayed again After exiting RICOH Gate La by pressing the MENU button and selecting Close if you want to restart RICOH Gate La select Pro grams from the Start menu then select Capli0o Sof...

Страница 144: ...l Settings is launched DU 10x is registered initially 4 Minimize Button Minimizes the window and displays its icon on the Win dows task bar If you click on the icon the window will be displayed again...

Страница 145: ...older For each time saved Creates a new folder for each time images are saved and saves the images shot at the same time in the same folder If you save several times in one day they are saved in separ...

Страница 146: ...f patterns If you select Background illustration setting from the menu displayed by the MENU but ton in the RICOH Gate La window the Back ground illustration settings dialog box appears 1 Background i...

Страница 147: ...is is a device that connects to a computer and can read the contents of cards In addition to the PC Card type there are Card Readers compatible with various types of cards into which you can directly...

Страница 148: ...Displaying Thumbnail Images How to Use DU 10x DU 10x enables you to view downloaded images at a glance as well as edit rotate and resave images This section explains how to use DU 10x DU 10x runs in a...

Страница 149: ...the Close button in the upper right corner of the screen For how to set DU 10x so that it does not launch automatically see P 138 Starting and Exiting DU 10x There are two methods of starting DU 10x...

Страница 150: ...ail Display Area The reduced images are displayed at one glance 4 Folder Display Area The folders inside My Computer are displayed in a hierarchy The images inside folders selected here appear in the...

Страница 151: ...ding order is going from small to large the oppo site is descending order For the alphabet ABC is ascending order and ZYX is descending Select which order to use 1 2 or 3 and choose either ascending o...

Страница 152: ...to Use DU 10x 152 Changing the Display Size To change the display size use either the tool bar or Display size from the View menu You can change the display size to one of five sizes avail able 1 Extr...

Страница 153: ...Chapter 2 Section 3 Displaying Thumbnail Images How to Use DU 10x 153 6 Small Medium GPS is used for a Ricoh camera other than this model Normally it is disabled...

Страница 154: ...n slide show from the menu bar Place the pointer of the mouse on one of the images you selected right click and choose slide show from the menu Menu Shortcut menu displayed with right click The slide...

Страница 155: ...ing the mouse button or pressing the Enter key 2 Display interval Specify how long in seconds to display each image when using Auto slide show 3 Background color Choose a background color for your ima...

Страница 156: ...humbnail Display screen follow the steps below Select an image you want to rename On the image you selected right click and choose Rename from the menu When the Rename dialog box appears enter the new...

Страница 157: ...mage from the clipboard to another Windows application For example when using Paint from Windows Acces sories start Paint and then select Paste from the Edit menu Copying a Reduced Image File You can...

Страница 158: ...functions avail able x indicates that the camera support the function o indicates that the camera does not support the function Your Caplio Model GPS Linkage function Camera Memo function Caplio RR30...

Страница 159: ...2 button on the tool bar and Medium memo in the View menu 3 The Search Area 4 button on the tool bar and Start ListEditor in the Edit menu 5 button in the upper right of the thumbnail shown in the Th...

Страница 160: ...ou want to delete in the Thumbnail Display Area Select Delete from the File menu Using the Shortcut Menu Right click on the image you want to delete in the Thumbnail Display Area The menu appears Sele...

Страница 161: ...Information Dialog Box To display image information follow one of the steps below Using the File Menu Click the image in the Thumbnail Display Area for which you want to see informa tion Select Prope...

Страница 162: ...fferent file name The only file format you can save in is TIFF To save under a new file name follow the steps below 1 Select Save as from the File menu The Save As dialog box appears 2 Specify where t...

Страница 163: ...r name or specify an arbitrary character string for the title 3 Options Check the options to print an image with a frame a shooting date a printing date the number of pages and a file name For informa...

Страница 164: ...ter related settings such as selection of a printer paper size and paper feed method Printing Images To print images follow the steps below Select the images you want to print by clicking on them To s...

Страница 165: ...ctures Movies on a Computer For Macintosh For the rest of this explanation still images and movies will be referred to together as file When downloading images from your camera it is recommended you s...

Страница 166: ...ing images for Macintosh USB driver Connecting your camera to computer Mounter Downloading images Mac OS 8 6 to 9 2 2 Mac OS X 10 1 2 to 10 3 RICOH Gate La for Macintosh O USB driver O O Mounter O O I...

Страница 167: ...operation Display Resolution 640 480 pixels or greater 800 600 or greater recommended Display Colors 256 colors or greater 32 000 or greater recommended CD ROM Drive A CD ROM drive compatible with th...

Страница 168: ...e included CD ROM into the CD ROM drive of your computer and the window or icon shown on the left appears Install the software Mac OS 8 6 to 9 2 2 P 169 Mac OS X 10 1 2 to 10 3 P 170 Connect the camer...

Страница 169: ...on and open the MacOS9 folder The Caplio Installer icon appears Double click the Installer Caplio Installer icon The Installer starts up and the Start screen appears Click Caplio Software Click the OK...

Страница 170: ...r s password Click the key icon A verification window appears Enter the administrator s name and pass word and then click OK Click Continue The Select a Destination screen appears Click Continue The i...

Страница 171: ...iles into the Trash Using the Terminal program enter sudo rm rf System Library Startupitems CaplioStartup and delete Please remove the following files from their respective folders File Name Folder Na...

Страница 172: ...Chapter 3 Section 2 Downloading Images to a Computer...

Страница 173: ...the cover Open the terminal cover and then con nect the USB cable to its USB terminal Your camera turns on To disconnect your camera from your computer 1 Turn your camera off by pressing the power but...

Страница 174: ...n the environment used Follow the steps in the reference pages to download For Mac OS 8 6 to 9 2 2 Download using RICOH Gate La see P 175 For Mac OS X 10 1 2 to 10 3 Download using the Mounter see P 1...

Страница 175: ...and you can view the image files stored in internal memory When an SD Memory Card is loaded the Caplio SD icon is displayed and you can view the image files stored on the SD Memory Card loaded Double...

Страница 176: ...in internal memory When an SD Memory Card is loaded the Caplio SD icon is displayed and you can view the image files stored on the SD Memory Card loaded Double click the displayed icon It can be hand...

Страница 177: ...78 Background illustration If you select this a sub menu will appear allowing you to change the background design of the RICOH Gate La window Sub menu Figure 4 Save Button Click this and the images do...

Страница 178: ...o create a folder Do not Create Your downloaded images will all be saved in the folder specified in item 2 For each date photographs Creates a new folder assigning the date it was shot as the folder n...

Страница 179: ...nformation such as shooting conditions to the still images you shoot This section explains camera memos Chapter 4 Shooting with Camera Memos Be sure to set the date and time on the camera See P 17 To...

Страница 180: ...nd transfer it to the camera so that you can use them when shooting images with a camera memo If you want to use data not included in the camera memo list you can make a temporary memo using the camer...

Страница 181: ...Shooting Mode select the camera memo you want to use and shoot still images See P 189 You can create a temporary memo and attach it to a still image See P 191 You can attach a memo to a previously sh...

Страница 182: ...Chapter 4 Section 2 Creating a Camera Memo List This section explains how to create a camera memo list...

Страница 183: ...category name You can switch between LIST TITLE tabs by clicking on another LIST TITLE tab Enter a camera memo in the CONTENTS box Up to 32 alphanumeric characters can be entered for a camera memo Cl...

Страница 184: ...computer before transferring it to the camera You can also transfer the camera memo list to the camera directly without saving it in the computer The Save As dialog box appears Select the place to sav...

Страница 185: ...ayed 7 MOVE UP button Pressing this button scrolls the camera memo list one row upward 8 MOVE DOWN button Pressing this button scrolls the camera memo list one row downward 9 ADD button Pressing this...

Страница 186: ...the camera to the computer starts when the USB cable is connected wait until the file transfer ends Click the Transfer to Camera button on the toolbar or click Transfer to Camera on the Tool menu The...

Страница 187: ...is formatted by the camera format func tion Install the PC card adapter into the com puter to be ready for use Load an SD memory card on the PC card adapter Follow Steps to of How to Use ListEditor Se...

Страница 188: ...tion 3 Shooting with Camera Memos By using a camera memo list stored on an SD memory card you can shoot a still image with a memo This chapter explains shooting with camera memos For how to create a m...

Страница 189: ...end of the first row If a voice memo has been attached a speaker icon is dis played To enter a temporary memo select Temporary Memo Input See P 191 You can also record a voice memo by selecting Recor...

Страница 190: ...mos press the OK button to display the Camera Memo screen For how to view a camera memo attached to a still image see P 189 For how to attach a camera memo to a still image see P 196 For how to regist...

Страница 191: ...o select YES and then press the O button to display the camera memo list screen Create or Correct a Memo Temporarily Temporary Memo Camera memos are edited or corrected on a computer but you can creat...

Страница 192: ...appears Press the O O O O button to return to the Cam era Memo screen To register additional memos repeat steps to Correcting a Temporarily Memo To correct a temporarily memo follow the steps below T...

Страница 193: ...screen Press the O O O O button to return to the Cam era Memo screen If there are any more memos to correct repeat steps to Correcting a Camera Memo to Create a New Temporary Memo A temporary memo can...

Страница 194: ...it confirmation screen appears Press the button to select YES and then press the O O O O button The Keyboard screen appears Correct the memo by using the keyboard For instructions on using the keyboar...

Страница 195: ...icon and then press the ADJ but ton to start playback Deleting a Camera Memo Display a still image from which you want to delete a camera memo Press the O O O O button The camera memo attached to the...

Страница 196: ...ss the buttons to select the cam era memo to attach and then press the O O O O button If a temporary memo has been attached its contents are displayed up to the end of the first row If a voice memo ha...

Страница 197: ...voice Hold the buttons down for fast positioning Press the O O O O button The camera memo attached to the still image is dis played Displaying and Changing a Camera Memo Attached to a Still Image on...

Страница 198: ...ontents are displayed up to the end of the first row If a voice memo has been attached a speaker icon is dis played To select a temporary memo click TEMPO RARY To select a voice memo click the speaker...

Страница 199: ...humbnails with a camera memo appear Editing a Camera Memo To edit a camera memo perform the follow ing steps Double click the memo mark Memo Set ting Y N Display at the bottom of a thumbnail The Edit...

Страница 200: ...To search in subfolders too click the Display All in Folder icon Enter a keyword in the search bar area for searching memos Several keywords can be entered to narrow down the search results Select AN...

Страница 201: ...tail Dialog Box 1 Memo Embedding Position Select the memo position on an image 2 Set Memo Background Color Enables you to set the memo color Set Memo Character Color Bring up the Color Setup dialog bo...

Страница 202: ...Chapter 4 Section 4 Using Voice Memos This section explains operations related to a voice memos such as registra tion and use of voice memos...

Страница 203: ...oting with a Voice Memo See P 189 Shoot a still image with a voice memo attached in the same manner as for a text camera memo Create a voice memo See P 204 Catalog a camera memo in the camera memo lis...

Страница 204: ...he operating procedure by pressing the ADJ button instead of the button Pressing the ADJ button skips steps and jumps to step and returns to the camera memo screen after a voice memo is recorded Press...

Страница 205: ...When playback is stopped or ends the Re registra tion Confirmation screen appears Select NO and press the O O O O button The display returns to the Memo List screen To record again select YES and pre...

Страница 206: ...ng procedure by pressing the ADJ button instead of the button Pressing the ADJ button skips steps and jumps to step and returns to the camera memo screen after the voice memo is played back Press the...

Страница 207: ...nstead of the button Pressing the ADJ button skips steps and jumps to step and returns to the camera memo screen after the voice memo is re recorded Press the buttons to select Play back Press the but...

Страница 208: ...rs Click the memo you want to correct in the memo list Click the Replay Voice button The voice memo cannot be played back if your computer has no speakers Playing Back and Confirming a Voice Memo Atta...

Страница 209: ...Appendices...

Страница 210: ...k at the bottom of the area Entering a blank space Press the buttons to move the cursor to the bottom of the keyboard and then press the button Press the buttons to select SPACE Press the DISP button...

Страница 211: ...char acter immediately after to the right of the character you want to erase Press the button to return the cursor to the keyboard Press the buttons to select BS Press the buttons to select BS and th...

Страница 212: ...ce AUTO Fixed Daylight Overcast Tungsten light Fluorescent light One Push Exposure Adjustment Light Metering Sensitive Distribution Multi Light Metering 256 segments Center weighted Light Metering Spo...

Страница 213: ...ely listed below D Using the Accessory Shoe An optical finder available in stores or external flash available in stores can be used by attaching it to the accessory shoe Item Model Remarks AC Adapter...

Страница 214: ...ult your travel agent on a plug Adapter suitable for wall outlets in your country of destination The Warranty This product is for domestic use The warranty is only valid domestically In the unlikely e...

Страница 215: ...battery chamber lid Do not lift the camera by the side cover or battery chamber lid If water droplets enter the inside of the camera immediately stop using it Then power off the camera remove the batt...

Страница 216: ...ra This may cause a change in quality paint to peel etc As the surface of the LCD Monitor is easily scratched do not rub hard objects against it Please clean the surface of the LCD Monitor with solven...

Страница 217: ...the batteries Battery life Replace the batteries with a new set P 13 Batteries run out quickly They are being used in extreme high or low tempera tures Many shots are being taken in dark places insid...

Страница 218: ...dark The distance to the subject is greater than 3 3 meters in Telephoto or greater than 5 0 meters in Wide angle Get closer to your subject and shoot P 51 The image is too bright You are too close t...

Страница 219: ...P 16 Files cannot be deleted The file has been set to protect Release the protection P 111 The SD Memory Card is locked Release the Lock write protection P 18 Cannot format a Memory Card The SD Memor...

Страница 220: ...ports change to another one If you are using a port other than USB connect via a USB port Measure 5 For Windows 98 98SE Me the COM Port setting may be wrong Follow the steps below 1 Connect your camer...

Страница 221: ...llow the steps below 1 Load the Caplio CD ROM into your computer 2 Connect your camera via the USB cable to your computer 3 Click the Start button on the Windows taskbar to display the Start menu 4 On...

Страница 222: ...r recognizes the camera the New Hardware screen launches and your camera is registered by the computer Step 2 If your computer still does not recognize the camera follow the steps below 1 Load the Cap...

Страница 223: ...he CD ROM At this time do not connect your camera 19 Connect your camera via the USB cable to your computer When the computer recognizes the camera the New Hardware screen launches and your camera is...

Страница 224: ...Right click the camera icon on the My Computer screen and click Properties to open the camera s Properties screen Click the Event tab on the Prop erties screen For the computer operation select None o...

Страница 225: ...TECTED The card is Locked write protection Unlock the card P 18 PRINT SETTINGS CANNOT BE SET FOR THIS FILE This file movies and other cannot be selected for printing INSUFFICIENT MEMORY Files cannot b...

Страница 226: ...whether or not they are incurred during the warranty period 6 This warranty only applies to the camera and not to the accessories such as the case and strap nor does it apply to the battery and other...

Страница 227: ...C 15 105B Changes or modifications not expressly approved by the party responsible for compliance could void the user s authority to operate the equipment FCC 15 21 Properly shielded and grounded cabl...

Страница 228: ...268 438 au erhalb Deutschlands 49 6331 268 438 France partir de la France 0800 91 4897 en dehors de la France 33 800 91 4897 Italia dall Italia 02 696 33 451 dall estro 39 02 696 33 451 Espa a desde...

Страница 229: ...leting 101 DirectX 132 Display language 129 Display size 152 Display symbols 24 Enlarged View Button 9 Enlarged view 97 Enlarged view button 25 Downloading 174 Due to camera shake 34 Exposure 80 Expos...

Страница 230: ...RESTORE DEFAULTS 86 SHARPNESS 79 RICOH Gate La 144 177 RICOH Gate La for Macintosh 166 SLIDE SHOW 99 Safety precautions 7 Scene mode 10 39 Scene selection screen 31 Red eye 52 Rechargeable battery 8...

Страница 231: ...Wide angle button 25 Viewfinder 9 Viewer screen 162 Viewing 91 93 Voice memo 49 203 Voice memo mode 10 Volume 95 Z rename 156 uninstall 171...

Отзывы: