6.2.4.1 Selftest error messages and resolution
Left hotend fan - Not spinning:
Check proper wiring of the print and the hotend fan cables. Ensure that both are
properly connected to the miniRAMBO electronics, and that they are not swapped.
Please check/ Not connected - Heater/ Thermistor:
Check proper wiring of the hotend power cables and the thermistor cables. Ensure
that both are properly connected to the miniRAMBO electronics, and that they are not
swapped.
Bed/Heater - Wiring error:
Check that the heatbed and the hotend power cables are not swapped or that the
thermistor cables from both the hotend and the heatbed are not swapped in the
miniRAMBO electronics.
Motor - {XYZ} - Endstop {XYZ}:
Check that motor and endstop on indicated axis are properly connected to the
Rambo electronics and not swapped with motor or endstop of different axis. Axis
causing the problems is indicated on the LCD panel.
Endstop not hit - Motor {XY}:
Check mechanical settings that endstop can be reached when axis is in minimal
position.
Endstop not hit - Motor Z:
Check if the print head can be moved all the way down the Z axis to trigger the
PINDA probe over the bed.
Endstops - Wiring error - {XYZ}:
Check the proper cabling of endstops. Routine indicates axis on which endstop
reported malfunction or is not properly responding. Check the proper connection in
the Rambo electronics.
Loose pulley - {XY}:
The belt pulley is loose and slips on the motor shaft. It is important to tighten the first
grub screw on the flat piece of shaft, then continue with the second grub screw.
6.2.5 Calibrate XYZ
The Original Prusa i3 MK2.5 comes with a full mesh bed leveling feature, however, for this to
work, we need to first calibrate the distance between the tip of the nozzle and the PINDA
(
P
rusa
IND
uction
A
utoleveling) probe. The process is fairly straightforward; so let’s get to it.
The purpose of the X/Y/Z calibration routine is to measure the skew of the X/Y/Z axes and to
find the position of the 4 calibration points on the print bed for proper bed leveling. You can
16
Содержание i3 MK2.5
Страница 1: ......
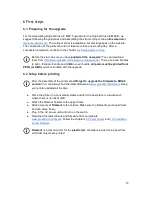
Страница 9: ...Pict 1 Original Prusa i3 MK2 5 printer upgrade Pict 2 Description of Original Prusa i3 MK2 5 9 ...
Страница 64: ...Pict 40 Nozzle change 64 ...


