6–44
Replacement Procedures
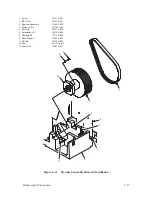
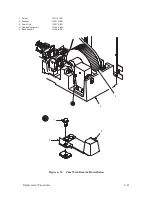
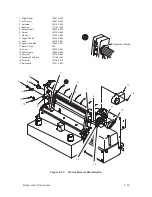
Shuttle Motor
(Figure 6–14)
Removal
1. Disconnect the AC power cord and open the top cover.
2. Open the upper paper guide (1). Remove four screws (2) and washers
(3), two ground clips (18), and the lower paper guide (4).
3. Loosen two screws (5).
4. Separate the cam cover (6) and the attached gasket (7) from the base
support (8).
5. Loosen four nuts (9). Allow the motor (10) to slip down.
6. Slip the belt (11) off the motor pulley (12).
7. Open the rear door of the printer. Disconnect shuttle motor connectors
P34 (13) and P40 (14).
8. Support the motor while removing four nuts (9), lockwashers (15),
washers (16), and carriage bolts (17).
9. Remove the motor from the printer.
Содержание P9012
Страница 1: ...P N 132305 001 Rev E P9012 Multifunction Line Printer...
Страница 49: ...2 31 Principles of Operation Power Supply PCBAs 1 3 SHORT OPEN Figure 2 21 Power Supply PCBA...
Страница 53: ...2 35 Principles of Operation PAPER FEED MOTOR TRACTORS PAPER TRANSPORT Figure 2 26 Paper Feed Components...
Страница 58: ...2 40 Principles of Operation...
Страница 84: ...4 18 Troubleshooting...
Страница 107: ...5 23 Alignments and Adjustments 1 Screw 2 MPU Arm 1 2 Figure 5 9 Magnetic Pickup Phasing Adjustment...
Страница 118: ...5 34 Alignments and Adjustments...
Страница 203: ...6 85 Replacement Procedures This page intentionally left blank...
Страница 214: ...6 96 Replacement Procedures...
Страница 217: ...A 3 Power Paper Stacker Maintenance Printer Rear Power Paper Stacker Figure A 1 Power Paper Stacker...
Страница 236: ...A 22 Power Paper Stacker Maintenance...
Страница 246: ...D 2 Torque Table...
Страница 254: ...Index 6...
Страница 255: ......
Страница 256: ...132305 001 Rev E...


