5–32
Alignments and Adjustments
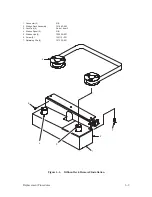
Paper Out Detector
(Figure 5–13)
Check
1. With the paper loaded and the printer running, move the forms thickness
adjustment lever to the fully open position. Paper motion should stop
within two seconds.
2. With the paper loaded and the printer running, allow the paper to run out.
Paper motion should stop within two seconds. This should occur for
forms thickness settings anywhere between “A” and “C.”
Adjustment
1. Load paper and apply power.
2. Set the forms thickness adjustment lever (1) to the fully closed position.
3. Rotate the shaft (2) until the space between the nylon button (3) and the
platen (4) is between 0.010 and 0.020 inches wide.
4. Move the forms thickness adjustment lever 1/4 to 1/2 inch past position
“C” toward the fully open position.
5. If an error indication is on, adjust the shaft by turning it clockwise until
the error indication goes off.
6. Adjust the shaft by turning it counterclockwise until an error indication
just appears.
Содержание P9012
Страница 1: ...P N 132305 001 Rev E P9012 Multifunction Line Printer...
Страница 49: ...2 31 Principles of Operation Power Supply PCBAs 1 3 SHORT OPEN Figure 2 21 Power Supply PCBA...
Страница 53: ...2 35 Principles of Operation PAPER FEED MOTOR TRACTORS PAPER TRANSPORT Figure 2 26 Paper Feed Components...
Страница 58: ...2 40 Principles of Operation...
Страница 84: ...4 18 Troubleshooting...
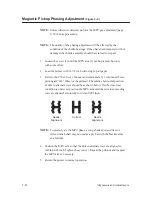
Страница 107: ...5 23 Alignments and Adjustments 1 Screw 2 MPU Arm 1 2 Figure 5 9 Magnetic Pickup Phasing Adjustment...
Страница 118: ...5 34 Alignments and Adjustments...
Страница 203: ...6 85 Replacement Procedures This page intentionally left blank...
Страница 214: ...6 96 Replacement Procedures...
Страница 217: ...A 3 Power Paper Stacker Maintenance Printer Rear Power Paper Stacker Figure A 1 Power Paper Stacker...
Страница 236: ...A 22 Power Paper Stacker Maintenance...
Страница 246: ...D 2 Torque Table...
Страница 254: ...Index 6...
Страница 255: ......
Страница 256: ...132305 001 Rev E...


