5–18
Alignments and Adjustments
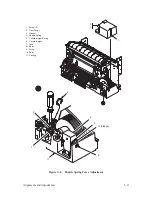
Platen Gap
(Figure 5–7)
1. Disconnect the AC power cord from the rear of the printer. Open the top
cover. Remove paper from the printer.
2. Remove the ribbon deck assembly as described on page 6–8 of Chapter
6, Replacement Procedures.
3. Raise the forms thickness adjustment lever (1) to the open position.
CAUTION
Hammer tips may be damaged when subjected to a sideways force.
4. Measure the platen gap, as follows:
CAUTION
Take care not to damage the hammer bank cover with the feeler gauge.
a.
Insert a flat feeler gauge (2) between the platen (3) and the hammer
tips (4) in the ribbon path of the hammer bank cover (5) within six
hammer positions of the left end of the hammer bank. If the forms
thickness adjustment lever is in the “A” position, use a 0.009 inch
feeler gauge. When the lever is fully closed, use a 0.007 inch gauge.
b. Carefully lower the forms thickness adjustment lever until the platen
just contacts the feeler gauge with the lever at the “A” setting. The
feeler gauge should move with only slight friction. Make sure the
gauge is vertical and in the same plane as the hammer tips.
5. Repeat step 4 for the right end of the hammer bank.
6. If the platen gap is incorrect:
a.
Adjust the two set screws (6) as required. Note that 1/4 turn equals
about 0.008 inch.
b. Repeat steps 4 through 6.
7. Install the ribbon deck assembly as described on page 6–8 of Chapter 6,
Replacement Procedures.
8. Install paper. Close the top cover and connect the AC power cord.
Содержание P9012
Страница 1: ...P N 132305 001 Rev E P9012 Multifunction Line Printer...
Страница 49: ...2 31 Principles of Operation Power Supply PCBAs 1 3 SHORT OPEN Figure 2 21 Power Supply PCBA...
Страница 53: ...2 35 Principles of Operation PAPER FEED MOTOR TRACTORS PAPER TRANSPORT Figure 2 26 Paper Feed Components...
Страница 58: ...2 40 Principles of Operation...
Страница 84: ...4 18 Troubleshooting...
Страница 107: ...5 23 Alignments and Adjustments 1 Screw 2 MPU Arm 1 2 Figure 5 9 Magnetic Pickup Phasing Adjustment...
Страница 118: ...5 34 Alignments and Adjustments...
Страница 203: ...6 85 Replacement Procedures This page intentionally left blank...
Страница 214: ...6 96 Replacement Procedures...
Страница 217: ...A 3 Power Paper Stacker Maintenance Printer Rear Power Paper Stacker Figure A 1 Power Paper Stacker...
Страница 236: ...A 22 Power Paper Stacker Maintenance...
Страница 246: ...D 2 Torque Table...
Страница 254: ...Index 6...
Страница 255: ......
Страница 256: ...132305 001 Rev E...

