AV1
and
AV2
SD
and
USB
!
The different source volume level can be
set between
iPod
and
USB
.
!
When
“
Flat
”
is selected, no supplement or
correction is made to the sound. This is
useful to check the effect of the equalizer
curves by switching alternatively between
“
Flat
”
and a set equalizer curve.
1
Display the
“
AV Sound Settings
”
screen.
=
For details, refer to
Displaying the
“
AV
Sound Settings
”
screen
on page 171.
2
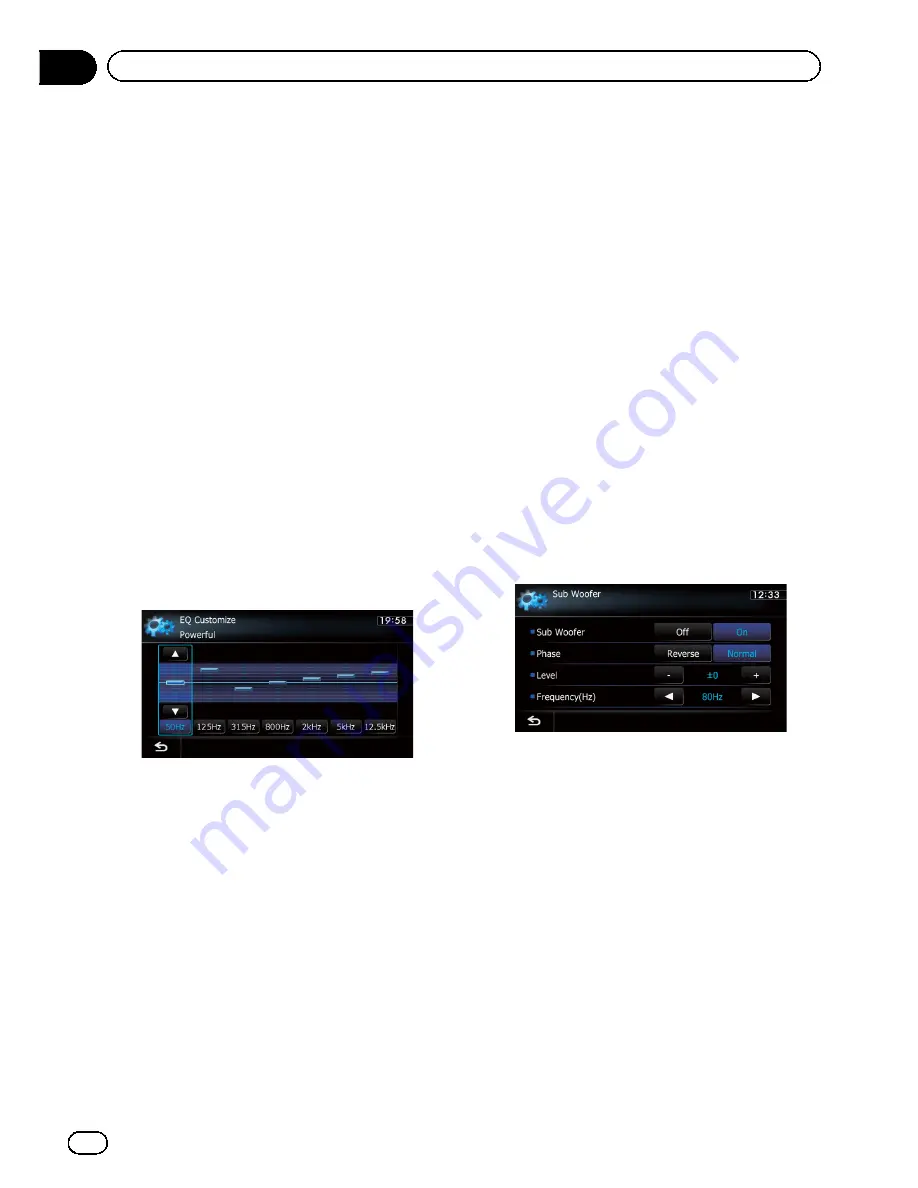
Touch [EQ].
3
Touch one of the keys to select a curve
that you want to use as the basis of custo-
mizing.
4
Touch [Customize].
5
Touch the frequency that you want to
adjust the level.
6
Touch [
a
] or [
b
] to adjust the level of
the equalizer band.
Each time you touch [
a
] or [
b
], the level of
the equalizer band increases or decreases.
Adjusting loudness
Loudness compensates for deficiencies in the
low and high sound ranges at low volume.
1
Display the
“
AV Sound Settings
”
screen.
=
For details, refer to
Displaying the
“
AV
Sound Settings
”
screen
on page 171.
2
Touch [Loudness].
Each time you touch [
Loudness
], the level is
selected in the following order:
Off
Low
Mid
High
Using subwoofer output
The navigation system is equipped with a sub
woofer output mechanism, which can be
turned on or off.
p
This function is not available when
“
Sub
Woofer
”
is
“
Off
”
.
1
Display the
“
AV Sound Settings
”
screen.
=
For details, refer to
Displaying the
“
AV
Sound Settings
”
screen
on page 171.
2
Touch [Sub Woofer].
3
Touch [On] to turn subwoofer output
on.
To turn subwoofer output off, touch [
Off
].
4
Touch [Reverse] or [Normal] to select
the phase of subwoofer output.
5
Touch [+] or [
–
] next to
“
Level
”
to adjust
the output level.
“
+6
”
to
“
–
24
”
is displayed as the level is in
creased or decreased.
6
Touch [
c
] or [
d
] next to
“
Frequency(Hz)
”
to select cut-off fre-
quency.
Each time you touch [
c
] or [
d
], cut off fre
quencies are selected in the following order:
50Hz
63Hz
80Hz
100Hz
125Hz
Only frequencies lower than those in the se
lected range are output from the subwoofer.
En
174
Chapter
31
Customizing preferences
Содержание AVIC-X920BT
Страница 21: ...En 21 Chapter 02 Basic operation Basic operation ...
Страница 22: ...Screen switching overview 2 5 6 1 1 3 4 En 22 Chapter 03 How to use the navigation menu screens ...
Страница 253: ...Section ln_s_ta_I_la_ti_o_n GI Adjusting the microphone angle The microphone angle can be adjusted m J to iii r En ill ...
Страница 287: ......


