AV2
(Video) and
EXT1
(Video),
EXT2
(Video)
Rear view camera image
Map screen
p
The picture adjustment may not be avail
able with some rear view cameras.
p
Because of the LCD screen characteristics,
you may not be able to adjust the screen at
low temperatures.
3
Touch [+] or [
–
] to adjust the desired
item.
Each touch of [
+
] or [
–
] increases or decreases
the level of the desired item.
4
Touch
to return to the previous
screen.
Displaying the
“
AV System
Settings
”
screen
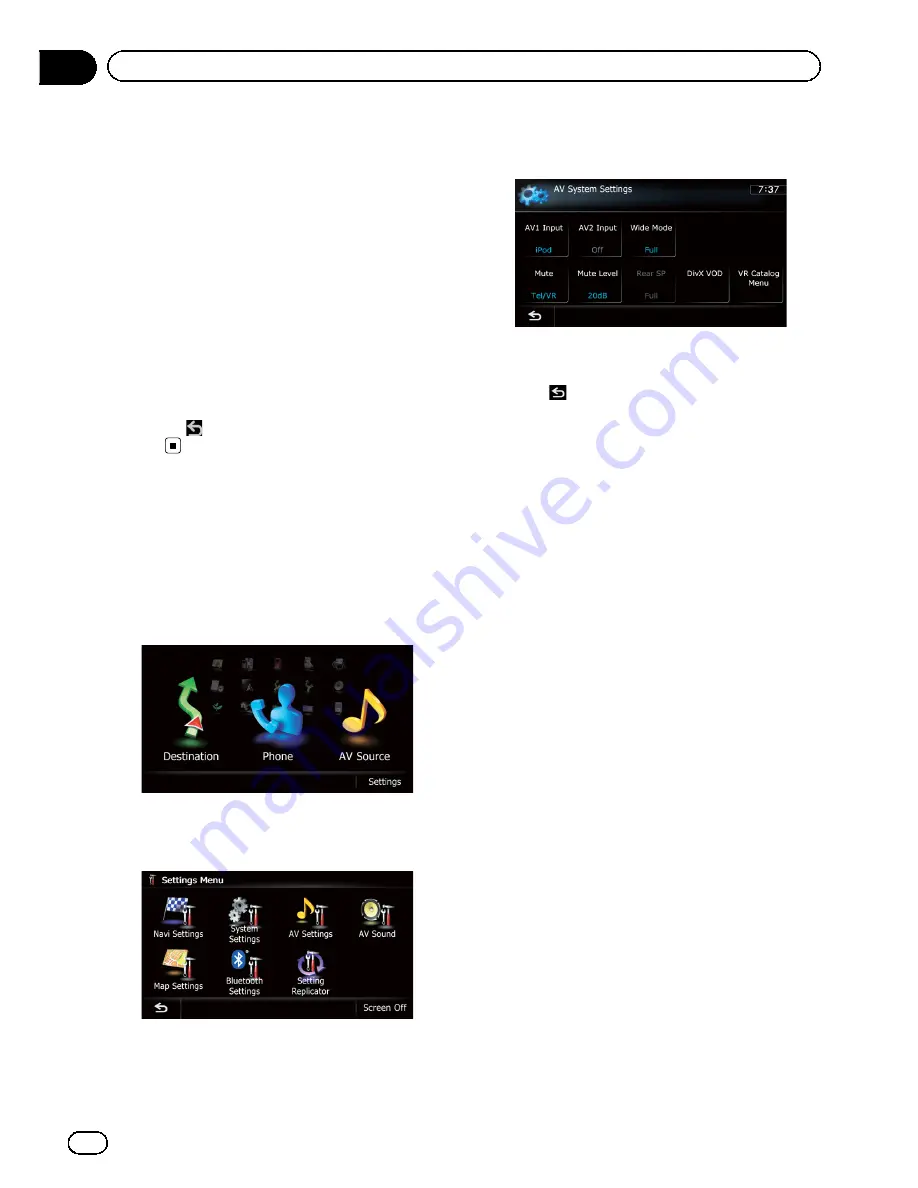
1
Press the HOME button to display the
“
Top Menu
”
screen.
2
Touch [Settings].
The
“
Settings Menu
”
screen appears.
3
Touch [AV Settings].
The
“
AV System Settings
”
menu appears.
4
Touch the item that you want to
change the setting.
p
You can only adjust
“
Wide Mode
”
when se
lecting an AV source with video.
#
Touch
.
Returns the previous screen.
Setting video input 1 (
AV1
)
You can switch this setting according to the
connected component.
p
This setting applies to mini jack input.
1
Display the
“
AV System Settings
”
screen.
=
For details, refer to
Displaying the
“
AV Sys-
tem Settings
”
screen
on this page.
2
Touch [AV1 Input].
Each touch of [
AV1 Input
] changes the set
ting as follows:
!
iPod
: iPod connected with the USB Inter
face cable for iPod (CD IU50V)
!
Video
: External video component
!
Off
: No video component is connected.
p
Use
AV1 Input
when connecting CD IU50V
(sold separately) through the external video
component.
Setting video input 2 (
AV2
)
You can switch this setting according to the
connected component.
p
This setting applies to RCA inputs
(AUDIO INPUT and VIDEO INPUT) on the
back of the system.
En
168
Chapter
31
Customizing preferences
Содержание AVIC-X920BT
Страница 21: ...En 21 Chapter 02 Basic operation Basic operation ...
Страница 22: ...Screen switching overview 2 5 6 1 1 3 4 En 22 Chapter 03 How to use the navigation menu screens ...
Страница 253: ...Section ln_s_ta_I_la_ti_o_n GI Adjusting the microphone angle The microphone angle can be adjusted m J to iii r En ill ...
Страница 287: ......


