User Manual For CYCLONE
FX
Programmers
107
tested.
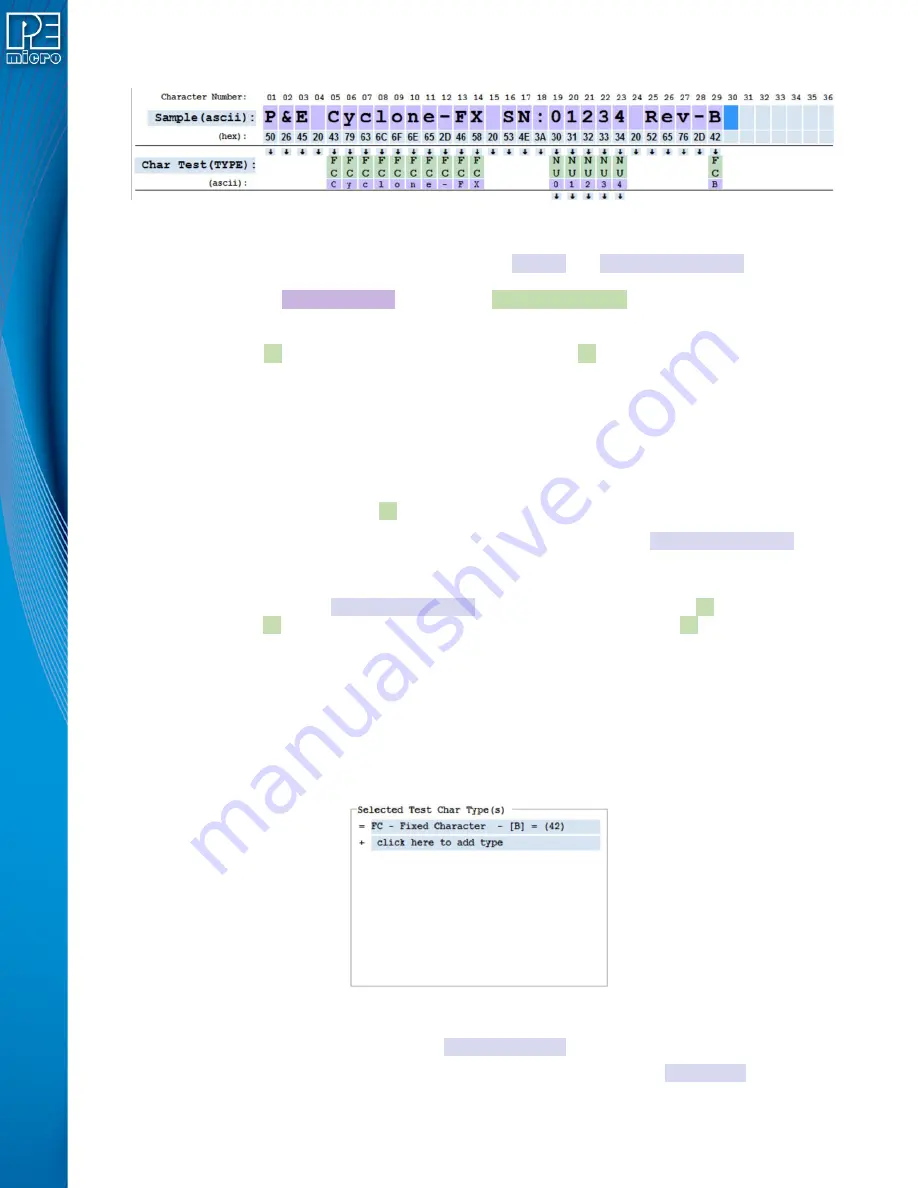
Figure 11-10: Sample Characters copied to Char Test Section
Simply clicking on the down arrows between the
Sample
and
Char Test(TYPE):
Sections of
the screen transfers the corresponding character to the test section. The transferred characters
are shown as ASCII characters along with an
associated type
. The ASCII characters in the
Char Test Section represent transferred value and do not change when the Sample characters are
edited. When transferred from the Sample, the associate type is automatically set to either Fixed
Character (
FC
) type or if asci characters (0-9) to NUmeric (
NU
) type. All possible character types
are defined in
Section 11.6.2 - Character Types
. Any character types which are represented by a
contiguous range of values are indicated by a set on down arrows into the Optional Range
Restriction Sections of the display.
shows that only the product name “Cyclone-FX”, the serial number (SN) “01234”,
and the revision (Rev-) “B” were selected for character testing. The manufacturer “P&E”, blank
spaces, and other characters are ignored during character testing.
Note:
Each of the fixed characters in ‘Cyclone-FX’ and ‘B’ require an exact match, while each number in
‘01234’ only has to be in the
NU
range of 0-9 to be a match.
All entries in the Char Test field can be deleted by double clicking the
Char Test(TYPE):
button. Individual Char Test entries can be deleted by double clicking anywhere on them.
Often setting just the
Char Test(TYPE):
of tested characters to Numeric (
NU
) or Fixed
Character (
FC
) and setting the appropriate ascii value for Fixed Character (
FC
) fields is sufficient to
generate a barcode test (although the Barcode Test Generation Utility also allows specification of
fairly complex barcodes as well).
11.6.1.3 Set desired type of selected characters from step 2.2
Once a Char Test characters have been selected, they can be changed to different types than
were transferred from the Sample. An individual associated type is edited by clicking on it to set
the cursor position. For example, clicking on the Char Test(TYPE): “B” character type opens the
window in Figure 2.3a:
Figure 11-11: Selected Test Char Type(s) Window
11.6.1.3.1 Adding, Changing and Deleting Char Test(TYPE):
This window shows all the character types associated with the selected
Char Test
character.
Shown types can be changed or deleted by clicking on them or types can be added by or deleted


