30
Adding and Deleting Servo Drives
Section 4-3
Deleting Position Control Units
1,2,3...
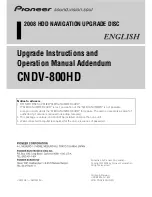
1.
Selecting the Position Control Unit to be deleted in the CX-Motion-NCF Ba-
sic Window, and then select
Unit - Delete
, click
, or right-click and se-
lect
Delete
from the pop-up menu.
2.
A dialog box saying “Delete the selected Unit. Proceed?” will be displayed.
Click the
OK
Button.
4-3
Adding and Deleting Servo Drives
Adding Servo Drives
to Position Control
Units
Select a Position Control Unit in the CX-Motion-NCF Basic Window, and then
select
Unit - Edit Parameters
or double-click a Position Control Unit to dis-
play the Axis Map Setting Window. In the Axis Map Setting Window, add a
new Servo Drive.
1,2,3...
1.
Select
Edit - New Driver
, click
in the toolbar, or right-click the Position
Control Unit and select
New Driver
from the pop-up menu.
2.
Enter the Servo Drive name.
Up to 32 one-byte characters can be entered.
Содержание CX-MOTION-NCF - V1.8
Страница 2: ...CXONE AL C V3 CXONE AL D V3 CX Motion NCF Ver 1 8 Operation Manual Revised October 2008...
Страница 3: ...iv...
Страница 5: ...vi...
Страница 21: ...xxii Application Precautions 5...
Страница 33: ...12 Connecting to PLC Section 2 2...
Страница 36: ...15 Screen Name Section 3 1 Edit Parameter Windows...
Страница 37: ...16 Screen Name Section 3 1 Monitor Windows Axis Monitor Window Unit Monitor Window...
Страница 63: ...42 Editing Servo Parameters Section 5 2...
Страница 68: ...47 Print Section 6 5 Print Samples An example of printed Unit Parameters is shown below...
Страница 89: ...68 Writing to Flash Memory Section 7 6...
Страница 95: ...74 Axis Monitor Section 8 2 2 Click the OK Button to start communications i e establish connection...
Страница 103: ...82 Axis Monitor Section 8 2...
Страница 104: ...83 SECTION 9 Test Run Operation This section describes the test run operations for each axis 9 1 Test Run 84...
Страница 109: ...88 Test Run Section 9 1...
Страница 133: ...112 Index...
Страница 137: ...116 Revision History...