


M
AKING COPIES
67
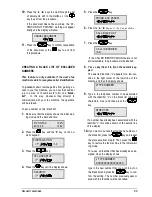
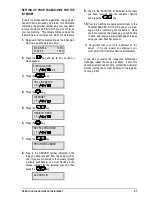
“Level 3” is the initial value (default).
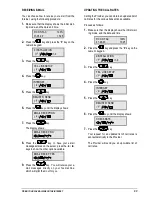
4.
Press the
{ y NH\V WR LQFUHDVH RU GHFUHDVH
the brightness
,
To continue setting the other parameters,
press the
key until the display shows the
desired parameter. Otherwise press the
key to exit from the procedure. In either case,
to confirm the selected value you do not have
to press the
key.
,
The asterisk that appears on the right-hand
side of the display indicates that this is the
value currently set on the fax machine.
,
After 2 minutes of inactivity or 2 minutes after
the last photocopying operation, the initial
values (default) are restored.
WHAT DOCUMENTS YOU CAN COPY
Before making a copy, make sure that the character-
istics described in “What documents can be in-
serted in the ADF”, in “Transmitting and receiv-
ing”.
WHAT PAPER SIZES AND TYPES YOU CAN
USE
The original may be printed on the following paper
sizes and types:
•
Sizes: A4, Letter, Legal,
•
Type: normal, glossy, coated, transparent.
For instructions on how to load the various types of
print, see the “Loading paper” section of the “In-
stalling the fax machine” chapter.
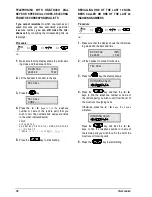
MAKING A COPY
First of all, make sure that the machine is turned on,
with the print head installed, and ready for operation
(initialization cycle completed) – the display shows:
RX ON FAX 100%
29-10-00 14:42
Proceed as follows:
1.
If necessary, load some paper onto the ASF and
make sure that the size corresponds to the one
set on the Setup menu (see the “Loading Pa-
per” section of the “
Installing the fax machine”
chapter).
2.
Position the document to be copied face down
on the ADF. Make sure that the original thick-
ness lever is correctly set: to the left for plain pa-
per, to the right for special paper.
As mentioned previously, the printing quality ob-
tained will depend on a series of values that are to
be selected before activating the copying function
(see “Getting the Desired Printing Quality”).
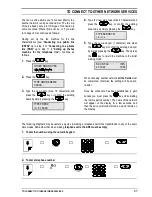
3.
Press the
key.
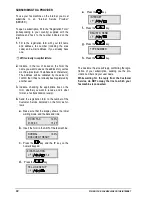
NUMBER OF COPIES
(1 – 50) 1
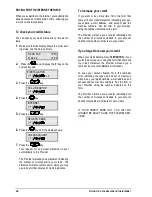
,
If you have set a password to control the use
of the copying function, you will be prompted
to enter it. Type it and then press the
key.
4.
Set the number of copies, using the numeric
keypad.
5.
Press the
key to start the copy operation.
If you have problems making a copy, check the
following conditions and then retry:
•
If there is no ink left in the head, the copy op-
eration is not started and the CHECK PRINT
HEAD message will blink on the display.
Replace the print head (see
Keeping the fax
machine in good working order).
•
If the quality of the copy is not good:
– Perform
the
calibration operation (see the
“Keeping the fax machine in good work-
ing order” chapter).


