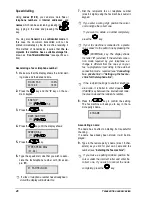
background image


S

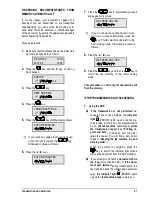
ETTING UP THE FAX MACHINE FOR THE TELEPHONE LINE 

 13 

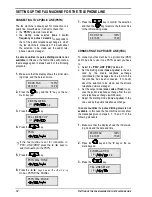
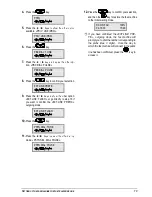
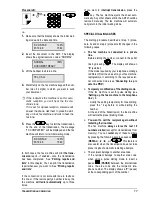
4. 

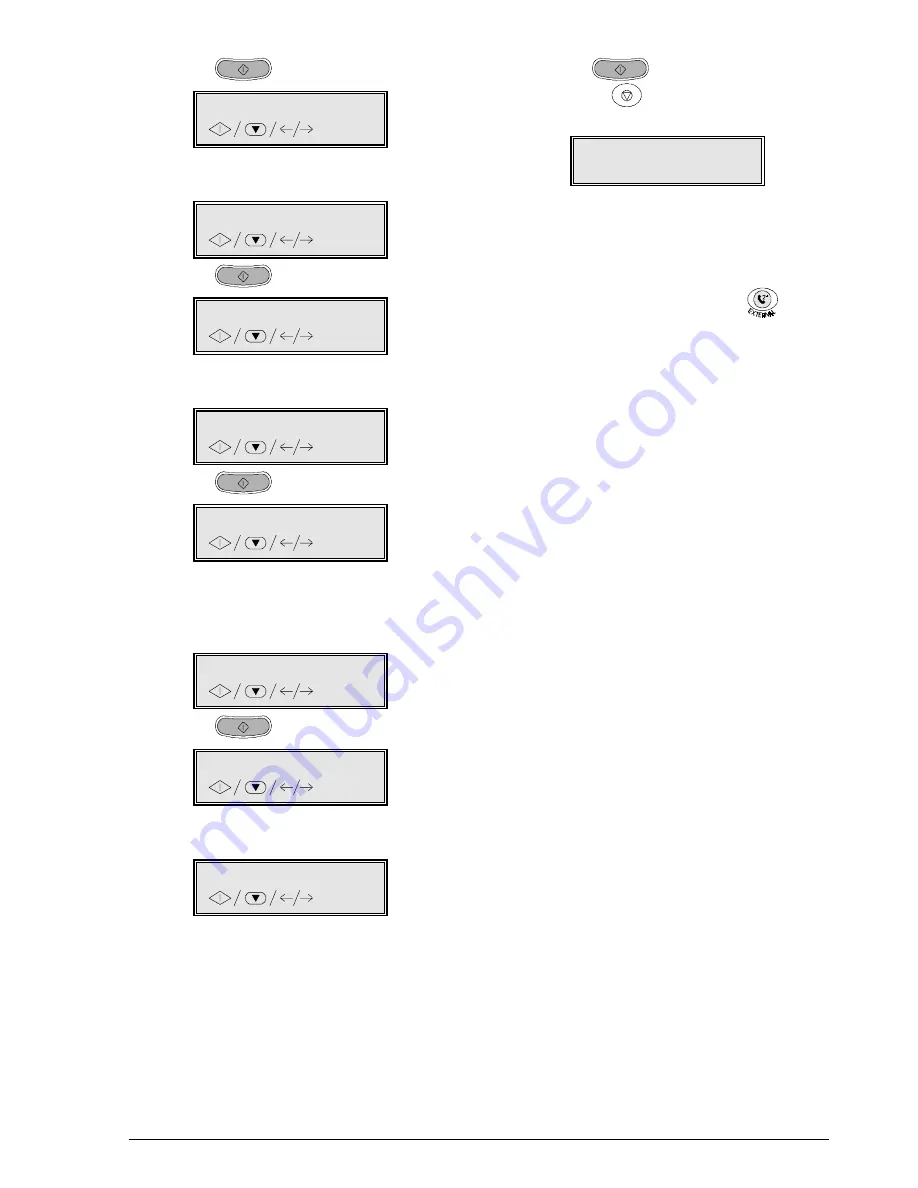
Press the 

 key. 


PSTN 


5. 

Press the 

{  y NH\V WR VKRZ WKH RWKHU RSWLRQ

available: «PRIV. LINE (PBX)». 


PRIV. LINE (PBX) 


6. 

Press the 

 key. 


PBX DIAL: TONE 


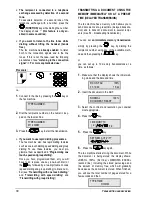
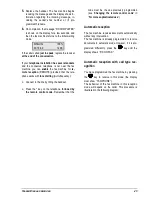
7. 

Press the 

{  y NH\V WR GLVSOD\ WKH RWKHU R

p-

tion: «PBX DIAL: PULSE». 


PBX DIAL: PULSE 


8. 

Press the 

 key to confirm your selection. 


EXT.LINE:PREFIX. 


9. 

Press the 

{  y NH\V WR VKRZ WKH RW

her option: 

«EXT.LINE: FLASH» or go directly to step 10 if 
you want to confirm the «EXT.LINE: PREFIX.» 
outgoing mode. 


EXT.LINE: FLASH 


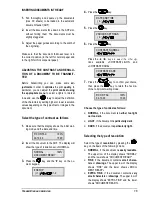
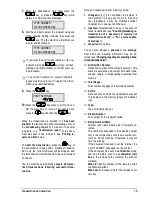
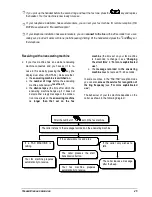
10. 

Press the 

 key. 


PSTN.DIAL: TONE 


11. 

Press the 

{  y NH\V WR VHOHFW WKH RWKHU GLDOOLQJ

mode: «PSTN SEL. DIAL PULSE». 


PSTN.DIAL: PULSE 


12. 

Press the 

 key to confirm your selection, 

and then the 

 key to restore the fax machine 

to the initial waiting mode. 


RX ON FAX                  100% 


02-10-00                       15:29 

,

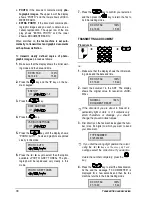
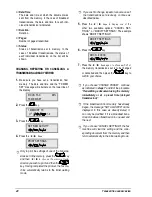
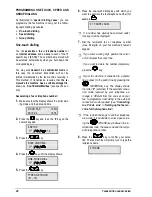
If you have confirmed the «EXT.LINE: PRE-
FIX», outgoing mode, the fax machine will 
prompt you to dial the number corresponding to 
the prefix (max. 3 digits).  Once the way in 
which the fax machine will connect to the public 

line has been confirmed, press the 

 key to 

access it.  


Содержание OFX 800

Страница 1: ...236865Z User s Manual...

Страница 2: ...ompatibility declaration This product has been designed and developed to operate in the networks of all European Community countries and in those of Switzerland and Norway Full compatibility with the...

Страница 3: ...ERS At a national level the settings and set up parameters for each installation vary according to certification require ments or individual user needs These settings and those indicated in the manual...

Страница 4: ...ents to be sent or copied Maximum capacity 30 A4 A5 Letter and Legal sheets Paper guides adjustable to the width of the document to be sent or copied Operator panel Display Manual feeder for plain pap...

Страница 5: ...V Outlet for sent copied documents Optical reader Outlet for documents received copied Socket for connection to telephone handset Print head compartment...

Страница 6: ...items parameters and their values on two lines of 16 charac ters NUMERIC KEYS 0 9 Used for dialling the tele phone or fax number Used for entering numeric data Selects digits and alphanu meric charac...

Страница 7: ...cels incorrect settings PAUSE Inserts a pause during direct dialling or the programming of one touch and speed dialling numbers REDIAL With no document inserted displays a list of incoming outgoing ca...

Страница 8: ...he transmission or reception in progress Eliminates the error condition and re stores the correct operating status START Starts reception After the fax number has been dialled starts sending a documen...

Страница 9: ...21 RECEIVING A DOCUMENT 22 IF THE FAX MACHINE RUNS OUT OF PAPER OR INK OR THERE ISA POWERFAILURE 22 RECEPTION MODES 22 Manual reception 22 Automatic reception 23 Automatic reception with call type re...

Страница 10: ...OTHER NETWORK SERVICES 57 USING YOUR FAX MACHINE ON THE INTERNET FAX2NET 59 INTRODUCTION 59 What is the Internet 59 What is an Internet address 59 What is e mail 59 What is an Internet Service Provid...

Страница 11: ...MUNICATION CHARACTERISTICS 79 POWER SUPPLY CHARACTERISTICS 79 RECEPTION CHARACTERISTICS 79 TRANSMISSION CHARACTERISTICS 79 CHARACTERISTICS OF OPTICAL READER 79 ENVIRONMENTAL CONDITIONS 79 Test Sheet N...

Страница 12: ......

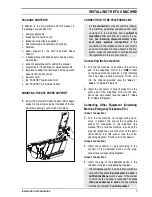
Страница 13: ...ance with the regulations in force in your country Connecting the fax machine 1 Turn the fax machine on its side and insert one end of the telephone cord in the LINE socket on the base of the fax mach...

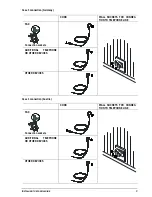
Страница 14: ...n Case 2 connection CORD WALL SOCKETS FOR CONNEC TION TO TELEPHONE LINE FAX Connection sockets ADDITIONAL TELEPHONE OR OTHER DEVICES CORD WALL SOCKETS FOR CONNEC TION TO TELEPHONE LINE FAX Connection...

Страница 15: ...ction Austria CORD WALL SOCKETS FOR CONNEC TION TO TELEPHONE LINE FAX Connection sockets ADDITIONAL TELEPHONE OR OTHER DEVICES OTHER DEVICES CORD WALL SOCKETS FOR CONNEC TION TO TELEPHONE LINE FAX Con...

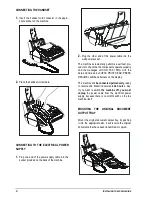
Страница 16: ...check that its components operate properly and the messages RX ON FAX 100 with the date and time and CHECK PRINT HEAD PRESS RESUME will then alternate on the display The machine will be connected per...

Страница 17: ...paper sizes A4 210 x 297 mm US Letter 8 5 x 11 in and US Legal 8 5 x 14 in in weights ranging from 70 g m2 to 90 g m2 Type of paper For optimum print quality only printing media rec ommended by the ma...

Страница 18: ...format you have loaded 1 Press the key and the 8 key on the nu meric keypad 8 SETUP 1 9 2 Press the key DATE AND TIME 3 Press the key until the display shows PRINTER PARAM 4 Press the key FORMAT A4 5...

Страница 19: ...ts box and holding it by its finger grip peel the protective film off from the print nozzles Avoid touching both the nozzles and the electri cal contacts 4 Insert the print head in its housing with th...

Страница 20: ...then press the key The display will show PRINTING The fax machine will print another test page with the values you have set and then return to waiting mode The display will show RX ON FAX 100 on the u...

Страница 21: ...o change some of the digits move the cursor on to them using the y keys and type over the correct digits 7 Press the key The procedure for changing the date and time is now complete The new date and t...

Страница 22: ...e incorrect character and overtype the correct one If you want to cancel the name completely press 7 Press the key to confirm the name STATION NUMBER Entering your fax number 1 Press the key TYPE YOUR...

Страница 23: ...ws HEADING INSIDE 5 Press the y NH V WR VHlect the alternative parameter HEADING OUTSIDE 6 Press the key to confirm the setting and then the key to restore the machine to its initial waiting mode RX O...

Страница 24: ...Press the yNH V WR VHOHFW WKH RWKHU GLDOOLQJ mode PSTN DIAL PULSE PSTN DIAL PULSE 7 Press the key to confirm the selection and then the key to restore the fax machine to the initial waiting mode RX O...

Страница 25: ...if you want to confirm the EXT LINE PREFIX outgoing mode EXT LINE FLASH 10 Press the key PSTN DIAL TONE 11 Press the yNH V WR VHOHFW WKH RWKHU GLDOOLQJ mode PSTN SEL DIAL PULSE PSTN DIAL PULSE 12 Pre...

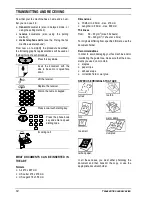
Страница 26: ...key Press the phone book key and enter a speed dialling code Incoming call WHAT DOCUMENTS CAN BE INSERTED IN THE ADF Formats A4 210 x 297 mm US Letter 216 x 279 mm US Legal 216 x 356 mm Dimensions Wid...

Страница 27: ...FAX 100 02 10 00 15 29 2 Insert the document in the ADF The display will show the type of resolution set NORMAL NORMAL 100 DOCUMENT READY 3 Press the key and the 8 key on the nu meric keypad 8 SETUP 1...

Страница 28: ...TONES The pho tograph will be reproduced very clearly in this mode PHOTO GREY TONES 7 Press the key to confirm your selection and then press the key to return the fax to its initial waiting mode RX ON...

Страница 29: ...sheets still in the ADF should be removed manually The fax machine will automati cally return to the initial waiting mode SPECIAL DIALLING CASES The dialling procedure described at step 3 proce dure...

Страница 30: ...he key followed by a two digit numeric code speed dialling and group dialling to dial a num ber see Transmitting with one touch dialling and Transmitting with speed dialling and Transmitting with grou...

Страница 31: ...from memory can be changed only if it is not already in progress If the document is being sent to more than one user broadcast it may be modified between transmission to one user and the next repeated...

Страница 32: ...ing completed the printout the fax ma chine automatically returns to the initial waiting mode If you wish to change repeat or cancel a one of the transmissions set previously continue as described bel...

Страница 33: ...to be re sent automatically press the key The fax machine will return to the initial waiting mode Otherwise proceed as follows 8 Press the yNH V RE TRANS DOC YES 9 Press the key and then the key to re...

Страница 34: ...to receive the call IF THE FAX MACHINE RUNS OUT OF PAPER OR INK OR THERE IS A POWER FAILURE Thanks to its memory the fax machine will still be able to receive even if there is no paper there is no ink...

Страница 35: ...that the tele phone works with tone dialling multi frequency Connect to the line by lifting the handset Press the key on the telephone followed by the remote control code Remember that the code must...

Страница 36: ...at the end of the conversation you can hang up The caller asks you to receive Your fax machine pre pares to receive Your fax machine prepares automati cally to receive It will wait to receive a docum...

Страница 37: ...is less than 5 the silence lapse the time after which the answering machine hangs up if it does not detect either a reply message or the connec tion tones set on the answering machine is longer than t...

Страница 38: ...ess the key until the display shows ONE TOUCH DIAL 5 Press the key TYPE ONE TOUCH 01 15 6 Press the one touch dialling key with which you want to associate the fax telephone number for example 01 FAX...

Страница 39: ...om step 6 or you can leave this procedure and return the fax machine to the initial waiting mode by pressing the key Associating an Internet address If you wish to associate an Internet address to a o...

Страница 40: ...x 64 digits using the fax machine s numeric keypad If you enter a wrong digit position the cursor on it and type the correct one If you want to delete a number completely press the key If your fax mac...

Страница 41: ...f a fax number you wish to associate an Internet address with a speed dial code follow points 1 to 6 of the previous procedure and then continue as follows Before using the fax machine in Internet you...

Страница 42: ...ed has been changed or deleted at any time the display will show the number that you have associated with the pre viously changed key or code or in the case of deletion the message NOT PROGRAMMED 9 Re...

Страница 43: ...with that num ber If the name has also been stored it will also be displayed After the last number has been dialled the transmis sion continues as described in Transmitting a document TRANSMITTING WI...

Страница 44: ...emote party or the name of the group to whom you wish to send your document The numbers names will be listed in the follow ing order SPACE 0 1 2 3 4 5 6 7 8 9 A B C D E F G H I J K L M N O P Q R S 7 8...

Страница 45: ...ontains data regarding the last transmission The fax ma chine is factory set to print automatically this type of report only in the case of failed transmission TX REPORT FAILED If you want to print it...

Страница 46: ...very transmission irrespective of the result Choosing TX REPORT NO sets the fax machine not to automatically print a report 7 Press the key to confirm this choice then press the key to return the fax...

Страница 47: ...n single or broadcast executed from the memory Type type of transaction TX ADF TX ADF ECM RX POLL RX POLL ECM TX MEM TX MEM ECM TX FOR WARD TX FORWARD ECM for transmis sion RX RX ECM TX POLL TX POLL E...

Страница 48: ...11 10 00 15 26 2 Press the key and the 9 key on the nu meric keypad 9 INSTALLATION 1 9 3 Press the key TEL LINE SETUP 4 Press the key until the display shows PRINT INSTALL 5 Press the key PRINT INSTA...

Страница 49: ...is choice The fax machine returns to the initial waiting mode automatically If you chose PRINT GROUP DIAL the fax machine will prompt you to enter the group code If you have chosen EXIT MENU press the...

Страница 50: ...waiting mode RX ON FAX 100 28 06 00 10 44 Receiving a document that is longer than the paper format used If you receive a document that is longer than the paper currently loaded in the fax machine you...

Страница 51: ...key until the display shows SILENT RX 6 Press the key SILENT RX NO 7 Press the yNH V WR VKRZ WKH RWKHU RSWLRQV available SILENT RX ALWAYS SILENT RX DAILY SILENT RX DAILY 8 Press the key SILENT RX FRO...

Страница 52: ...NO RINGS 04 6 Press the key to confirm this choice then press the key to return the fax ma chine to the initial waiting mode FAX PHONE 100 28 10 00 16 28 Changing the ring volume If you wish you can...

Страница 53: ...network manager If an answering machine is connected to the fax machine we advise you to disconnect it be fore activating the recognition procedure 1 Make sure that the display shows the initial wait...

Страница 54: ...s choice and then the key to return the fax machine to the initial waiting mode RX FAX TEL 100 28 10 00 16 28 Changing the silent time If the silent time set for the answering machine is shorter than...

Страница 55: ...EL LINE SETUP 4 Press the key PSTN 5 Press the key until the display shows REMOTE START YES By pressing the y NH V RX FDQ VKRZ WKH other option available REMOTE START NO In this case you will move str...

Страница 56: ...ress the key if you want the fax ma chine only to print the document when it did not manage to send the document successfully or press the y NH V WR GLVSOD WKH RWKHU Rp tion PRINT ALWAYS 13 Press the...

Страница 57: ...hine to the initial waiting mode RX ON FAX 100 28 10 00 11 45 Adjusting the volume of line tones If the volume of either the line or connection signal tones seems too loud or too quiet change it using...

Страница 58: ...ce then press the key to return the fax ma chine to the initial waiting mode RX ON FAX 100 29 10 00 16 28 Enabling disabling ECM mode The ECM Error Correction Mode is a system for correcting errors ca...

Страница 59: ...mote party and the time you wish to receive the document The fax machine enables you to carry out polling reception with up to 50 remote parties at a time Proceed as follows 1 Make sure that the displ...

Страница 60: ...100 POLL RX SET 2 Press the key and the 4 key on the nu meric keypad 4 RX POLLING 1 9 3 Press the key SET NEW ACTIVITY 4 Press the yNH V PRINT SETTINGS Only to print the reception polling parameters...

Страница 61: ...SET will alternate on the lower line of the display Cancelling polling transmission already set 1 Make sure you have set polling transmission RX ON FAX 97 POLL TX SET 2 Press the key and the 5 key on...

Страница 62: ...vated by means of passwords max 4 digits requested by the fax machine every time an attempt is made to activate or access certain features or to modify fax machine settings If the password is not en t...

Страница 63: ...he key 10 The fax machine displays the next security fea ture If you wish to change or cancel the passwords for the other security features repeat the process from step 6 for each feature or press to...

Страница 64: ...RD _ Otherwise PRINT LIST will be displayed im mediately 4 Type the password If the password entered is incorrect the display will show WRONG CODE xxxx Three attempts can be made to enter the pass wor...

Страница 65: ...SETUP 4 Press the key until the display shows SECURITY 5 Press the key PROGR ACC PASSW 6 Press the yNH V XQWLO WKH GLVSOD VKRZV CALL BLACK LIST 7 Press the key CALL ID BARRIER 0 9 If the CALLER IDENTI...

Страница 66: ...y MEMORY TX XXXX 6 Press the ykeys to scroll through the list of reference numbers associated with the docu ments in the memory and then press the key to select the desired document or select the docu...

Страница 67: ...ived incoming without having to dial the number again IMPORTANT WARNING If the TX PROTECTION function has been en abled on your fax machine see Security Fea tures only people who know the password can...

Страница 68: ...he order indicated below SPACE 0 1 2 3 4 5 6 7 8 9 A B C D E F G H I J K L M N O P Q R S 7 8 V W X Y Z _ o 5 Press the key to start dialling REDIALLING ONE OF THE LAST 10 NUM BERS CALLED OR ONE OF THE...

Страница 69: ...new area code max 6 characters and press the key or confirm the existing area code by simply pressing the key TYPE ACRONYM a z x 5 Type the new acronym 1 character and press the key or confirm the ex...

Страница 70: ...alling methods such as one touch keys and speed dial codes the key must be pressed once during programming see Programming one touch speed and group dialling in Transmitting and re ceiving before dial...

Страница 71: ...s a company or marketing firm net is an Internet service network In this example www example com is the WEB site address item is the name of a directory on this WEB site and page html is the name of a...

Страница 72: ...already been registered by another user 3 Indicate checking the appropriate box on the form whether you want to receive and in what format a fax transmission receipt 4 Send the registration form to t...

Страница 73: ...ber indicated in the reply you have received from the Customer Ser vice if you are connected to the network through a private switchboard you must first key in the access number for the external line...

Страница 74: ...ncrease your credit If you want to buy more time fill in the form that came will your credit statement indicating your per sonal data e mail address and account and fax machine numbers Fax the form to...

Страница 75: ...keys to show the other option available EMAIL RECEP YES 9 Press the key You will receive your e mail messages directly on your fax machine which will print them out for you UPDATING THE CALL RATES Cal...

Страница 76: ...dial ling code for further details see Programming one touch speed and group dialling Transmit ting with one touch dialling and Transmitting with speed dialling in Transmitting and receiv ing Receivi...

Страница 77: ...n the right hand side of the display indicates that this is the value currently set on the fax machine After 2 minutes of inactivity or 2 minutes after the last photocopying operation the initial valu...

Страница 78: ...the date and time RX ON FAX 100 07 10 00 15 42 2 Insert the document in the ADF The display shows the initial resolution value NORMAL NORMAL 100 DOCUMENT READY 3 Press the key until the display shows...

Страница 79: ...dy for operation initialization cycle completed the display shows RX ON FAX 100 29 10 00 14 42 Proceed as follows 1 If necessary load some paper onto the ASF and make sure that the size corresponds to...

Страница 80: ...ems refer to the appropriate section of this chapter REPLACING THE PRINT HEAD OUT OF INK When the ink in the cartridge runs out the display shows the message OUT OF INK At this point you must change t...

Страница 81: ...Push the print head in the direction indicated by the arrow until you hear a click confirming that it has been correctly inserted 8 Close the print head compartment cover and press the key again The m...

Страница 82: ...tervals that will vary depending on how intensively the machine is used the following precautions should also be observed do not attempt to refill the print head this could damage the head itself or t...

Страница 83: ...peating the print head cleaning proce dure three times the print quality is still not up to standard continue as follows to obtain a satis factory print sample Use the machine to make a copy of a docu...

Страница 84: ...Clean the electrical contacts using a slightly dampened cloth Do not touch the nozzles 6 Disconnect the fax machine from the electrical power supply 7 Clean the electrical contacts on the print head c...

Страница 85: ...ESS RESUME 2 Lift the print head compartment cover 3 Disconnect the fax machine from the electrical power supply 4 Move the print head carriage to the left as shown in the figure 5 Clean the print hea...

Страница 86: ...es appear on the copy and further inspection of the optical reader shows it to be perfectly clean contact a qualified technician CALIBRATING THE SCANNER If the printing quality of the fax machine dete...

Страница 87: ...ssage REMOVE DOCUMENT PRESS Try to unload the original by pressing the key If this is not successful you must remove it manually as follows 1 Push in the lever situated under the right hand side of th...

Страница 88: ...t the document is not jammed inside the machine If the line is busy wait until it is free and then re transmit The fax machine does not receive in automatic mode You have set it for man ual reception...

Страница 89: ...ble lists the functions that can cannot be carried out at the same time Activity in progress Operations permitted Operations not permitted Printing in local mode TX from memory Reception to memory Ans...

Страница 90: ...tted Set the document format correctly or repaginate it to lie within the allowed dimensions 08 Check document Paper jam Remove the document or paper that has jammed and check that documents in the AD...

Страница 91: ...in paper with bubble ink jet technology Max length of print line 204 mm Print heads monochrome black Paper Unit weight from 70 to 90 g m2 Paper feed Automatic sheet feeder ASF 200 sheets of 80g m2 pap...

Страница 92: ...80 Test Sheet No 1...

Отзывы: