154
Printing System
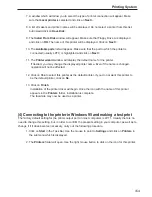
7. A window which will allow you to select the type of printer connection will appear. Make
sure that Local printer is selected and click on Next >.
8. A list of makers and printer names will be displayed. Do not select a printer from this list,
but instead click on Have Disk.
9. The Install From Disk window will appear. Make sure that Floppy Drive A is displayed
and click on OK. The name of this printer will be displayed. Click on Next >.
10. The Available ports list will appear. Make sure that the port to which the printer is
connected (usually LPT1) is highlighted and click on Next >.
11. The Printer wizard window will display the default name for the printer.
If desired, you may change the displayed printer name. Even if the name is changed,
operation will not be affected.
12. Click on Yes to select this printer as the default printer. If you do not want this printer to
be the default printer, click on No.
13. Click on Finish.
Installation of the printer driver will begin. Once the icon with the name of this printer
appears in the Printers folder, installation is complete.
The facsimile may now be used as a printer.
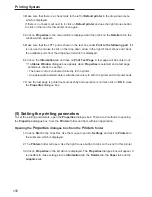
(4) Connecting to the printer in Windows 95 and making a test print
The factory default setting for the printer output port on most computers is LPT1. Usually there is no
need to change this setting, but, in order to confirm the present setting in your computer, as well as to
change it if it does become necessary, carry out the following procedure.
1. Click on Start in the Task Bar. Use the mouse to point to Settings and click on Printers in
the submenu which is displayed.
2. The Printers folder will open. Use the right mouse button to click on the icon for this printer.
Содержание OFX 5500
Страница 187: ......

