[Counter history]
Introduction
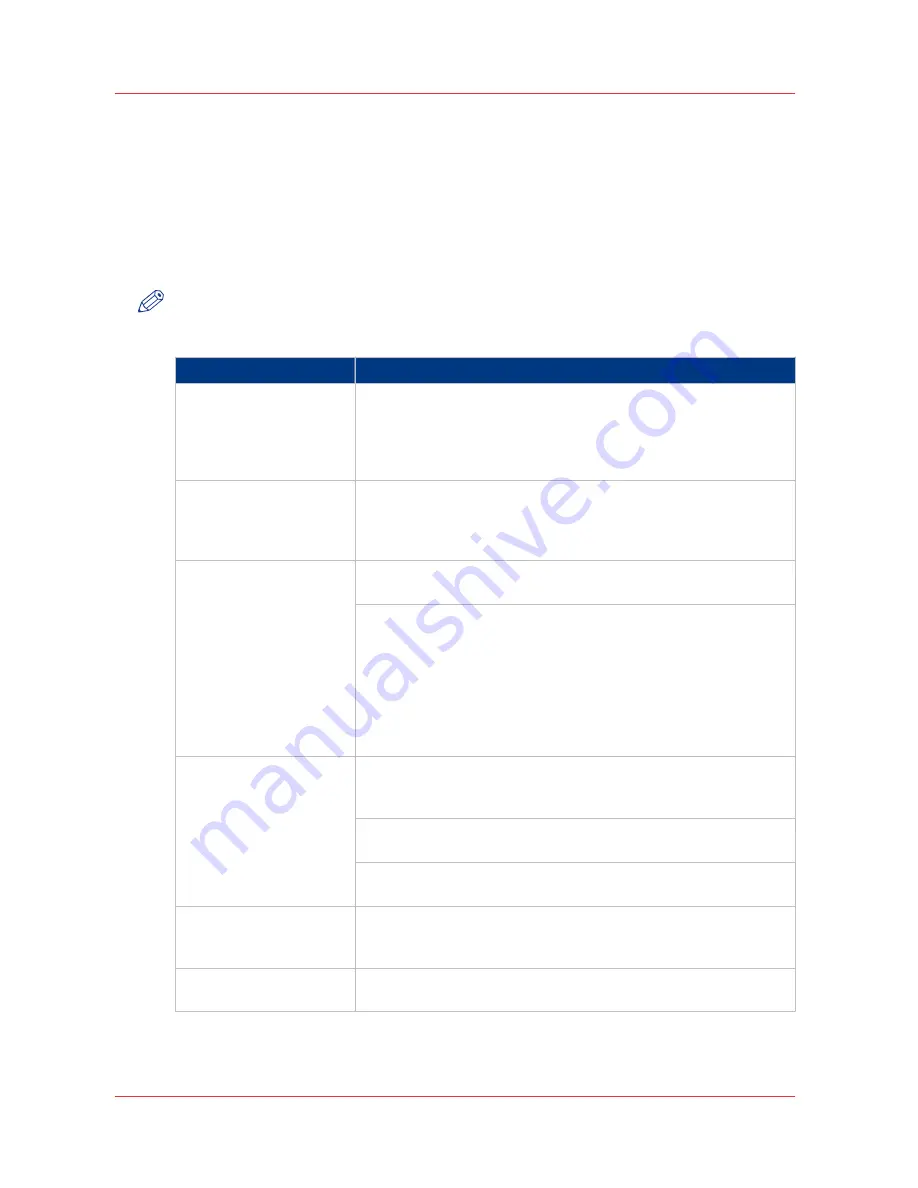
Navigate to the [Support] - [Counter history] tab to get an overview of the consumables used per
printed job.
The table below gives an overview of the various functionalities you can access in the [Counter
history] to sort, group, save or print the information you need.
NOTE
To access the [Counter history] functionality you must log on as a Key operator or as a System
administrator.
Functionality
Description
[Counter history]
In the header of the counter history list you can select a value from
the drop-down list, next to [Counter history] you can select a value
between [today] and [6 days], or between [1 week] and [12 weeks].
The counter history list will display the used consumables that are
printed during the selected period of time.
Sort by [Job name], [Job
owner], [Smart Inbox] or
[Time Printed]
If you want to sort the counter history list, you can click on the col-
umn headers of the counter history list: [Job name]; [Job owner];
[Smart Inbox]; [Time Printed]. This way you can sort the list accord-
ing to your needs.
[List view] or [Group
view].
Select [List view] at the bottom of the counter history list if you
want to display all printed jobs.
Select [Group view] at the bottom of the counter history list if you
want to display only the groups based on your sort criterion.
For example, if you sort your counter history list by the column
[Job owner] and you click on [Group view], the counter history list
displays a list with all job owners that have sent print jobs to the
printer in the selected period. When you expand the [Job owner]
group, the list displays all jobs that were sent by the [Job owner] in
the selected period.
[View total info]
Select [View total info] in the upper right-hand corner of the coun-
ter history list if you want to have a complete overview of job coun-
ter information.
Click on a group name to display counter information for all jobs in
the group.
Click on a job name to display counter information for the selected
job.
[Save all]
Select [Save all] in the upper right-hand corner of the counter histo-
ry list if you want to save the counter history for all jobs in the list.
You can save the counter data as an [XML-file] or as a [CSV-file].
[Print all]
Select [Print all] in the upper right-hand corner of the counter histo-
ry list if you want to print the counter history for all jobs in the list.
[Counter history]
286
Chapter 8 - Support
Содержание PlotWave 750
Страница 1: ...Oc PlotWave 750 Operation guide...
Страница 8: ...Contents 8...
Страница 9: ...Chapter 1 Preface...
Страница 14: ...Online support for your product 14 Chapter 1 Preface...
Страница 15: ...Chapter 2 Introduction...
Страница 44: ...Select a language 44 Chapter 2 Introduction...
Страница 45: ...Chapter 3 Define your workflow with Oc Express WebTools...
Страница 137: ...Chapter 4 Use the Oc PlotWave 750 to print...
Страница 165: ...Chapter 5 Use the Oc TC4 scanner for copy and scan to file jobs...
Страница 209: ...Chapter 6 The finishing options...
Страница 227: ...Chapter 7 Maintain and troubleshoot the Oc PlotWave 750 system...
Страница 274: ...127 Closing the guide plates Insert a new tape roll 274 Chapter 7 Maintain and troubleshoot the Oc PlotWave 750 system...
Страница 283: ...Chapter 8 Support...
Страница 298: ...Audit log 298 Chapter 8 Support...
Страница 299: ...Chapter 9 Account management...
Страница 307: ...Appendix A Overview and tables...


