SETUP PROCEDURE
3-24
3.3.9
Setting of Pitch Sensor
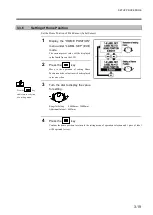
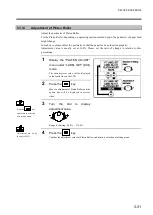
Set the type of Pitch Sensor that is used for detecting label.
Depending on the print media used, the sensors used for label detecting are different.
1
Display the “PITCH SENSOR”
menu under “LABEL SET” (Edit)
mode.
The current preset value will be displayed
in the fourth line on the LCD.
2
Press the
key.
Move to selection of Pitch Sensor and the
option line will be displayed in reverse
video.
3
Turn the dial to display the pitch
sensor to be used.
Pitch Sensor
Content
GAP1
Selected when label is detected according to the rate of penetration through label.
Usually GAP1 sensor is used.
Media Supported: Label with backing paper
* Please use the label pitch (p) to determine one or two GAP1 or GAP2
sensors are used with the following calculation equation.
If the label pitch can fit in nowhere, please use Gap1 sensor.
If the label pitch can fit in both, either an error or a Skip occurs. (Please
select a label pitch that does not fall in this range.)
I-MARK1
Selected when label is detected according to the reflectivity of label.
Normally I-Mark1 sensor is used.
Media Supported: Label with I-Mark
* Please use the label pitch (p) to determine one or two reflection sensors are
used with the following calculation equation.
If the label pitch can fit in nowhere, please use one reflection sensor.
If the label pitch can fit in both, either an error or a Skip occurs. (Please
select a label pitch that does not fall in this range.)
INVALIDITY
Select this option if label detecting is disabled.
Media Supported: Continuous paper
4
Press the
key.
Confirm the pitch sensor to be sued and return to selection of setting menu.
Pressthe
key
and return to selection
of a setting menu.
Содержание DURA SI600
Страница 1: ...THERMAL PRINTER INSTRUCTION MANUAL ...
Страница 2: ......
Страница 19: ...BEFORE OPERATION 1 3 Rear View ...
Страница 20: ...BEFORE OPERATION 1 4 Operating Panel ...
Страница 36: ...BEFORE OPERATION 1 20 ...
Страница 48: ...BASIC OPERATIONS 2 12 ...
Страница 54: ...SETUP PROCEDURE 3 6 3 1 3 Menu Flow of Setting Mode ...
Страница 166: ...INSTALLING AND REMOVING THE OPTIONAL UNIT 5 12 ...
Страница 167: ...INSTALLING AND REMOVING THE OPTIONAL UNIT 5 13 ...
Страница 174: ......
Страница 175: ...P N A2302B SECOND VERSION ...

