background image

Checking Feature Selections / Proof Copying (Check Mode) (continued)

4-6

4.

To change the settings:

Touch the desired copying condition key on the Check Screen to highlight it.
Any key that cannot be highlighted indicates that the copying condition
cannot be changed from the Check Screen.
Touch 

CHANGE SETTING

.

The LCD will display an appropriate screen to change the copying condition
selected.

• Selecting a basic copying condition key will display the Basic Screen.
• Selecting a Special Original Mode key will display the Special Original

popup menu.

• Selecting an Image Adjust Mode key will display the Change Image

Adjustment Setting Screen.
When 

BOOK MARK

 has been checked on a subsequent screen, selecting

the mode key will jump to that screen.

• Selecting an Application Mode key will display the Change Application

Selection Screen.
When 

BOOK MARK

 has been checked on a subsequent screen, selecting

the application function key will jump to that screen. See p. 10-2 for details.

CHANGE SETTING

 will not function for the following application functions,

however they can be released by touching 

RELEASE SETTING

: Program

Job, Non-Image Area Erase, Reverse Image, AUTO Layout, Overlay.

Change the setting as desired, then restore the Check Screen to return to
the checking steps.
From the Basic Screen, press [

CHECK

] to return to the Check Screen.

From the Special Original popup menu, Change Image Adjustment Setting
Screen or Change Application Selection Screen, touch 

OK

 to return to the

Check Screen.
•  When making a set or sample copy, proceed to step 

6

.

•  To start printing without proofcopying, proceed to step 

8

.

5.

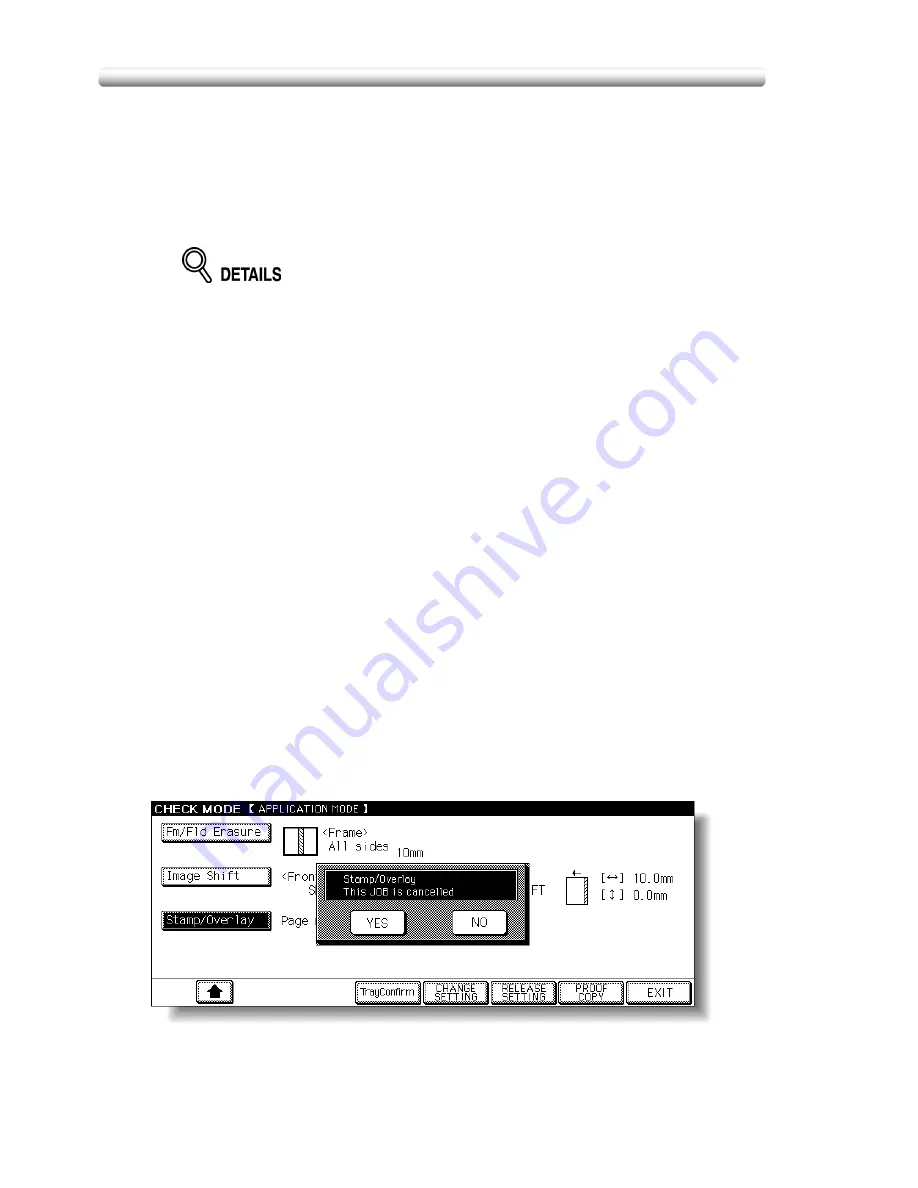
To release the settings:

Touch the desired copying condition key on the Check Screen to highlight it,
then touch 

RELEASE SETTING

.

The confirmation screen will appear on the Check Screen.

Touch 

YES

 to cancel the function, or 

NO

 to restore.

•  If making a sample copy, proceed to the next step.
•  To start printing, proceed to step 

8

.

Содержание CF5001

Страница 1: ...CF5001 User Manual ...

Страница 2: ...fter completion of the last copy with the copier remaining in the ready to copy state during that time The time period for the Auto Low Power function can be set for 5 minutes 10 minutes 15 minutes 30 minutes 60 minutes 90 minutes 120 minutes or 240 minutes See p 2 19 for details Automatic Shut Off This function achieves further energy conservation by partially turning OFF the power supply thereby...

Страница 3: ...se 1 18 Section 2 Machine Information Machine Configuration 2 2 External Machine Items 2 2 Internal Machine Items 2 4 Standard Optional Equipment 2 5 Control Panel Layout 2 6 Basic Screen 2 8 FN 120 FN 9 Finisher with PK 5 Punch Kit 2 10 Cover Inserter D 2 12 C 208 Large Capacity Cassette 2 13 TMG 3 Trimming Unit 2 14 Turning On the Power Switch 2 16 To Turn On the Power 2 16 To Turn Off the Power...

Страница 4: ...anning Printing 3 13 Selecting Paper Size 3 14 To Select Paper Size Automatically APS 3 14 To Specify Desired Paper Size AMS 3 16 Copying Using Special Paper Multi Sheet Bypass Tray 3 18 Selecting Magnification Ratio Lens Mode 3 22 To Copy in 1 000 Magnification Mode 3 22 To Change Magnification Ratio Fixed Magnification Zoom Mode 3 23 Making Double Sided Copies 1a2 2a2 3 25 Using RADF 3 25 Using ...

Страница 5: ... Service Message Is Displayed 5 2 Limited Use of the Copier in Trouble 5 3 Clearing Mishandled Paper 5 4 When JAM Appears on Folder Key Or Arrow Key Flashes 5 6 When ADD PAPER Appears on Folder Key Or Arrow Key Flashes 5 8 When Memory Full Message Is Displayed Memory Overflow 5 9 Memory Overflow in Current Job 5 9 Memory Overflow in Reserve Job 5 10 When Power OFF ON Screen Is Displayed 5 11 Troub...

Страница 6: ...ng RGB Value 7 19 Modifying HSB Value 7 21 Changing Colours Using CMYK Value Colour Balance Adjustment 7 24 Selecting Line Screen Dot Screen or High Compression Screen Setting 7 26 Adjusting Sharpness and Contrast Selecting Gloss Mode 7 29 Making Fine Adjustment in Image Detection Image Judge 7 32 Specifying Original Type Original Image Type in Special Original 7 34 Section 8 Advanced Information ...

Страница 7: ...es Dual Page 10 20 Programming Different Settings for an Output Job Program Job 10 24 Dividing an Image for Enlarged Copy Multi Page Enlargement 10 27 Erasing Outside of the Original Non Image Area Erase 10 30 Reversing Colour in Image Reverse Image 10 32 Repeating Selected Image Area Repeat Vert Horiz Mode 10 34 Repeating Automatically or Selecting RepeatingTimes Repeat AUTO Repeat Mode 10 37 Eli...

Страница 8: ...Multi Sheet Bypass Tray 12 8 To Store Copy Paper 12 8 Original Information 12 9 Platen Glass Originals 12 9 RADF Originals 12 10 Section 13 Maintenance Supplies Adding Toner 13 2 Inserting a New Staple Cartridge into FN 120 FN 9 Finisher 13 7 Empty Waste Basket of PK 5 Punch Kit 13 10 Empty Waste Basket of TMG 3 Trimming Unit 13 12 Exchanging Toner Recovery Box 13 14 Cleaning Image Scanning Sectio...

Страница 9: ... C Function Setting 14 18 4 Scanner Function Setting 14 19 5 Lock Delete Job Memory 14 20 6 Paper Type Special Size Set 14 21 1 Paper Type Special Size Set 14 21 2 Paper Type Set Bypass 14 23 7 Panel Contrast Key Sound Adjustment 14 24 8 Key Operator Data Setting 14 25 9 Weekly Timer 14 26 How to Access the Weekly Timer Setting Mode 14 27 1 Weekly Timer On Off Setting 14 28 2 Timer Setting 14 29 3...

Страница 10: ...ting 14 48 19 Non Image Area Erase Setting 14 50 20 AE Adjustment 14 51 21 Execute Adjustment Operation 14 52 22 Magnification Adjustment 14 53 23 Timing Adjustment 14 54 24 Centring Adjustment 14 56 25 Printer Gamma Sensor Adjustment 14 57 Index Section 14 Key Operator Mode continued ...

Страница 11: ...lly resets to auto mode defaults after a specified period of copier inactivity Auto Shut Off Automatically shuts off the main power after a specified period of copier inactivity Booklet Creates a multiple page signature booklet copied on both sides of paper in 1a2 or 2a2 copy mode Chapter Starts chapter pages on the right side front pages of the finished document Only duplex mode 1a2 is compatible...

Страница 12: ... image loss reduce shift amount from 0 250 mm in 1 mm increments Interrupt Copying Interrupts copying in progress to perform an urgent copy using any of the copier features for the interrupt job Job Memory Programs up to 30 jobs and recalls each job by job number as needed All compatible platen glass functions can be programmed into Job Memory directly after they are selected Job Status Displays t...

Страница 13: ...XT PHOTO mode text image in TEXT mode coloured image with small text in MAP mode Original Type Improves the image quality by specifying the printed original type Output Mode for Machine with FN 120 FN 9 Finisher Installed Non Sort Sort Staple Sort and Group modes using the primary main tray Non Sort Face Down exit Non Sort Face Up exit Group Face Down exit and Group Face Up exit modes using the se...

Страница 14: ... touching PROOF COPY on the Check Screen Punch Mode for FN 120 FN 9 Finisher with PK 5 Punch Kit Installed Punches four holes in output copies Repeat Selects the horizontal image area across the page and repeats it down the page as many times as the repeat width setting 10 150 mm permits in manual or auto Reserve Scans in subsequent copy jobs while the CF5001 is busy printing or copying Reverse Im...

Страница 15: ...d on the same part of the tabbed copy paper Three Fold Mode for Machine with FN 9 Finisher Installed Folds A4 or 8 5 x11 R output copies in three Trimming Mode for FN 9 Finisher with TMG 3 Trimming Unit Installed Trim the end of folded or stitched folded booklets Weekly Timer Can be set according to the needs of each work environment Turns main body power Off On daily or weekly during lunch time o...

Страница 16: ...tock certificates Legal Documents Food stamps Postage stamps canceled or uncanceled Checks or drafts drawn by government agencies Internal revenue stamps canceled or uncanceled Passports Immigration papers Motor vehicle licenses and titles House and property titles and deeds General Identification cards badges or insignias Copyrighted works without permission of the copyright owner You are prohibi...

Страница 17: ...Basic ...

Страница 18: ......

Страница 19: ...1 Section 1 Safety Information Precautions for Installation and Use Caution Labels and Indicators 1 2 Requirements for Safe Use 1 6 Regulations 1 13 ...

Страница 20: ...élevée ATTENTION Temperatura alta Temperatura alta PRECAUCION Alta temperatura CUIDADO CAUTION ATTENTION PRECAUCION CUIDADO Heisse Oberfläche Alta temperatura ATTENZIONE PRECAUCION VORSICHT ATTENTION CAUTION ATTENZIONE ATTENTION CAUTION VORSICHT PRECAUCION The fixing unit is very hot To avoid getting burned DO NOT TOUCH DO NOT put your hand between the main body and developing fixing unit otherwis...

Страница 21: ...ay ignite and cause a dangerous situation To avoid any unexpected injury DO NOT put your hand into the holes 3 places on the bottom plate of the LCT DO NOT INSERT your finger into the two RADF hinge portions otherwise you may be injured Rear side of the RADF Inside of the LCT Right rear side of the Main body CAUTION WARNING CAUTION ...

Страница 22: ...our hand into it otherwise you may be injured Finisher with Cover inserter To avoid injury DO NOT put your hand on top of the printed sheets Be sure to hold both sides of the printed sheets when removing them and DO NOT leave your hand on the printed sheets while the primary main tray goes up DO NOT insert your finger into the bottom of the upper part of the feeder when returning to its original p...

Страница 23: ...or replacement labels The following indicators are used on the caution labels or in this manual to categorize the level of safety cautions DANGER Action highly liable to cause death or serious injury WARNING Action liable to cause death or serious injury CAUTION Action liable to cause minor injury machine trouble or physical damage If you find any of these indicators when removing jammed paper add...

Страница 24: ...n the socket even after it has been positively inserted disconnect the plug and contact your electrical contractor For plug cable equipment the socket outlet shall be installed near the equipment and shall be easily accessible Do not bend or crush the power cord If your copier power cord is bent or damaged in any way contact your service representative immediately Do not attempt to repair it yours...

Страница 25: ...ION Ventilation Keep the installation place well ventilated Keep away from dust or corrosive gases These materials may cause poor image quality During the use of machine the machine generates ozone in an insufficient amount to cause any hazard to the human body However if the machine is used in a poorly ventilated room many copies are made or more than one copier is used at the same time an odor m...

Страница 26: ...ine to let hot air out from the rear fan 760 315 1275 1591 1591 1475 200 1021 1021 570 100 100 889 120 950 1959 470 CF5001 OC 2 Front CF5001 OC 2 Right side Unit mm Unit mm 760 656 100 410 1701 1901 85 760 315 1275 1619 1619 1619 1475 200 200 1021 1021 1021 158 440 440 100 100 889 120 950 1959 499 CF5001 AFR 20 Front Unit mm Unit mm CF5001 AFR 20 Right side CF5001 AFR 20 FN 120 Front Unit mm 100 1...

Страница 27: ...e left side of the finisher as any interference may cause damage to the finisher 760 656 949 410 1280 3162 3462 85 712 150 150 760 656 100 100 410 600 2213 889 120 950 1619 1619 1619 2413 1959 85 712 1021 1021 1021 158 440 440 499 450 CF5001 AFR 20 FN 9 Cover Inserter D C 208 Front CF5001 AFR 20 C 208 Right Side CF5001 AFR 20 FN 9 Cover Inserter D C 208 FN 120 FN 9 TMG Kit A TMG 3 Front Unit mm Un...

Страница 28: ...e manual Do not touch the inside of the machine for any other purpose than removing jammed paper or adding toner If machine repair is necessary be sure to contact your service representative Never attempt to repair it by yourself If any abnormal sound smell or smoke comes from the machine immediately stop using it turn off the power switch disconnect the power plug and contact your service represe...

Страница 29: ...wn into a fire the toner may ignite and cause a dangerous situation CAUTION Paper Check paper to be sure it conforms to the specifications outlined in Section 12 Do not use paper with staples or paper that conducts electricity silver carbon etc otherwise an accident may occur as a result of fire To avoid machine trouble do not use heat sensitive paper coloured transparency or paper specifically de...

Страница 30: ...re to remove the copies from the exit tray before the maximum capacity is reached Failure to do so will cause the copier to jam CAUTION FN 120 FN 9 Finisher Paper Capacity The FN 120 Finisher is equipped with two exit trays and FN 9 Finisher is equipped with three exit trays Select an exit tray and output mode on the Output Mode popup menu To prevent paper misfeed do not exceed the paper capacity ...

Страница 31: ...hine which operates by means of a laser There is no possibility of danger from the laser provided the machine is operated according to the instructions in this manual Since radiation emitted by the laser is completely confined within protective housing the laser beam cannot escape from the machine during any phase of user operation This machine is certified as a Class 1 laser product This means th...

Страница 32: ... 660 nm This product employs a Class IIIb Laser Diode that emits an invisible laser beam The Laser Diode and Scanning Polygon Mirror are incorporated in the print head unit The print head unit is NOT A FIELD SERVICE ITEM Therefore the print head unit should not be opened under any circumstances x 4 ...

Страница 33: ...n the United States This is a semiconductor laser The maximum power of the laser diode is 7 mW and the wavelength is 645 660 nm For European Users This is a semiconductor laser The maximum power of the laser diode is 7 mW and the wavelength is 645 660 nm For Denmark Users Dansk Dette er en halvlederlaser Laserdiodens højeste styrke er 7 mW og bølgelængden er 645 660 nm CAUTION Use of controls adju...

Страница 34: ...ulla tavalla saattaa altistaa käyttäjän turvallisuusluokan 1 ylittävälle näkymättömälle lasersäteilylle VARNING Om apparaten används på annat sätt än i denna bruksanvisning specificerats kan användaren utsättas för osynlig laserstrålning som överskrider gränsen för laserklass 1 VARO Avattaessa ja suojalukitus ohitettaessa olet alttiina näkymättömälle lasersäteilylle Älä katso säteeseen VARNING Osy...

Страница 35: ... the outside of the machine as shown below CLASS 1 LASER PRODUCT APPAREIL A RAYONNEMENT LASER DE CLASSE 1 LASER KLASSE 1 PRODUKT KONICA MINOLTA BUSINESS TECHNOLOGIES INC 1 6 1 Marunouchi Chiyoda ku Tokyo Japan MANUFACTURED KHK THIS PRODUCT COMPLIES WITH 21 CFR CHAPTER I SUBCHAPTER J ...

Страница 36: ... the room well ventilated REMARQUE Placer l appareil dans une pièce largement ventilée Une quantité d ozone négligable est dégagée pendant le fonctionnement de l appareil quand celui ci est utilisé normalement Cependant une odeur désagréable peut être ressentie dans les pièces dont l aération est insuffisante et lorsque une utilisation prolongée de l appareil est effectuée Pour avoir la certitude ...

Страница 37: ...2 Section 2 Machine Information Machine Configuration Turning On the Power and Loading Paper Machine Configuration 2 2 Turning On the Power Switch 2 16 Loading Paper 2 22 ...

Страница 38: ...ion 11 Tray 2 12 Tray 1 13 Front door 2 OC 2 Original cover option 4 Key counter option 14 FN 120 Finisher option 15 FN 9 Finisher option 16 Trimming kit A option 17 TMG 3 Trimming unit option 18 Cover inserter D option 19 Power switch 20 LCD Touch screen 21 Control panel 5 Toner access door 9 Right side door 6 Toner recovery box 7 Multi sheet bypass tray ...

Страница 39: ...ow removal of mishandled paper 10 Tray 3 universal tray is user adjustable and holds 500 sheets 90 g m2 paper from 13 x19 to A5R 11 Tray 2 universal tray is user adjustable and holds 500 sheets 90 g m2 paper from 13 x19 to A5R 12 Tray 1 universal tray is user adjustable and holds 500 sheets 90 g m2 paper from 13 x19 to A5R 13 Front door opens to allow removal of mishandled paper 14 FN 120 Finisher...

Страница 40: ...Fixing unit fuses the toner onto the copy paper 3 Main power switch used only by service representative turns machine power on off when pressed 4 Total counter indicates the total number of prints made 5 Black print counter indicates the total number of the black prints made 1 Lever A 2 Fixing unit 3 Main power switch 4 Total counter 5 Black print counter ...

Страница 41: ... unit HDD 7 Hard disk drive Printer controller Fiery S300 50C K Cover inserter D PK 5 Punch kit OC 2 Original cover AFR 20 Duplexing document feeder Key counter Work table FN 120 Finisher FN 9 Finisher CF5001 main body TMG 3 Trimming unit C 208 Large capacity cassette TMG kit A ...

Страница 42: ...e to scanner 8 COPY switches the machine operation mode to copy 9 TIMER lights when the timer function is set 10 INTERRUPT stops copying in progress to allow copying from the platen glass 11 POWER SAVER ON OFF activates power saving mode for times when the copier is inactive or activates Timer Interrupt mode when Weekly Timer function is active 12 STOP stops the copying sequence deletes the stored...

Страница 43: ...cts on the glass or put excess weight or pressure on it otherwise the glass may be scratched or break to cause injury When the Call for Service Screen p 5 2 is displayed be sure to contact your service representative immediately The control panel of this machine can be slightly lowered to three angled positions to ensure easy access by anyone regardless of the physical or positional status of the ...

Страница 44: ...3 Graphic icons Original direction icon indicates the original direction specified on the Special Original popup menu Image adjust icon indicates the enhance mode specified on the Special Original popup menu Rotation icon is displayed when Rotation automatically functions Toner recovery box icon is displayed when replacement of the toner recovery box is due PM icon is displayed when preventive mai...

Страница 45: ...ancel printing a reserve job 11 IMAGE ADJUST key is touched to display five sorts of the Image Adjustment Setting Screens to adjust the image quality 12 SPECIAL ORIGINAL key is touched to specify the condition of originals to be scanned 13 APPLICATION key is touched to select various application functions 14 ROTATION OFF key is touched to release the Rotation function 15 STORE key is touched to st...

Страница 46: ...only holds sets output in Fold mode Stapling Fold mode or Three fold mode 3 Primary Main tray holds sets output in Non sort mode Sort mode offset Staple sort mode or Group mode offset 4 Secondary Sub tray holds sets output in Sort mode or Group mode with face down up mode 1 Finisher door 1 Finisher door 2 Booklet tray FN 9 Finisher only 3 Primary Main tray 3 Primary Main tray 4 Secondary Sub tray ...

Страница 47: ...lds or stitches folds copies into booklet styled sets and also folds max 3 copies in three 9 Waste basket option holds waste paper punched out 10 Stacker unit handle withdraws unit to allow removal of mishandled paper and replacement of staple cartridge 11 Cartridge housing holds staple cartridge to be replaced when supplying staples 1 Entrance lever 1 Entrance lever 2 PK 5 Punch kit option 3 Cove...

Страница 48: ...y guide plates hold cover sheets to fix the position 4 Upper tray holds cover sheets for use in cover sheet output mode 5 Lower tray holds cover sheets for use in cover sheet output mode or a copied set in manual stapling punching three fold mode 6 Lower tray guide plates hold cover sheets to fix the position 1 Cover inserter control panel 3 Upper tray guide plates 4 Upper tray 5 Lower tray 6 Lowe...

Страница 49: ...he copy paper to the main body 6 LCT paper guides hold copy paper to fix the position 7 LCT paper guide knobs can be turned to move or fix the LCT paper guide 8 Rear stopper fixes the rear end of copy paper 9 Rear stopper knobs can be turned to move or fix the rear stopper 10 LCT bottom plate goes up automatically when paper supply becomes low and goes down when the paper loading button is pressed...

Страница 50: ... delivered 5 Trimmer stacker cover opens to allow you to take out the finished sets 6 TMG kit A connects the Finisher and Trimming unit 7 FN 9 Finisher allows the Trimming unit to be installed DO NOT place heavy objects on the trimmer stacker or apply any weight on it and DO NOT use it for storage Excessive weight applied to the inside or outside of the trimmer stacker will damage the equipment 5 ...

Страница 51: ...nob can be turned to ease removal of mishandled paper 2 Waste basket holds waste paper cut off from the booklets 3 Trimmer pressure release lever opens to allow removal of mishandled paper 2 Wast basket 1 Trimmer unit knob 3 Trimmer pressure release lever ...

Страница 52: ...main power switch is located on the upper left side of the internal main body Be sure not to use the main power switch in usual operation 2 The Wake up Screen and Warm up Screens will be displayed A few seconds after the Wake up Screen appears in the LCD touch screen seven types of Warm up Screens will be displayed in succession for approx 7 0 minutes ...

Страница 53: ...een See p 3 11 to p 3 12 3 The Basic Screen will be displayed The message on the Basic Screen will inform you that copying job is now available When the initial settings are changed by the Key Operator the modified conditions will be displayed on the Basic Screen When Enter E K C password is displayed enter your password to use the machine When Set the key counter is displayed insert the key count...

Страница 54: ... switch is located on the left side of the control panel The touch screen and all the LEDs on the control panel will go out Be sure not to use the main power switch in usual operation When the machine is under control of the Weekly Timer function turning off the power switch will deactivate the function ...

Страница 55: ...s If the Auto Shut Off function activates at the same time the power will be turned off without the LCD screen becoming dark The LCD screen will not go off during a duplex copying job or when the Jam Position Screen is displayed Shutting Off Automatically Auto Shut Off This function automatically shuts off the power after a specified period initially 90 minutes of copier inactivity To start a copy...

Страница 56: ...the machine automatically activates the Low Power mode before releasing POWER SAVER ON OFF 2 The Shut Off mode will be activated The POWER SAVER ON OFF LED will be lit and all other LEDs and the LCD screen will be turned off Be sure to press POWER SAVER ON OFF for one second or longer otherwise the following message will be displayed and the Shut Off Low Power mode will not be activated To release...

Страница 57: ...see p 14 12 to p 14 19 1 Enter EKC password Enter your 8 digit EKC password using the keypad To set an EKC password see p 14 14 to p 14 16 If an invalid EKC password is entered continue by entering the correct password 2 Press START Your current copy count and copy limit will be displayed for 3 sec 3 Start a copying job When the message changes to Ready to copy copying job is available on the mach...

Страница 58: ...y key displays a paper type and a number which indicates the paper weight to be loaded The following paper types are provided Normal Recycled Coloured High Q Coated Colour sp Tab paper Exclusive A to D The numbers corresponding to the paper weight are 1 64 74 g m2 2 75 80 g m2 3 81 105 g m2 4 106 162 g m2 5 163 209 g m2 6 210 256 g m2 for LCT and Multi sheet bypass tray only Key Operator can chang...

Страница 59: ...y not open or machine trouble may be caused To load the same size as loaded before proceed to step 4 If changing the paper size proceed to the next step 2 Adjust the position of the side guide plate Pull up the lock lever at the front then slide the side guide plate to the desired position See the size indication on the bottom plate of the tray to determine the position of the side guide plate Pus...

Страница 60: ...hold the rear stopper at the lower part to slide it to the left Be sure to press down the rear stopper when moving it to the right and also be sure to hold it at the lower part when moving it to the left Do not move the rear stopper forcibly otherwise it may be damaged 4 Place paper on the tray Load paper aligning it to the right side of the tray then align the rear stopper to the paper Be sure th...

Страница 61: ...hen paper is seated properly close the paper feed roller 6 Gently push in the tray until it locks into place The indicator on the tray key will change to Do not clam the tray into the main body otherwise machine trouble may be caused ...

Страница 62: ... paper and adjust the paper guides to the paper size Stack paper up to 250 sheets 90 g m2 When loading special paper do not exceed the limit indicated on the paper guides otherwise paper misfeed may occur Do not load paper of the weight less than 64 g m2 otherwise paper misfeed may occur The OHP film or ink jet paper is not available on this machine Do not load the transparency film or ink jet pap...

Страница 63: ...plate will go up Without the power turned on the LCT bottom plate will not function Be sure to turn on the power switch before loading paper in the LCT To load the same size as loaded before proceed to step 3 If changing the paper size proceed to the next step 2 Adjust the position of the LCT paper guides and rear stopper 1 Turn the four LCT paper guide knobs and two rear stopper knobs countercloc...

Страница 64: ...T paper guide knobs two for each clockwise to fix the guides 3 Move the position of the rear stopper to the appropriate positions according to the size indication on the bottom plate then turn the two rear stopper knobs clockwise to fix the rear stopper 3 Press the paper loading button once then load the paper into the LCT The LCT bottom plate will go down ...

Страница 65: ...e bottom plate will not go down any more Do not load above the limit indicated on the LCT paper guides Be sure that the rear stopper is correctly positioned according to the paper size to be loaded otherwise machine trouble may occur 5 Close the LCT top door ...

Страница 66: ...ve 4 Move the green levers located at the front and the left side to the edge of the paper 5 Close the paper feed roller then push in the tray until it locks into place 3 FINISHED SETS ONE FINISHED SET Example 9 Tabbed sheets loaded in position for 3 finished sets Example 3 Tabbed sheets loaded in position for one finished set Section 3 Management 3rd TAB 2nd TAB 1st TAB Printed side Section 1 Int...

Страница 67: ...ets into the LCT as illustrated above 4 Close the LCT top door Section 1 Introduction Section 1 Introduction Section 1 Introduction Section 1 Introduction Section 1 Introduction Section 1 Introduction Section 1 Introduction Section 1 Introduction ONE FINISHED SET THREE FINISHED SETS Example 3 Tabbed sheets loaded in position for one finished set Example 9 Tabbed sheets loaded in position for 3 fin...

Страница 68: ... to p 3 21 for specifying the paper type of the Multi sheet bypass tray 3 FINISHED SETS ONE FINISHED SET Example 9 Tabbed sheets loaded in position for 3 finished sets Example 3 Tabbed sheets loaded in position for one finished set Section 1 Introduction 3rd TAB 2nd TAB 1st TAB Printed side Section 1 Introduction Section 1 Introduction Section 1 Introduction 1st TAB 2nd TAB 3rd TAB 2nd TAB 3rd TAB...

Страница 69: ...ial Paper Multi Sheet Bypass Tray 3 18 Selecting Magnification Ratio Lens Mode 3 22 Making Double Sided Copies 1a2 2a2 3 25 Making Single Sided Copies from Double Sided Originals 2a1 3 31 To Scan Originals into Memory Store Mode 3 33 To Set Next Copying Job Reserve 3 35 To Check Control Jobs in Progress Job Status Screen 3 38 Output Mode for Machine without Finisher 3 41 Output Mode for Machine wi...

Страница 70: ...tible with AUTO Tab Paper Fold Stitch Fold Trimming with Booklet selected Combination Booklet Overlay Overlay Memory Incompatible with FULL COLOUR Tab Paper Incompatible with SINGLE COLOUR Tab Paper The colour adjustment function is provided on this machine See Section 7 Colour Adjustment Some adjustments cannot be made in the BLACK mode and SINGLE COLOUR mode Incompatible with BLACK Hue Saturatio...

Страница 71: ...uch OK The selected colour will be indicated under the COLOUR MODE indication of the Basic Screen with the SINGLE COLOUR key highlighted Touch CANCEL to restore the previous setting 2 Select additional copy conditions as desired If the colour adjustment is desired see Section 7 Colour Adjustment 3 Enter the desired print quantity from the control panel keypad See p 3 10 for details on setting prin...

Страница 72: ...n displayed at the upper left corner of the Basic Screen Up to 100 originals can be set at a time The copy result may not be satisfactory if the originals are set in wrong direction Be sure that the originals are set in the same direction as indicated by the Original direction icon especially when making double sided copies or using Staple Stitch Fold Fold or Booklet mode See p 9 2 to p 9 3 for de...

Страница 73: ...Positioning Originals continued 3 5 3 Adjust paper guides ...

Страница 74: ...eft rear side of the document feeder tray Place two sided originals with page one FACE UP Up to 100 originals can be set at a time Be sure not to use unsuitable RADF originals See p 12 9 for details Do not set more than 100 originals or over the limit indicated on the paper guides otherwise a paper misfeed will occur to cause damage to the originals Before placing originals in the tray be sure the...

Страница 75: ... FACE UP in the document feeder tray Place two sided originals with page one FACE UP Up to 100 originals can be set at a time Be sure not to use unsuitable RADF originals See p 12 9 for details Do not set more than 100 originals or over the limit indicated on the paper guides otherwise a paper misfeed will occur to cause damage to the originals Before placing originals in the tray be sure the docu...

Страница 76: ...on icon displayed at the upper left corner of the Basic Screen The copy result may not be satisfactory if the original is set in wrong direction Be sure that the original is set in the same direction as indicated by the Original direction icon especially when making double sided copies or using Staple Stitch Fold Fold or Booklet mode See p 9 2 to p 9 3 for details 3 Gently close the document feede...

Страница 77: ...tioning Originals continued 3 9 Do not place too heavy originals or do not press strongly when thick original is placed and is under pressure of RADF otherwise the glass may be broken and you may be injured ...

Страница 78: ...then outputs sorted sets 1 Enter the desired print quantity from the control panel keypad Entered quantity will be displayed on the touch panel To Change Print Quantity Follow the procedure below to change the print quantity that has been already entered 1 Press C CLEAR QTY The quantity displayed on the touch panel will return to 1 2 Enter the correct quantity Entered quantity will be displayed on...

Страница 79: ... screen seven types of Warm up Screens display in succession See p 2 16 to p 2 17 for details on turning on the power switch 2 Touch the LCD panel to change the Warm up Screen to the Basic Screen Check that the message Ready to copy reserve is displayed on the Basic Screen 3 Set the desired copying conditions and enter the print quantity See p 3 10 for details on setting print quantity 4 Position ...

Страница 80: ... to highlight it 7 Set the desired copying conditions enter the print quantity position original s then press START Up to 9 reserve jobs can be prepared Copying on the reserve job will start automatically after completing the warm up The Job Status Screen allows you to alter the output order of the reserve jobs or to delete the reserve job See p 3 38 p 3 40 If all three reserve job keys are used t...

Страница 81: ... 2 Press STOP The current machine operation of the selected job will be suspended If wrong job is suspended touch CONTINUE on the popup menu immediately select the correct job then press STOP to suspend it 3 Touch EXIT to cancel the job All the data of the selected job will be deleted To restart the suspended job touch CONTINUE on the popup menu ...

Страница 82: ... highlight APS under the PAPER SIZE on the Basic Screen 2 Select additional copy conditions as desired 3 Enter the desired print quantity from the control panel keypad See p 3 10 for details on setting print quantity 4 Position original s See p 12 9 to p 12 11 for the original sizes detectable from the RADF or on the platen glass Detectable original sizes can be changed from AB sizes to inch sizes...

Страница 83: ... 578 0 579 0 612 0 613 0 707 0 708 0 816 0 817 0 866 0 867 1 000 1 001 1 154 1 155 1 156 1 157 1 224 1 225 1 414 1 415 1 634 1 635 1 731 1 732 2 000 2 001 4 000 0 250 0 433 0 434 0 500 0 501 0 578 0 579 0 612 0 613 0 707 0 708 0 816 0 817 0 866 0 867 1 000 1 001 1 154 1 155 1 156 1 157 1 224 1 225 1 414 1 415 1 634 1 635 1 731 1 732 2 000 2 001 4 000 Paper size Paper size Magnification Magnificati...

Страница 84: ...to select the desired paper size Selected tray key will be highlighted and under the LENS MODE the AMS key will also be highlighted If copying in 1 000 100 magnification mode and specifying a paper size see p 3 22 2 Select additional copy conditions as desired 3 Enter the desired print quantity from the control panel keypad See p 3 10 for details on setting print quantity 4 Position original s See...

Страница 85: ...00 0 612 0 433 0 498 0 352 0 431 B4 1 154 1 000 0 816 0 577 0 706 0 500 0 576 0 407 0 498 A4R 1 414 1 224 1 000 0 707 0 865 0 613 0 705 0 498 0 610 A4 1 000 0 865 0 707 1 000 0 613 0 865 0 498 0 705 0 431 B5R 1 632 1 412 1 154 0 817 1 000 0 708 0 813 0 576 0 703 B5 1 156 1 000 0 817 1 154 0 708 1 000 0 576 0 813 0 498 A5R 2 000 1 733 1 414 1 000 1 224 0 867 1 000 0 705 0 865 A5 1 414 1 224 1 000 1...

Страница 86: ... can be used in the Multi sheet bypass tray To specify the combinations of special paper type and weight to be selected for the Multi sheet bypass tray see p 14 23 To specify the special paper type weight and size in Tray 1 to 4 to be used on a regular basis see p 14 21 to p 14 22 1 Open the Multi sheet bypass tray and load the copy paper See p 2 26 for further details of loading procedure For the...

Страница 87: ... Paper as the special paper type to copy onto the tabbed paper including the tab part specify the original paper type as Tab Paper on the Special Original popup menu See p 9 4 to p 9 5 If no paper type and weight indication is needed touch the highlighted key to clear the selection of the six keys The selected paper type and number indicating the paper weight will appear on the bypass tray key of ...

Страница 88: ... popup menu then use arrow keys to scroll to the desired size To select the Non STD size Touch Non STD size to display the popup menu touch the vertical or horizontal size key to highlight it then use the keypad on the popup menu to enter the vertical horizontal size or use arrows to scroll to that number To select the Wide size paper ...

Страница 89: ...cify the actual size of the wide size paper to be loaded Wide paper size information is not initially input in this machine 6 Touch OK The Basic Screen will be restored The bypass tray key shows the specified size paper type and the number indicating paper weight and is highlighted along with the TYPE SIZE key When the STD size special or Wide size paper is selected the size specified on the popup...

Страница 90: ...ss AUTO RESET The initial settings are restored Check that APS is highlighted to indicate that the 1 000 magnification is selected The initial settings may be altered by the Key Operator See p 14 10 2 Select additional copy conditions as desired Specifying paper size will release 1 000 magnification and set AMS automatically In this case touch 1 1 to highlight it again 3 Enter the desired print qu...

Страница 91: ...om Mode Incompatible Conditions AMS Repeat mode in Repeat Reduce Shift in Image Shift See p 8 5 to p 8 7 for Vertical Horizontal Zoom mode 1 Touch ZOOM on the Basic Screen The popup menu for changing magnification ratio will be displayed When starting a new copying job be sure to close the RADF securely then press AUTO RESET 2 Specify the desired magnification ratio To select a preset or user pres...

Страница 92: ...digit number Start with 0 if the magnification ratio is under 1 000 If an incorrect ratio is entered continue by entering the correct ratio Use the upper arrow c to enlarge or the lower arrow d to reduce the ratio in 0 1 0 001 increments To restore the previous setting touch CANCEL 3 Select additional copy conditions as desired 4 Enter the desired print quantity from the control panel keypad See p...

Страница 93: ...for the information on unsuitable RADF originals Incompatible Conditions Face Up Multi Page Enlargement Non Image Area Erase Verti Horiz mode or Auto mode of Repeat AUTO Layout Storing Image in Overlay Memory 1 Touch 1a2 or 2a2 on the Basic Screen to highlight it When starting a new copying job be sure to close the RADF securely then press AUTO RESET Double sided original Duplex copy Duplex copy S...

Страница 94: ...n to display the Special Original popup menu then touch the desired original direction key to highlight it Touch OK to return to the Basic Screen 3 Select the binding mode Touch OUTPUT MENU on the Basic Screen to display the Output Mode popup menu then touch the desired binding mode key to highlight it Selecting TOP BIND will make copies upside down on the reverse side while RIGHT LEFT BIND copies...

Страница 95: ...antity 6 Position originals FACE UP in the document feeder according to the original direction See p 3 4 to p 3 7 for details on positioning originals Use RADF store mode p 3 33 to p 3 34 when the original count exceeds 100 7 Press START The machine starts to scan originals then prints duplex copies when ready for output Press STOP to suspend the scanning or printing job See p 3 13 for details Whe...

Страница 96: ...Enlargement Storing Image in Overlay Memory 1 Check the original set direction The Original direction icon is located at the upper left corner of the Basic Screen To change the original set direction touch SPECIAL ORIGINAL on the Basic Screen to display the Special Original popup menu then touch the desired original direction key to highlight it Touch OK to return to the Basic Screen 2 Select the ...

Страница 97: ... 9 for paper sizes detectable on the platen glass See p 3 8 for details on positioning originals Use Non Image Area Erase to prevent the black copy marks to be produced when scanning the original with the document feeder or original cover open See p 10 30 to p 10 31 4 Touch 1a2 on the Basic Screen to highlight it The STORE key will be automatically highlighted on the screen DO NOT press AUTO RESET...

Страница 98: ...on the platen glass with the back side image original then press START Repeat this step until all originals are scanned Memory indicator on the upper right of the Basic Screen allows you to check the remaining memory To delete the scanned data without printing press STOP See p 3 13 for details 9 After all originals are scanned touch STORE to exit the Store mode STORE will no longer be highlighted ...

Страница 99: ...ut Storing Image in Overlay Memory 1 Touch 2a1 on the Basic Screen to highlight it When starting a new copying job be sure to close the RADF securely then press AUTO RESET 2 Select additional copy conditions as desired 3 Enter the desired print quantity from the control panel keypad See p 3 10 for details on setting print quantity 4 Position originals FACE UP in the document feeder See p 3 4 to p ...

Страница 100: ...can originals then prints simplex copies when ready for output Press STOP to suspend the scanning or printing job See p 3 13 for details When the finisher trimmer unit paper exit tray capacity is exceeded due to the print quantity selected remove the copied sets as they exit otherwise mishandled paper will occur ...

Страница 101: ...store mode Specification for Store Mode Incompatible with RADF store mode Image Insert Storing image in Overlay Memory 1 Make copying selections as desired When starting a new copying job be sure to close the RADF securely then press AUTO RESET 2 Touch STORE on the Basic Screen to highlight it 3 Enter the desired print quantity from the control panel keypad See p 3 10 for details on setting print ...

Страница 102: ...e p 9 2 to p 9 3 for details See p 3 4 to p 3 9 for details on positioning originals 5 Press START to scan Repeat steps 4 and 5 until all originals are scanned Memory indicator on the upper right of the Basic Screen allows you to check the remaining memory To delete the scanned data without printing press STOP See p 3 13 for details See p 5 9 to p 5 10 if memory overflow occurs Should memory overf...

Страница 103: ...patible Conditions Interrupt copying Scanning in Store mode Proof copy Storing image in Overlay Memory 1 Press START to start scanning printing for the current job FREE JOB will become active to show that the reserve job setting is now available 2 Touch FREE JOB to highlight it The Reserve Job Setting Screen will be displayed On the Reserve Job Setting Screen all keys on the LCD and control panel ...

Страница 104: ...en See p 3 38 to p 3 40 for details 5 Press START to start scanning for the reserve job Up to 10 jobs current job included can be set When setting more than one reserve job the next reserve job setting will be available after the copier starts to scan for the previous reserve job To set the fourth copying job touch the active FREE JOB key at the far right to scroll to the next reserve setting scre...

Страница 105: ...ill be restored To scroll to the next previous screen touch the arrow keys displayed at the right side of the folder keys When trouble occurs on a reserve job which is not currently displayed on the screen the arrow key to scroll to that job will blink See p 5 6 to p 5 8 6 Copying of the reserve job will start automatically after completing the current job When the finisher trimmer unit paper exit...

Страница 106: ...d Check the current status of the machine See p 3 40 for details of the screen 2 Perform the desired setting on the screen To change the order of reserve job Touch to highlight the desired reserve job key then touch JOB PRIORITY The highlighted reserve job is advanced by one in printing order unless the job preceding the selected one is already in progress If more than six jobs are entered use the...

Страница 107: ...IST to display the Previous Job List Screen Touch to scroll to the next page Up to 16 previous jobs 4 pages can be displayed Touch to return to the previous page Touch OK to return to the Job Status Screen To display noncomplete job list Touch NONCOMPLETE JOB LIST to display the Noncomplete Job List Screen Touch to scroll to the next page Up to 16 noncomplete jobs 4 pages can be displayed Touch to...

Страница 108: ... PRINTING Printing in each mode NO PAPER No paper in copy print mode STOP Stop in each mode RESERVE Ready to reserve JAM Jam in each mode TOTAL PAGE s Displays the number of scanned pages for each job 0 to 9999 PAGE s TO GO Displays the remaining copy count of the job 0 to 9999 The number exceeding 9999 will be displayed as 9999 Copy count No of scanned pages x Print quantity MINUTE s TO GO Displa...

Страница 109: ...rientation e g A4 and A4R 3 Group mode copies each original page in amounts determined by the print quantity setting then outputs grouped sets normally 4 Rotation group mode rotates every other grouped set by 90 upon exit provided the same paper size is loaded in two trays one tray with paper loaded in portrait orientation and the other tray with paper loaded in landscape orientation e g A4 and A4...

Страница 110: ...on Booklet Repeat AUTO Layout Non Image Area Erase 1 Load copy paper When using Rotation sort or Rotation group mode load the same paper size into two trays in different orientation Do not release the Rotation function When starting a new copying job be sure to close the RADF securely then press AUTO RESET 2 Select the desired output mode To select Face down non sort mode Confirm that OUTPUT MENU ...

Страница 111: ... additional copy conditions as desired 5 Enter the desired print quantity from the control panel keypad The exit tray capacity is 120 sheets Be sure that the capacity is not exceeded See p 3 10 for details on setting print quantity 6 Position original s FACE UP in the document feeder or FACE DOWN on the platen glass See p 3 4 to p 3 9 for details on positioning originals 7 Press START Press STOP t...

Страница 112: ...Output Mode for Machine without Finisher continued 3 44 Output Icons on the Basic Screen Non sort Rotation sort Group Rotation group Non sort Rotation sort Group Rotation group Face Down Face Up ...

Страница 113: ...he original set having each sorted set offset by 30mm upon exit 3 Staple mode offsets and staples each sorted set Up to 50 sheets or within 5mm thick can be stapled 4 Group mode groups together multiple copies of each original and offsets the sets by 30mm upon exit Using Face up mode in combination with the above four modes simplex copies exit face up on the exit tray 4 1 2 3 4 3 2 1 4 3 2 1 4 3 2...

Страница 114: ...hange the output mode as desired See Section 8 for the output modes using Finisher options Specification for Output Modes with Finisher Incompatible with Sort mode Using platen glass unless Image Insert Dual Page or Platen store mode is used Fold Stitch Fold Three Fold Trimming Incompatible with Staple mode Using platen glass unless Image Insert Dual Page or Platen store mode is used Fold Stitch F...

Страница 115: ... proceed to the next step To set Staple mode proceed to step 4 To set output to the Secondary sub tray proceed to step 5 3 Touch OUTPUT MENU to display the Output Mode popup menu then touch MAIN TRAY to highlight it To select Non sort mode deselect all the keys in the OUTPUT MAIN TRAY area To select Sort mode touch SORT to highlight it To select Group mode touch GROUP to highlight it To select Fac...

Страница 116: ...d to step 3 if the present setting is desired 2 Touch OUTPUT MENU on the Basic Screen to display the Output Mode popup menu touch the desired staple position key then touch OK The Basic Screen will be restored with the selected staple position icon displayed When making double sided copies select the desired binding mode on the Output Mode popup menu See p 3 52 for details of the binding mode 3 1 ...

Страница 117: ...t it To select Face down non sort mode deselect both FACE UP and GROUP To select Face up non sort mode touch FACE UP to highlight it To select Face down group mode touch GROUP to highlight it To select Face up group mode touch FACE UP and GROUP to highlight them Touch OK to restore the Basic Screen OUTPUT MENU will be highlighted and the output icon of the selected output mode will be displayed in...

Страница 118: ...9 gradually goes down while printed materials output DO NOT allow any object to interfere with the operation of the tray on the left side of the finisher as any interference may cause damage to the finisher When the finisher exit tray capacity is exceeded due to the print quantity selected remove the copied sets as they exit otherwise mishandled paper will occur Output Icons on the Basic Screen No...

Страница 119: ...Mode for Machine with Finisher continued 3 51 Left 1 posi Right 1 posi Left 2 posi Up 2 posi Primary Main tray Staple Sort Non sort Group Non sort Group Secondary Sub tray Face down Secondary Sub tray Face up ...

Страница 120: ...tain the desired copy result Right Left bind Normal duplex copies Top bind Duplex copies arranged upside down on the reverse side 1 Touch OUTPUT MENU to display the Output Mode popup menu 2 Touch to highlight the desired binding mode key 3 Touch OK to return to the Basic Screen 3 1 2 3 1 2 1 2 3 1 2 3 Copies Binding mode ...

Страница 121: ... Copy 4 2 Checking Feature Selections Proof Copying Check Mode 4 4 Interrupt Copying 4 8 Storing Job Conditions Job Memory Job Store 4 11 Recalling Stored Job Settings Job Memory Job Recall 4 14 Recalling Previous Job Settings 4 15 Displaying Screen for Operation Guide Help Mode 4 16 ...

Страница 122: ...e for multiple originals Proof copy is not compatible with Group or Rotation group output mode 1 Select the desired copy conditions and enter the desired print quantity When starting a new copying job be sure to close the RADF securely then press AUTO RESET 2 Position original s See p 3 4 to p 3 9 for details on positioning originals 3 Press PROOF COPY on the control panel A sample copy will be ou...

Страница 123: ...ntity as required Proof copy can be performed as needed until the print quantity amount on the Basic Screen reaches zero If required change the print quantity on the Basic Screen 6 Press START If the print quantity is not changed the copier will output the rest minus the sample sets When the finisher trimmer unit paper exit tray capacity is exceeded due to the print quantity selected remove the co...

Страница 124: ... using Store mode Booklet Sheet Cover insertion Image insert Chapter Dual Page Combination Program job Specifications for Check Mode and Proof Copy Proof copy is available when using RADF or Platen store mode for multiple originals Proof copy is unavailable with Group output mode 1 Select the desired copy conditions and enter the desired print quantity When starting a new copying job be sure to cl...

Страница 125: ...wn above Touching the upper arrow key will resume the previous screen Touch TrayConfirm to display the Tray Setting Check Screen Verify all the settings made for the current job If settings are OK proceed to step 8 If a sample copy is needed proceed to step 6 If making any setting change from the Check Screen proceed to the next step If releasing any setting from the Check Screen proceed to step 5...

Страница 126: ...ked on a subsequent screen selecting the application function key will jump to that screen See p 10 2 for details CHANGE SETTING will not function for the following application functions however they can be released by touching RELEASE SETTING Program Job Non Image Area Erase Reverse Image AUTO Layout Overlay Change the setting as desired then restore the Check Screen to return to the checking ste...

Страница 127: ...ng as required If the desired selection cannot be changed press STOP to delete all the data in memory then press AUTO RESET to restart the job setting 7 Change the print quantity as required Proof copy can be performed as needed until the print quantity amount on the Basic Screen reaches zero Note that the print quantity amount on the Check Screen does not change If required change the print quant...

Страница 128: ...ent machine operation for interrupt copying Note that the compatible copying conditions vary according to the timing selected See p 14 37 to p 14 42 Specification for Interrupt Mode The Interrupt mode cannot be selected with the following copier conditions The Basic Screen is not displayed Overlay Memory is in use The Call for Service message displays or a paper misfeed occurs Incompatible 2a1 2a2...

Страница 129: ...iginal s See p 3 4 to p 3 9 for details on positioning originals 4 Press START to start the interrupt copying When CHECK is pressed during Interrupt copying the information displayed reflects the initial copy job settings Check mode will not display Interrupt copy job information 5 When Interrupt copying is completed press INTERRUPT again The INTERRUPT LED turns out and the INTERRUPT indicator on ...

Страница 130: ...dy for the temporary job performed in Interrupt mode Scanning originals into memory The LED blinks until scanning is completed for all originals placed in the document feeder Then the LED remains steady for the temporary job performed in Interrupt mode Scanning originals into memory while printing in Reserve mode The LED blinks until the copier completes the current printing job scans all original...

Страница 131: ...or Job Memory All copying functions can be selected Interrupt mode cannot be used while in Job Memory 1 Make job selections from the Basic Screen and or Application Selection Screen When starting a new copying job be sure to close the RADF securely then press AUTO RESET 2 Press JOB MEMORY on the control panel The Job No Selection Screen will be displayed 3 Touch STORE The Job Store Check Screen wi...

Страница 132: ...e restored To suspend the storing job after step 6 press AUTO RESET Job Memory mode will be cancelled and the Basic Screen will return from any screen 6 Touch to highlight one of the keys numbered from 1 30 to store the job under that number The screen displays 15 job number keys The arrow key at the lower left corner can be used to scroll to the next previous page A blank key indicates that no jo...

Страница 133: ...ng the touch screen alphabet keypad To correct an entry touch 1 CHARACTER DELETE repeatedly to delete each character entered then enter the correct job name If you do not wish to enter a name simply touch OK The key displays 16 asterisks in place of a name When changing the name of a job previously stored touch 1 CHARACTER DELETE repeatedly to delete the previous name then enter the new name 9 Tou...

Страница 134: ... you want to recall The screen displays 15 job number keys If required scroll to the next page with the arrow key to reach the desired job number key 16 30 3 If desired touch JOB CHECK The Job Recall Check Screen displays to enable you to review the settings 4 Touch OK The settings of the selected job will be recalled on the restored Basic Screen To cancel the recall mode touch CANCEL to return to...

Страница 135: ...ed off then on 1 Press JOB MEMORY on the control panel The Job No Selection Screen will be displayed 2 Touch PRE JOB RECALL The JOB CHECK key will be displayed between STORE and PRE JOB RECALL on the screen 3 Touch JOB CHECK to display the Job Check Screen Check the settings of the previous output job 4 Touch OK to return to the Basic Screen The settings of the previous output job is recalled on t...

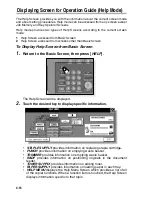
Страница 136: ...eturn to the Basic Screen then press HELP The Help Screen will be displayed 2 Touch the desired key to display specific information STAPLE SUPPLY provides information on replacing staple cartridge PUNCH provides information on emptying waste basket TRIMMER provides information on emptying waste basket RADF provides information on positioning originals in the document feeder TONER SUPPLY provides i...

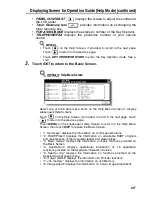
Страница 137: ...he Help Screen if provided to scroll to the next page Touch to return to the previous page Touch MENU on the subsequent Help Screen to return to the Help Menu Screen then touch EXIT to restore the Basic Screen 1 Hard keys displays the information on control panel buttons 2 RADF Platen displays the information on unsuitable RADF originals and maintenance of the document feeder and platen glass 3 Ba...

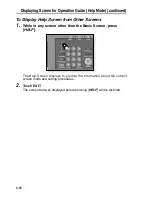
Страница 138: ...elp Screen from Other Screens 1 While in any screen other than the Basic Screen press HELP The Help Screen displays to provide the information about the current screen mode and setting procedures 2 Touch EXIT The screen that was displayed before pressing HELP will be restored ...

Страница 139: ...Is Displayed 5 2 Clearing Mishandled Paper 5 4 When JAM Appears on Folder Key Or Arrow Key Flashes 5 6 When ADD PAPER Appears on Folder Key Or Arrow Key Flashes 5 8 When Memory Full Message Is Displayed Memory Overflow 5 9 When Power OFF ON Screen Is Displayed 5 11 Troubleshooting Tips 5 12 ...

Страница 140: ...contact your service representative immediately by following the procedure below 1 Make note of the Report code No indicated in the second line of the message area If your machine uses the Remote Diagnostics option and is automatically monitored by your service representative the Key Operator can call for service using the Key Operator setting See p 14 44 After calling for service using the Key Op...

Страница 141: ...resentative Be sure to utilize the limited function only temporarily and arrange for machine repair immediately 1 If the limited use of the copier is available the following message is displayed in the message area instead of the Report code ex 2 Press AUTO RESET Make note of the Report code No 3 Turn OFF then ON the power switch A copying job can continue without using the troubled portion of the...

Страница 142: ... for the caution label locations inside the machine 2 Follow the procedure on the screen to remove misfed paper Touch on the screen if provided to go to the next page of a series of illustrations When removing mishandled paper be sure to leave no torn paper inside the machine 3 When completed the Basic Screen will be restored If any misfeed location is left the screen displays the next disposal pr...

Страница 143: ...bodily electrical shock NEVER TOUCH the area The internal fixing unit is very hot To avoid getting burned DO NOT TOUCH Be careful of removing staples stuck inside the machine so as not to get injured DO NOT INSERT your finger into the two RADF hinge portions otherwise you may be injured ...

Страница 144: ...ified and the folder key of the print scan job in trouble is not currently displayed on the screen the arrow key to scroll to that job will flash Follow the procedure below to remove mishandled paper 1 Display the Jam Position Screen Touch JAM JOB The Jam Position Screen will be displayed When the arrow key flashes touch the key to scroll to the JAM JOB folder key then touch it to display the Jam ...

Страница 145: ...l be restored JAM JOB has changed to STOP and the settings for the current printing job are displayed on the screen 4 Press START The scan print job will resume 5 Touch FREE JOB to continue the reserve job setting The drum unit generates high voltage To avoid electrical shock NEVER TOUCH the area The internal fixing unit is very hot To avoid getting burned DO NOT TOUCH Be careful of removing stapl...

Страница 146: ...lash Follow the procedure below to continue the copying operation 1 Display the Basic Screen for the print job in progress Touch ADD PAPER The Basic Screen for the print job will be displayed When the arrow key flashes touch the key to scroll to the ADD PAPER folder key then touch it to display the Basic Screen for the print job 2 Check the flashing tray key then supply that empty tray with copy p...

Страница 147: ...the job or suspend the job Should memory overflow occur frequently it is recommended that you contact your service representative to expand the memory capacity in your machine Memory Overflow in Current Job When memory overflow occurs while scanning the first job the machine stops immediately and the screen provides JOB STOP and SCAN STOP as the only two available options If the job settings inclu...

Страница 148: ...top until all the jobs on standby for printing are completed If the job settings include Booklet mode SCAN STOP will disappear To delete the scanned data and discontinue the last reserve job touch JOB STOP To give up further scanning but print out the data already scanned for the last reserve job touch SCAN STOP To continue scanning the last reserve job touch CONTINUE as the current printing job g...

Страница 149: ...hen any trouble affects the electrical signal of the copier the Power OFF ON Screen will be displayed Follow the procedure below to turn the machine power off then on 1 Turn OFF the power switch 2 Wait about 10 seconds 3 Turn ON the power switch ...

Страница 150: ...d inner surface of document cover clean Call for service if Call for service is displayed in the message area Check density indicator and lighten if required COPY PAPER MISHANDLES DURING COPYING Fan copy paper and load it with curl side in proper location Do not exceed the tray capacity COPY IMAGE CAN BE RUBBED OFF Check copy paper thickness Use Thick paper mode if paper weight requires it MAGNIFI...

Страница 151: ...ENU Check for a paper misfeed and remove it as required Properly close finisher door RADF INDICATOR WILL NOT LIGHT AFTER AUTO RESET IS PRESSED Fully close RADF RADF LIGHT IS FLASHING The document feeder is ready to accept originals Insert originals on RADF tray press AUTO RESET then START ADD TONER MESSAGE IS DISPLAYED New toner supply is needed Follow instructions for adding toner CALL FOR PM IS ...

Страница 152: ...g screen with odd numbers not even If required make an even numbered original page odd by inserting a blank sheet in front of that page so that the blank sheet is even and the insertion sheet is odd FINISHER STAPLE RESULT IS NOT AS EXPECTED The 2 staple position functions only on copy paper that is loaded vertically portrait style COPIES SKEW IN THE STAPLED SETS Check to see if copy paper is exces...

Страница 153: ...6 Section 6 Machine Specifications Main Body Option Specifications Main Body Specifications 6 2 Option Specifications 6 4 ...

Страница 154: ...per or labels one sheet each on Multi sheet bypass tray OHP films and ink jet paper are unavailable Copying speed 51 copies min A4 38 copies min A4R 28 copies min A3 50 copies min B5 31 copies min B4 43 copies min B5R Continuous copying 1 to 9 999 copies Types of original Sheet book originals Original size A3 11 x 17 or 303 mm x 438 mm maximum Copy size Standard size A3 to A6R size image cutoff wi...

Страница 155: ...inal Cover OC 2 14 5 kg w RADF 56 kg w Finisher FN 120 66 kg w Finisher FN 9 10 5 kg w Cover Inserter D 3 kg w Punch kit PK 5 40 kg w LCT C 208 68 kg w Trimming Unit TMG 3 Size 794 W x 889 D x 1181 H mm main body RADF 2139 W x 889 D x 1181 H mm main body RADF FN 9 C 208 3162 W x 889 D x 1181 H mm main body RADF FN 9 TMG 3 C 208 Effective size 1084 W x 972 D mm main body RADF 2224 W x 972 D mm main...

Страница 156: ...ginal insertion Automatic feed at a time Dimensions 588 W x 519 D x 135 H mm Weight Approx 14 5 kg Power source Supply from main body FN 120 FN 9 Finisher Type Offset catch tray Sorting system Sorting by shifting 30 2 mm copies are delivered face down Paper sizes A3 B4 F4 A4 A4R B5 B5R A5 A5R B6 A6R 13 x19 12 x18 11 x17 8 5 x14 8 5 x11 8 5 x11 R 5 5 x8 5 A4R 8 5 x11 R only in Three Fold mode Secon...

Страница 157: ...er source Supply from finisher TMG 3 Trimming Unit Function Trimming the end of booklet Types of paper 64 to 105 g m2 paper Paper sizes A3 B4 A4R 11 x17 8 5 x14 8 5 x11 R Number of trimmed sheet Fold mode 3 sheets max 105 g m2 paper or less Stitch Fold mode 20 sheets max using 80 g m2 paper 19 sheets max with a thick cover paper 16 sheets max using 105 g m2 paper 15 sheets max with a thick cover p...

Страница 158: ... D x 120 H mm Weight Approx 2 kg Power source Supply from finisher C 208 Large Capacity Cassette Function Paper feed into main body Paper sizes A3 B4 A4 B5 13 x19 12 x18 11 x17 8 5 x14 8 5 x11 and those Wide sizes Types of paper 64 g m2 105 g m2 paper Thick 106 g m2 256 g m2 paper Capacity 4 000 sheets Dimensions 720 W x 639 D x 485 H mm Weight Approx 40 kg Power source Supply from main body Other...

Страница 159: ...Advanced ...

Страница 160: ......

Страница 161: ...ng RGB and HSB Values Colour Adjustment 7 19 Changing Colours Using CMYK Value Colour Balance Adjustment 7 24 Selecting Line Screen Dot Screen or High Compression Screen Setting 7 26 Adjusting Sharpness and Contrast Selecting Gloss Mode 7 29 Making Fine Adjustment in Image Detection Image Judge 7 32 Specifying Original Type Original Image Type in Special Original 7 34 ...

Страница 162: ... be combined to make up any other colour colour mixture The colour mixture provides two different types three primary colours of light and three primary colours of pigment The three primary colours of light are called additive colour mixture and the more colours are added the brighter it will be Mixing red R green G and blue B coloured lights various colours can be created The three primary colour...

Страница 163: ... and the purity vivid dull etc of the colour The colour perception reddish bluish etc is defined as hue H The strength or purity of the colour is defined as saturation S and the lightness or darkness of the colour is defined as brightness B The above three elements are called the three attributes of colour With these three attributes the Munsell colour system has been created to describe colours i...

Страница 164: ... the three primary colours cyan C magenta M yellow Y and black K To enhance the copy quality this machine allows you to modify colours by means of the three attributes of colour based upon the human eye and perception The following methods are provided Adjust the density of the whole image Original 4 4 Density ...

Страница 165: ...Colour Copy Quality continued 7 5 Adjust the hue saturation and brightness Original 4 4 Hue 4 4 Saturation ...

Страница 166: ...Colour Copy Quality continued 7 6 The hue adjustment leads the colour of the image to another colour adjacent in the colour circle of red R yellow Y green G cyan C blue B and magenta M 4 4 Brightness ...

Страница 167: ...Colour Copy Quality continued 7 7 Change the hue by varying the image s red R green G and blue B individually or mutually Original 4 4 Red 4 4 Green ...

Страница 168: ...Colour Copy Quality continued 7 8 4 4 Blue ...

Страница 169: ...Colour Copy Quality continued 7 9 Change the hue by varying the image s cyan C magenta M yellow Y and black K individually or mutually Original 4 4 Cyan 4 4 Magenta ...

Страница 170: ...Colour Copy Quality continued 7 10 4 4 Yellow 4 4 Black ...

Страница 171: ...rovides two methods Line Screen and Dot Screen The Line Screen uses many halftone lines like scanning lines of a television while Dot Screen uses small dots to reproduce the image The Screen methods provide fine quality in reproducing the gradation in scanned photographic images however text originals may not be reproduced clearly by using the same method as photo originals Dot screen Black images...

Страница 172: ...inter may add colours in large or bold characters to reproduce the text in the same way as the photo While scanning such originals this machine detects and determines the photo portion and text area so that the text area should be reproduced in single colour and the photo portion in full colour This function also allows you to obtain the optimum print results by modifying the standard for image de...

Страница 173: ...e colour adjustment and image reproduction methods this machine allows you to apply the following filters to improve the copy image quality Sharpen the outline of the image Sharpness Increase the contrast of the image Contrast 4 4 Sharpness Original 4 4 Contrast Original ...

Страница 174: ...e colour adjustment is performed by varying the level of pigments in RGB model or CMYK model or by modifying the hue saturation and brightness of the image To reproduce the copy image select one of the two methods Line Screen and Dot Screen The Image Detection function will help in selecting the most appropriate method for each part of the original to make the copies of scanned image For further i...

Страница 175: ...ally using AE can be adjusted on the machine See 20 AE Adjustment in the Key Operator mode p 14 51 To Adjust Copy Density Background Whiteness Follow the procedure below to select the exposure density manually to make darker or lighter copies Background Whiteness Adjust the background whiteness when copying newspaper or recycled paper originals 1 Touch IMAGE ADJUST on the Basic Screen The Image Ad...

Страница 176: ... To resume the AE touch AUTO to highlight it 4 Touch BACKGROUND ADJUST to adjust the background whiteness if necessary Touch the desired level key from 1 to 4 to make the background lighter or from 1 to 4 to make it darker Touch OK The Copy Density Adjustment Screen will be restored To resume the previous setting touch CANCEL 5 Touch OK The Basic Screen will be restored with the IMAGE ADJUST key h...

Страница 177: ...colour modes Full colour Black and Single colour therefore twelve sorts of settings are available for the density adjustment 1 Select the desired colour mode from the Full colour Black or Single colour 2 Touch SPECIAL ORIGINAL on the Basic Screen to display the Special Original popup menu 3 Select the desired Original Image mode then press P COUNTER e g Selected Original Image mode TEXT PHOTO Colo...

Страница 178: ...mage mode see p 7 34 to p 7 35 4 Press any key from 0 to 6 using the keypad to determine the Density Shift Select smaller number for darker level or larger number for lighter level Entering 7 or above will be ignored 5 Touch OK on the Special Original popup menu Density Shift in the selected Original Image mode of the desired Colour mode is determined Density Shift Text Single colour 3 0 6 Density...

Страница 179: ...en G and blue B and also adjust the value of hue saturation and brightness Modifying RGB Value Change the colour of the copy image by modifying each value of red R green G and blue B 1 Touch IMAGE ADJUST on the Basic Screen 2 Touch COLOUR ADJUST to display the Colour Adjustment Screen 3 Touch the desired colour key ...

Страница 180: ...from 1 to 4 to make it deeper Touch STD to select the middle level 5 Touch OK The Colour Adjustment Screen will be restored To resume the previous setting touch CANCEL 6 Touch OK The Basic Screen will be restored with the IMAGE ADJUST key highlighted To resume the previous setting touch CANCEL To restore the initial settings touch RECALL STANDARD ...

Страница 181: ...aking adjustments to Hue Saturation and Brightness 1 Touch IMAGE ADJUST on the Basic Screen 2 Touch COLOUR ADJUST to display the Colour Adjustment Screen 3 Make an adjustment to Hue Touch HUE Touch the desired level key from 1 to 4 to make yellow closer to red and red closer to magenta Adjustment goes anticlockwise in the colour circle ...

Страница 182: ...el Touch OK The Colour Adjustment Screen will be restored To resume the previous setting touch CANCEL 4 Make an adjustment to Saturation Touch SATURATION Touch the desired level key from 1 to 4 to make the colours dull or from 1 to 4 to make them vivid Touch STD to select the middle level Touch OK The Colour Adjustment Screen will be restored To resume the previous setting touch CANCEL 5 Make an a...

Страница 183: ...om 1 to 4 to make it brighter Touch STD to select the middle level Touch OK The Colour Adjustment Screen will be restored To resume the previous setting touch CANCEL 6 Touch OK The Basic Screen will be restored with the IMAGE ADJUST key highlighted To resume the previous setting touch CANCEL To restore the initial settings touch RECALL STANDARD ...

Страница 184: ...al colour or in the whole density area of each colour The adjustment value ranges from 10 to 10 1 Touch IMAGE ADJUST on the Basic Screen 2 Touch COLOUR BALANCE to display the Colour Balance Adjustment Screen 3 Select the desired density area Check the shadow mid tone and highlight areas of the original then select the desired density area to adjust the colour balance If the adjustment is necessary...

Страница 185: ...y to display the desired adjustment value from 10 to 10 The adjustment can be made for each density area Repeat steps 3 and 4 if desired Select smaller number to make the colour lighter or larger number to make it darker 5 Touch OK The Basic Screen will be restored with the IMAGE ADJUST key highlighted To resume the previous setting touch CANCEL To restore the initial settings touch RECALL STANDAR...

Страница 186: ...tion improves the resolution by maximizing the number of lines drawn Smooth Tone provides a high performance colour grading by lowering the drawing lines HIGH COMPRESSION The desired copy result may not be obtained because the internal memory overflows when using the reproducing method selected manually or automatically according to the other copy conditions of the job In this case select High Com...

Страница 187: ...touch HIGH RESOLUTION or SMOOTH TONE under the LINE SCREEN indication to highlight it To select the Dot Screen touch HIGH RESOLUTION or SMOOTH TONE under the DOT SCREEN indication to highlight it To compress the scanned data touch HIGH COMPRESSION to highlight it Touch AUTO to highlight it if reproducing method should be selected automatically ...

Страница 188: ...n orHighCompression ScreenSetting continued 7 28 4 Touch OK The Basic Screen will be restored with the IMAGE ADJUST key highlighted To resume the previous setting touch CANCEL To restore the initial settings touch RECALL STANDARD ...

Страница 189: ...ers to improve the copy image quality Sharpen the outline of the image Sharpness Increase the contrast of the image Contrast Increase shine on the image Gloss Mode Follow the procedure below to make the adjustment See p 7 13 to p 7 14 for details of the Sharpness Contrast and Gloss mode 1 Touch IMAGE ADJUST on the Basic Screen 2 Touch OTHERS to display the Other Adjustment Screen ...

Страница 190: ...ine softer or from 1 to 4 to make it sharper Touch STD to select the middle level Touch OK To resume the previous setting touch CANCEL 4 Select the desired contrast level Touch CONTRAST then touch the desired level key from 1 to 4 to decrease the contrast or from 1 to 4 to increase the contrast Touch STD to select the middle level Touch OK To resume the previous setting touch CANCEL ...

Страница 191: ...e continued 7 31 5 Select the Gloss Mode Touch GLOSS MODE to highlight it 6 Touch OK The Basic Screen will be restored with the IMAGE ADJUST key highlighted To resume the previous setting touch CANCEL To restore the initial settings touch RECALL STANDARD ...

Страница 192: ...of the text or its proportion in the whole original For this adjustment two items are provided Text Photo proportion adjustment and Black Colour text proportion adjustment TEXT PHOTO changes the ratio of detecting the text area of the original COLOUR TEXT changes the proportion in detecting that the original text is black or coloured Follow the procedure below to make the adjustment 1 Touch IMAGE ...

Страница 193: ...el 5 Make an adjustment to COLOUR BLACK Touch the desired level key from 1 to 4 to increase the proportion of black text or from 1 to 4 to increase the proportion of coloured text Touch STD to select the middle level 6 Touch OK The Other Adjustment Screen will be restored To resume the previous setting touch CANCEL 7 Touch OK The Basic Screen will be restored with the IMAGE ADJUST key highlighted ...

Страница 194: ...ll text such as a map MAP Use Original Type to improve the image quality by specifying the printed original type Normal original PRINTED Photo printed original PHOTO PAPER Copied original COPIED PAPER Original printed using Ink jet printer INKJET PAPER 1 Touch SPECIAL ORIGINAL on the Basic Screen The Special Original popup menu will be displayed 2 Touch the desired key in ORIG IMAGE area and ORIG ...

Страница 195: ... Original continued 7 35 3 Touch OK The Basic Screen will be restored with the SPECIAL ORIGINAL key highlighted and the selected Original Image icon displayed To resume the previous setting touch CANCEL To restore the initial settings touch RECALL STANDARD ...

Страница 196: ......

Страница 197: ...Off Weekly Timer 8 2 Rotation 8 4 Vertical Horizontal Zoom Mode 8 5 Making Folded Booklet Fold Stitch Fold 8 8 Punching File Holes in Copies Punch 8 11 Output Three Folded Copies Three Fold 8 14 Making Trimmed Booklets Trimming 8 16 Cover Sheet Feeding 8 19 Off Line Finishing 8 22 ...

Страница 198: ... NOT TURN IT OFF BY PRESSING POWER SWITCH When the TIMER indicator light is on and other indicators are off copying is unavailable due to the Weekly Timer function However copying can be available by using the following procedure 1 Press POWER SAVER ON OFF on the control panel For details of the Weekly Timer function see p 14 26 to p 14 33 The Basic screen will be displayed along with the message ...

Страница 199: ...e valid 4 digit password 3 Press START The following message will be displayed on the Basic Screen 4 Set the hour for the interrupt use Enter a 1 digit hour ex 3 hours is 3 using the keypad on the control panel 0 9 5 Press START 6 Set the minute for the interrupt use Enter a 2 digit minute ex 7 minutes is 07 using the keypad on the control panel 00 59 Entering a number smaller than 5 will set the ...

Страница 200: ... activate the Rotation function automatically Follow the procedure below to release resume this function 1 Touch ROTATION OFF on the Basic Screen to highlight it When Rotation is released the Rotation icon on the Basic Screen will disappear to indicate that this function is cancelled 2 Touch to deselect ROTATION OFF to resume this function When Rotation is resumed the Rotation icon will be display...

Страница 201: ... below is the sample image using the Vertical Horizontal zoom 1 Touch ZOOM on the Basic Screen Length 1 000 Width 1 000 Length 0 500 Width 1 000 Length 4 000 Width 1 000 Length 2 000 Width 1 000 Length 1 000 Width 0 500 Length 0 500 Width 0 500 Length 4 000 Width 0 500 Length 2 000 Width 0 500 Length 1 000 Width 2 000 Length 0 500 Width 2 000 Length 4 000 Width 2 000 Length 2 000 Width 2 000 Lengt...

Страница 202: ...git vertical zoom ratio or use arrow keys c d to scroll to the desired ratio Similarly touch the horizontal zoom key to highlight it then set the horizontal zoom ratio 3 Touch OK The popup menu disappears automatically and the specified zoom ratio will be displayed on the Basic Screen 4 Select additional copy conditions as desired 5 Enter the desired print quantity from the control panel keypad Se...

Страница 203: ... 8 7 The figure shown below is the sample image using the Vertical Horizontal zoom with an original placed slanted on the platen glass Length 0 500 Width 2 000 Length 2 000 Width 0 500 Length 0 500 Width 2 000 Length 2 000 Width 0 500 30 30 ...

Страница 204: ...g m2 paper 20 sheets 19 sheets with a thick cover paper 105 g m2 paper 16 sheets 15 sheets with a thick cover paper Paper size A3 B4 A4R 11 x17 8 5 x14 8 5 x11 R Paper weight 64 105 g m2 80 g m2 paper is recommended Booklet tray capacity When the Booklet tray capacity is exceeded the finisher will stop operating Select the appropriate print quantity by referring to the following capacities Approx ...

Страница 205: ...When starting a new copying job be sure to close the RADF securely then press AUTO RESET 2 Touch MAIN TRAY if not highlighted 3 Touch STITCH FOLD or FOLD as desired 105 g m2 or less 3 sheet max 80 g m2 20 sheets max 19 sheets max with a thick cover paper 105 g m2 16 sheets max 15 sheets max with a thick cover paper Fold Stitch Fold ...

Страница 206: ... Screen to display the Application Selection Screen then touch Booklet twice to display the Booklet Mode Selection Screen to make another selection or to release the setting 6 Enter the desired print quantity from the control panel keypad See p 3 10 for details on setting print quantity 7 Position originals See p 3 4 to p 3 9 for details on positioning originals When loading originals heed the fol...

Страница 207: ...ropriate positions Do not punch special paper type such as labels tabbed sheets etc Otherwise machine trouble may occur in Punching kit Be sure that the paper guides of the paper tray are securely aligned to the paper otherwise the copies may not be punched in position Specifications for Punch Mode Copy paper size A3 B4 F4 A4 B5 80 g m2 paper recommended Paper weight 64 g m2 128 g m2 Number of hol...

Страница 208: ...ition popup menu 4 Touch the desired punch position key to highlight it 5 Touch OK on the Punch Position popup menu to restore the Output Mode popup menu 6 Touch OK on the Output Mode popup menu to complete the setting and return to the Basic Screen The selection made in punch position will be displayed in the OUTPUT icon area ...

Страница 209: ...the Basic Screen 8 Select additional copying features as required 9 Enter the desired print quantity from the control panel keypad See p 3 10 for details on setting print quantity 10 Position originals in the document feeder See p 3 4 to p 3 7 for details on positioning originals 11 Press START When the finisher exit tray capacity is exceeded due to the print quantity selected remove the copied se...

Страница 210: ... service representative Max number of folded sheets 80 g m2 only 3 sheets Paper weight 64 105 g m2 Special stock 80 g m2 paper is recommended Booklet tray capacity 50 sets max of 1 sheet folded set 50 sheets Incompatible Conditions Sort Staple sort Group Face Up Rotation Sort Rotation Group Output modes using secondary tray Fold Stitch Fold Punch Back cover feeding Mixed Original Dual Page Program...

Страница 211: ...ouch to highlight the A4R or 8 5 x11 R tray key if not already highlighted 7 Enter the desired print quantity from the control panel keypad See p 3 10 for details on setting print quantity 8 Position originals See p 3 4 to p 3 9 for details on positioning originals Up to 3 originals can be three folded 9 Press START When the Booklet tray capacity is exceeded the finisher will cease operating To av...

Страница 212: ...lowing capacities Approx 512 sheets max 80 g m2 paper Fold and Trimming 100 sets max of 3 sheet folded booklet 100 x 3 300 sheets max Stitch Fold and Trimming 100 sets max of 2 5 sheet folded booklet 100 x 5 500 sheets max 50 sets max of 6 10 sheet folded booklet 50 x 10 500 sheets max 32 sets max of 11 16 sheet folded booklet 32 x 16 512 sheets max 25 sets max of 17 20 sheet folded booklet 25 x 2...

Страница 213: ...lection Screen When copying dark originals or using Reverse Image mode together with Fold or Stitch Fold mode the folded line of the output copies may be slightly shifted 4 Touch OK on the Output Mode popup menu The Basic Screen will be restored and the selection made in the output mode will be reflected in the OUTPUT icon area 5 Select additional copying features as required NO COVER SHEET of Boo...

Страница 214: ...capacity Fold mode 12 pages or less for simplex copying 6 pages or less for duplex copying Stitch Fold mode 80 pages or less for simplex copying 80 g m2 paper only 40 pages or less for duplex copying 80 g m2 paper only Exceeding the above capacity limits may cause trouble in the Finisher 8 Press START When the Trimmer unit tray capacity is exceeded the Finisher and Trimmer unit will cease operatin...

Страница 215: ...ing Cover paper size Upper tray A4 A4R B5 B5R A5 8 5 x11 8 5 x11 R 5 5 x8 5 Lower tray A3 B4 A4 A4R B5 B5R A5 12 x18 11 x17 8 5 x14 8 5 x11 8 5 x11 R 5 5 x8 5 A5 and 5 5 x8 5 paper sizes are available in portrait type feeding only Cover paper weight 50 200 g m2 cover paper Tray capacity 200 sheets 200 g m2 cover paper or 30mm thick for both trays Incompatible Conditions Group Rotation Sort Rotatio...

Страница 216: ...ght it then select the covers tray When selecting FRONT BACK mode different tray sources can be specified for each Copy paper sizes available to be loaded are different in each tray See the specifications on p 8 19 5 Touch OK to restore the Output Mode popup menu 6 Touch OK on the Output Mode popup menu The Basic Screen will be restored 7 Select additional copying features as required ...

Страница 217: ...ed 9 Enter the desired print quantity from the control panel keypad See p 3 10 for details on setting print quantity 10 Position originals See p 3 4 to p 3 9 for details on positioning originals 11 Press START When the finisher exit tray capacity is exceeded due to the print quantity selected remove the copied sets as they exit otherwise mishandled paper will occur Please load cover sheet in cover...

Страница 218: ...n the centre Fold Three Fold FN 9 Finisher Cover Inserter D PK 5 Punch Kit 1 oblique staple 2 parallel staples Stitch Fold 2 staples in the centre Fold Three Fold Punch Specifications for Manual Stapling 1 oblique staple and 2 parallel staples Paper size A3 B4 A4 A4R B5 B5R A5 12 x18 11 x17 8 5 x14 8 5 x11 8 5 x11 R A5 paper is available in portrait type feeding only Paper weight 50 80 g m2 Staple...

Страница 219: ... below for each mode 1 oblique staple 2 parallel staples FACE UP Punch FACE UP Stitch Fold FACE UP for the outside of the finished set Three Fold FACE UP for the outside of the folded set Align the guide plate The indicator light of Start Stop button will turn green Refer to the specifications on previous page for available paper size and capacity in each mode Stitch Fold Three Fold Punch 1 obliqu...

Страница 220: ...stop the Off Line Finishing operation press the Start Stop button again The finisher will cease operating When using Stitch Fold mode the unfinished set will be left in the stacker unit inside the finisher When the Booklet tray capacity is exceeded the finisher will cease operating To avoid this select the appropriate print quantity from the specifications on p 8 8 and p 8 14 When the finisher exi...

Страница 221: ...al Original Specifying Original Direction 9 2 Copying Non Standard Size Originals Original Form 9 4 Copying Mixed Size Originals Mixed Original 9 6 Copying Z Folded Originals Z Folded Original 9 8 Scanning Thin Thick Originals in RADF Original Thickness 9 10 ...

Страница 222: ...copies with binding position specified or when staple position is specified 1 Touch SPECIAL ORIGINAL on the Basic Screen The Special Original popup menu will be displayed When starting a new copying job be sure to close the RADF securely then press AUTO RESET 2 Touch to highlight the desired original direction key A Z A Z A Z A Z A Z A Z A Z A Z Originals on RADF Originals on platen glass ...

Страница 223: ...ntity from the control panel keypad See p 3 10 for details on setting print quantity 6 Position originals FACE UP in the document feeder or FACE DOWN on the platen glass according to the original direction specified in step 2 See the illustration on previous page and p 3 4 to p 3 9 for details on positioning originals 7 Press START When the finisher trimmer unit paper exit tray capacity is exceede...

Страница 224: ...rlay Memory Incompatible with FULL AREA APS AMS Rotation Sort Rotation Group Mixed Original Z Folded Original Tab Paper Combination Booklet Dual Page Non Image Area Erase Image Shift Incompatible with Tab Paper 2a2 2a1 APS AMS ACS Single Colour Full Colour Original Type in Special Original Mixed Original Z Folded Original Non STD Size Sheet Cover Insertion Chapter Combination Booklet Image Insert ...

Страница 225: ...ee p 3 18 to p 3 21 To load tabbed copy paper in any other tray specify the paper type as Tab paper in the Key Operator mode See p 14 21 to p 14 22 For the procedure of tabbed copy paper supply see p 2 30 to p 2 32 7 Enter the desired print quantity from the control panel keypad See p 3 10 for details on setting print quantity 8 Position original s FACE UP in the document feeder or FACE DOWN on th...

Страница 226: ...ld Trimming Three Fold Punch B6R mixed Z Folded Original Non STD Size Tab Paper Sheet Cover Insertion Chapter Combination Booklet Image Insert Dual Page Program Job Multi Page Enlargement Non Image Area Erase Repeat AUTO Layout Reduce Shift in Image Shift Overlay Storing image in Overlay Memory 1 Touch SPECIAL ORIGINAL on the Basic Screen The Special Original popup menu will be displayed When star...

Страница 227: ...the Basic Screen to select the desired paper size 6 Enter the desired print quantity from the control panel keypad See p 3 10 for details on setting print quantity 7 Position mixed original s FACE UP in the document feeder See p 3 6 for details on positioning originals Use RADF store mode p 3 33 to p 3 34 when the original count exceeds 100 8 Press START When the finisher paper exit tray capacity ...

Страница 228: ...d Original Use RADF Incompatible Conditions Using platen glass Rotation Sort Rotation Group Mixed Original Non STD Size Tab Paper Multi Page Enlargement Non Image Area Erase Repeat AUTO Layout Storing image in Overlay Memory 1 Touch SPECIAL ORIGINAL on the Basic Screen The Special Original popup menu will be displayed When starting a new copying job be sure to close the RADF securely then press AU...

Страница 229: ...ed print quantity from the control panel keypad See p 3 10 for details on setting print quantity 7 Position Z folded original s FACE UP in the document feeder See p 3 7 for details on positioning originals Use RADF store mode p 3 33 to p 3 34 when the original count exceeds 100 8 Press START When the finisher paper exit tray capacity is exceeded due to the print quantity selected remove the copied...

Страница 230: ...tible Copying Conditions None 1 Touch SPECIAL ORIGINAL on the Basic Screen The Special Original popup menu will be displayed When starting a new copying job be sure to close the RADF securely then press AUTO RESET 2 Touch SPECIAL SETTING The Special Setting popup menu will be displayed 3 Touch Thick or Thin as required then touch OK The Special Original popup menu will be restored 4 Touch OK to re...

Страница 231: ...uantity 7 Position original s FACE UP in the document feeder See p 3 4 to p 3 7 for details on positioning originals Use RADF store mode p 3 33 to p 3 34 when the original count exceeds 100 8 Press START When the finisher trimmer unit paper exit tray capacity is exceeded due to the print quantity selected remove the copied sets as they exit otherwise mishandled paper will occur ...

Страница 232: ......

Страница 233: ...age Enlargement 10 27 Erasing Outside of the Original Non Image Area Erase 10 30 Reversing Colour in Image Reverse Image 10 32 Repeating Selected Image Area Repeat Vert Horiz Mode 10 34 Repeating Automatically or Selecting RepeatingTimes Repeat AUTO Repeat Mode 10 37 Eliminating Copy Marks Along Borders Frame Fold Erasure 10 40 Copying Image in the Centre of Copy Paper AUTO Layout 10 43 Adjusting ...

Страница 234: ...OOK MARK in the message area of the subsequent screen if desired so that the screen may be directly accessed from the Check Screen to change the setting you made If one function on the menu is incompatible with another it will appear dimmed The APPLICATION key on the Basic Screen will be highlighted when application selections have been made To restore the original copying conditions touch CANCEL ...

Страница 235: ...age in Overlay Memory 1 2 3 4 5 6 7 8 9 10 1 2 3 4 5 6 7 8 9 10 SURVEYOR S REPORT SURVEYOR S REPORT 1 2 3 4 5 6 7 8 9 10 1 2 3 4 5 6 7 8 9 10 SURVEYOR S REPORT SURVEYOR S REPORT 1 2 3 4 5 6 7 8 9 10 1 2 3 4 5 6 7 8 9 10 SURVEYOR S REPORT SURVEYOR S REPORT 1 2 3 4 5 6 7 8 9 10 1 2 3 4 5 6 7 8 9 10 SURVEYOR S REPORT SURVEYOR S REPORT 1 2 3 4 5 6 7 8 9 10 1 2 3 4 5 6 7 8 9 10 SURVEYOR S REPORT SURVEY...

Страница 236: ...ypass tray unless previously specified and loaded in any other tray Be sure that the trays for copy paper front back covers and insertions have the same paper size loaded 2 Touch APPLICATION on the Basic Screen When starting a new copying job be sure to close the RADF securely then press AUTO RESET 3 Touch Sheet Cover Insertion on the Application Selection Screen The Sheet Cover Insertion Screen w...

Страница 237: ...ayed on the screen to designate each insertion location When setting more than 15 locations touch the arrow key to move to the next page The first upper left key displays the Front Cover icon if selected The Back Cover icon appears if selected as the last fixed key with one active blank key preceding it Example If p 4 is entered in blank mode a blank sheet will be inserted between p 4 and p 5 in c...

Страница 238: ...m the control panel keypad See p 3 10 for details on setting print quantity 10 Position originals FACE UP in the document feeder For details on positioning originals see p 3 4 Use RADF store mode p 3 33 to p 3 34 when the original count exceeds 100 11 Press START When the finisher paper exit tray capacity is exceeded due to the print quantity selected remove the copied sets as they exit otherwise ...

Страница 239: ...tion to print chapter number onto chapter page in addition to page number numbering or watermark numbering See p 10 51 to p 10 61 Incompatible Conditions 1a1 2a1 Group Rotation Sort Rotation Group Face Up Mixed Original Tab Paper Combination Image Insert Program Job Multi Page Enlargement Non Image Area Erase Repeat Storing Image in Overlay Memory 1 Touch APPLICATION on the Basic Screen When start...

Страница 240: ...r in sequence even if original page numbers are entered out of sequence When a page number is larger than the total original page count insertion occurs as the last page of the document Touch Booklet on the Chapter Insertion Setting No Screen to use this function To change the selection of paper tray for copying title pages touch COPIED INSERT on the screen In this case you can touch CHANGE OF THE...

Страница 241: ...ty 7 Position originals FACE UP in the document feeder For details on positioning originals see p 3 4 to p 3 7 Use RADF store mode p 3 33 to p 3 34 when the original count exceeds 100 8 Press START When the finisher trimmer unit paper exit tray capacity is exceeded due to the print quantity selected remove the copied sets as they exit otherwise mishandled paper will occur ...

Страница 242: ...roup Fold Stitch Fold Trimming with Booklet selected Mixed Original Tab Paper Sheet Cover Insertion Chapter Booklet Image Insert Dual page Program Job Multi Page Enlargement Non Image Area Erase Repeat Overlay Storing Image in Overlay Memory 1 Touch APPLICATION on the Basic Screen When starting a new copying job be sure to close the RADF securely then press AUTO RESET 2 Touch Combination on the Ap...

Страница 243: ... to the illustration on the following page 4 Touch OK The Application Selection Screen will be restored 5 Touch OK on the Application Selection Screen The Basic Screen will be restored AMS is automatically selected When selecting any tray other than the one that is set and displayed on the Basic Screen touch the desired tray key 6 Select the desired original direction ...

Страница 244: ...ils on positioning originals see p 3 4 to p 3 7 Use RADF store mode p 3 33 to p 3 34 when the original count exceeds 100 9 Press START When the finisher paper exit tray capacity is exceeded due to the print quantity selected remove the copied sets as they exit otherwise mishandled paper will occur DETAILS Original Type and Layout Order Refer to the table below to select the desired Combination mod...

Страница 245: ...patible Conditions ACS APS 1a1 2a1 Group Rotation Sort Rotation Group Face Up Cover sheet feeder with Cover mode in Booklet Mixed Original Tab Paper Sheet Cover Insertion Combination Program Job Multi Page Enlargement Non Image Area Erase Repeat Storing Image in Overlay Memory 1 Load Copy Paper Load the desired copy paper size in a tray When selecting cover sheet mode Cover sheet Copy sheet or Cov...

Страница 246: ...rator can set the machine to position the page numbers automatically on the outside edges of the copy when using Booklet with Page Numbering in Stamp See p 14 37 to p 14 42 6 Touch OK on the Application Selection Screen The Basic Screen will be restored AMS is selected automatically 7 Select the tray in which you loaded copy paper in step 1 To release AMS select the desired magnification then sele...

Страница 247: ...als heed the following limits on capacity Fold mode 12 pages or less for simplex copying 6 pages or less for duplex copying Stitch Fold mode80 pages or less for simplex copying 40 pages or less for duplex copying Exceeding the above limits on capacity may cause misfeeds in the finisher 11 Press START When the finisher paper exit tray capacity is exceeded due to the print quantity selected remove t...

Страница 248: ...ILS Selecting Fold Stitch Fold Mode 1 Touch OUTPUT MENU on the Basic Screen to display the Output Mode popup menu then touch MAIN TRAY to highlight it 2 Touch STITCH FOLD or FOLD as desired NOTE Selecting FOLD or STITCH FOLD will automatically switch the output tray to Booklet tray Notice that the arrow shown beside the Main tray shifts to the Booklet tray 3 Touch OK on the Output Mode popup menu ...

Страница 249: ...p 1 to p 999 Incompatible Conditions Group Rotation Sort Rotation Group Mixed Original Tab Paper Sheet Cover Insertion Chapter Combination Dual Page Program Job Multi Page Enlargement Non Image Area Erase Repeat AUTO Layout Overlay Storing Image in Overlay Memory 1 Touch APPLICATION on the Basic Screen When starting a new copying job be sure to close the RADF securely then press AUTO RESET 2 Touch...

Страница 250: ...e insertion The third scanned platen image will be inserted after page 6 NOTES When a page number is larger than the total original count a sheet is inserted as the last page Insertions occur in sequence even if page numbers are entered out of sequence Entering the same page number twice will insert two sheets at that location Touch Booklet on the Image Insertion No Setting Screen to use this func...

Страница 251: ...l FACE DOWN on the platen glass then close the document feeder PLACE AND SCAN THE ORIGINALS IN ORDER 10 Press START 11 Repeat steps 9 and 10 for all originals Memory overflow may occur during scanning See p 5 9 to p 5 10 Should memory overflow occur frequently it is recommended that you contact your service representative to extend the memory capacity in your machine 12 Touch STORE to exit the Sto...

Страница 252: ... first scan copies normally Front Back Cover Facing Pages mode Image division starts from the third scan after the first and second scan copy normally Specifications for Dual Page Store mode is automatically selected Paper size A4 Incompatible Conditions APS AMS Rotation Sort Rotation Group Fold Stitch Fold Trimming available with Booklet selected Mixed Original Tab Paper Sheet Cover Insertion Com...

Страница 253: ...ey 4 Touch Output n to 1 or Output 1 to n to select the output order according to the original pagination Touch Booklet on the Dual Page Screen to use this function 5 Touch OK The Application Selection Screen will be restored 6 Touch OK on the Application Selection Screen The Basic Screen will be restored APS and AMS are automatically released and the STORE key appears highlighted to show that the...

Страница 254: ... the first page FACE DOWN with document feeder kept open When using document feeder position original s FACE UP For details on scanning originals in Front cover Facing pages and Front Back Cover Facing pages mode see the description on the following page 10 Press START to scan 11 Repeat steps 9 and 10 for all originals When using platen glass Non Image Area Erase and AUTO Layout are automatically ...

Страница 255: ...canning from the first page 6 Press START to start scanning 7 Repeat steps 5 and 6 for subsequent originals NOTES Memory overflow may occur during scanning See p 5 9 to p 5 10 When using platen glass Non Image Area Erase and AUTO Layout are automatically selected DO NOT CLOSE the document feeder throughout the scanning job Front cover Facing pages Front Back cover Facing pages Scan from first page...

Страница 256: ...anged for another JOB Output mode and print quantity setting cannot be specified for each JOB The last setting made will be applied to all JOBs Program Job settings cannot be stored in Job Memory Incompatible Conditions APS Change paper size Group Rotation Sort Rotation Group Fold Stitch Fold Trimming Mixed Original Sheet Cover Insertion Chapter Combination Booklet Image Insert Dual Page Multi Pag...

Страница 257: ...tically selected 4 Select the desired copy conditions 5 Position originals FACE UP in the document feeder or FACE DOWN on the platen glass If the number of document feeder originals exceeds 100 divide them into blocks not exceeding 100 sheets and load them from the block with the first page 6 Press START The paper size determined at this time will be applied to all subsequent JOBs When scanning fo...

Страница 258: ...ow occur frequently it is recommended that you contact your service representative to expand the memory capacity in your machine 9 Select the desired output mode and enter the print quantity from the control panel keypad See p 3 10 for details on setting print quantity 10 Touch STORE to exit the Store mode 11 Press START When the finisher paper exit tray capacity is exceeded due to the print quant...

Страница 259: ...n Rotation Sort Rotation Group Fold Stitch Fold Three Fold Trimming Cover Sheet Feeding Mixed Original Z Folded Original Non STD Size except FULL AREA Sheet Cover Insertion Chapter Combination Booklet Image Insert Dual Page Program Job Non Image Area Erase Repeat Frame Fold Erasure AUTO Layout Image Shift Stamp Overlay 1 Position original FACE DOWN on the platen glass The machine will detect the o...

Страница 260: ...ication Selection Screen The Multi Page Enlargement Setting Screen will be displayed with the original size and paper size tray number indicated 5 Select an output size or magnification as desired To select an output size Touch STD SIZE to display the popup menu touch the desired size key to highlight it then touch OK ...

Страница 261: ...ulti Sheet Enlargement Setting Screen 6 Touch OK The Application Selection Screen will be restored 7 Touch OK on the Application Selection Screen The Basic Screen will be restored 8 Enter the desired print quantity from the control panel keypad The actual number of copies will be the product of output quantity multiplied by print quantity See p 3 10 for details on setting print quantity 9 Press ST...

Страница 262: ...rt Rotation Group Fold Stitch Fold Trimming with Booklet selected Mixed Original Z Folded Original Tab Paper Sheet Cover Insertion Chapter Combination Booklet Image Insert Dual Page in RADF Store mode Multi Page Enlargement Reverse Image Reduce Shift in Image Shift Storing Image in Overlay Memory 1 Touch APPLICATION on the Basic Screen When starting a new copying job be sure to close the RADF secu...

Страница 263: ... the desired print quantity from the control panel keypad See p 3 10 for details on setting print quantity 6 Position original FACE DOWN on the platen glass DO NOT CLOSE THE DOCUMENT FEEDER Original size should be larger than 10mm x 10mm 7 Press START Having Any Problem This function may perform incorrectly if the lighting in the work place is directly over the platen glass In this case consult yo...

Страница 264: ...akes a reversed image according to the original image detected as Full Colour or Black Specifications for Reverse Image Incompatible Conditions Fold Stitch Fold Trimming Non Image Area Erase Repeat Stamp Overlay 1 Touch APPLICATION on the Basic Screen When starting a new copying job be sure to close the RADF securely then press AUTO RESET 2 Touch Reverse Image on the Application Selection Screen T...

Страница 265: ...ion of the Basic Screen with the SINGLE COLOUR key highlighted 5 Enter the desired print quantity from the control panel keypad See p 3 10 for details on setting print quantity 6 Position original s FACE UP in the document feeder or FACE DOWN on the platen glass For details on positioning originals see p 3 4 to p 3 9 7 Press START When the finisher paper exit tray capacity is exceeded due to the p...

Страница 266: ...g RADF 2a2 2a1 APS AMS Group Rotation Sort Rotation Group Mixed Original Z Folded Original Sheet Cover Insertion Chapter Combination Booklet Image Insert Dual Page Multi Page Enlargement Non Image Area Erase Reverse Image Frame Fold Erasure AUTO Layout Reduce Shift in Image Shift Stamp Overlay 1 Touch APPLICATION on the Basic Screen When starting a new copying job be sure to close the RADF securel...

Страница 267: ...pup menu to enter the value from the touch screen keypad Touch VERTI WIDTH or HORIZ WIDTH enter the value for each then touch OK to restore the Repeat Mode Selection Screen 4 Touch OK The Application Selection Screen will be restored 5 Touch OK on the Application Selection Screen The Basic Screen will be restored 6 Select the desired magnification and paper size APS and AMS are automatically relea...

Страница 268: ... See p 3 10 for details on setting print quantity 8 Position original FACE DOWN on the platen glass See the illustration on p 10 34 for details 9 Press START When the finisher trimmer unit paper exit tray capacity is exceeded due to the print quantity selected remove the copied sets as they exit otherwise mishandled paper will occur ...

Страница 269: ...le Conditions with Auto Detection Mode Using RADF 2a2 2a1 APS AMS Rotation Group Rotation Sort Rotation Group Mixed Original Z Folded Original Tab Paper Sheet Cover Insertion Chapter Combination Booklet Image Insert Dual Page Multi Page Enlargement Reverse Image Frame Fold Erasure AUTO Layout Reduce Shift in Image Shift Stamp Overlay Incompatible Conditions with Repeat Mode APS AMS Rotation if mag...

Страница 270: ... mode key Touch AUTO to select the Auto Detection mode Touch 2 Repeat 4 Repeat or 8 Repeat to select the desired Repeat mode 4 Touch OK The Application Selection Screen will be restored Non Image Area Erase is automatically selected on the Application Selection Screen when AUTO mode is selected When 2 Repeat mode is selected Page space function of Image Shift can be used to make the desired amount...

Страница 271: ...l panel keypad See p 3 10 for details on setting print quantity 8 Position original For AUTO mode original open the document feeder then position the original FACE DOWN on the platen glass For 2 Repeat 4 Repeat or 8 Repeat mode original RADF is also available See the illustration on p 10 37 for details When AUTO mode is selected Non Image Area Erase functions automatically DO NOT close the documen...

Страница 272: ...ulti Page Enlargement Repeat 1 Touch APPLICATION on the Basic Screen When starting a new copying job be sure to close the RADF securely then press AUTO RESET 2 Touch Frame Fold Erasure on the Application Selection Screen The Frame Fold Erasure Selection Screen will be displayed Set original General copying Frame Erasure copying Fold Erasure copying Frame Fold Erasure copying Fold erasure Frame era...

Страница 273: ...e selected mode To specify Frame Erasure All sides amount Touch to highlight FRAME if not highlighted then use the touch screen keypad or up down arrow key to enter the desired erasure amount of the TOP BOTTOM LEFT and RIGHT sides collectively from 1 to 300 mm in 1 mm increments To specify Frame Erasure Each side amount Touch to highlight FRAME if not highlighted then touch TOP SIDE RIGHT SIDE BOT...

Страница 274: ...h OK on the Application Selection Screen The Basic Screen will be restored 7 Enter the desired print quantity from the control panel keypad See p 3 10 for details on setting print quantity 8 Position original s FACE UP in the document feeder or FACE DOWN on the platen glass For details on positioning originals see p 3 4 to p 3 9 When lowering the document feeder onto thick original e g open book d...

Страница 275: ...verse Image Repeat Image Shift Overlay Storing Image in Overlay Memory Chapter Combination Booklet and Reverse Image are available when Non Image Area Erase is released manually 1 Touch APPLICATION on the Basic Screen When starting a new copying job be sure to close the RADF securely then press AUTO RESET 2 Touch AUTO Layout on the Application Selection Screen The incompatible function keys will b...

Страница 276: ...g print quantity 6 Position original s FACE UP in the document feeder or FACE DOWN on the platen glass For details on positioning originals see p 3 4 to p 3 9 DO NOT close the RADF when Non Image Area Erase is selected Placing original obliquely on the platen glass may cause black copy marks 7 Press START When the finisher trimmer unit paper exit tray capacity is exceeded due to the print quantity...

Страница 277: ... details If image loss is likely select the Reduce Shift mode instead of regular Image shift See p 10 48 Specifications for Image Shift Shift amount 0 to 250 mm in 1 mm increments Setting in 0 1 mm increments using up down arrow key is also available by Key Operator setting See p 14 37 to 14 42 Incompatible Conditions Multi Page Enlargement AUTO Layout Storing images in Overlay Memory 1 Select the...

Страница 278: ...or duplex copying Touch to highlight the desired shift direction key then use the touch screen keypad or up down arrow key to enter the desired shift amount from 0 to 250 mm in 1 mm increments The image display on the screen allows you to view the shift direction and amount to be created on the printed sheets When Booklet or 2 Repeat mode of Repeat has been already selected the PAGE SPACE key appe...

Страница 279: ...r details on setting print quantity 8 Position original s FACE UP in the document feeder or FACE DOWN on the platen glass For details on positioning originals see p 3 4 to p 3 9 9 Press START When the finisher trimmer unit paper exit tray capacity is exceeded due to the print quantity selected remove the copied sets as they exit otherwise mishandled paper will occur DETAILS Page Space Function Ori...

Страница 280: ...nts Setting in 0 1 mm increments using up down arrow key is also available by Key Operator setting See p 14 37 to 14 42 Incompatible Conditions Change magnification V H zoom APS Mixed Original Dual Page Multi Page Enlargement Non Image Area Erase Repeat AUTO Layout Overlay Storing Image in Overlay Memory Originals Right Front Back Up Down Left Right Left Down Right Left Up Left binding margin Righ...

Страница 281: ...S key appears dimmed to show inactivity Touch to highlight the desired shift direction key then use the touch screen keypad or up down arrow key to enter the desired shift amount from 0 to 250 mm in 1 mm increments The image display on the screen allows you to view the shift direction and amount to be printed on the printed sheets The AMS will automatically determine the magnification ratio accord...

Страница 282: ...red print quantity from the control panel keypad See p 3 10 for details on setting print quantity 8 Position original s FACE UP in the document feeder or FACE DOWN on the platen glass For details on positioning originals see p 3 4 to p 3 9 9 Press START When the finisher trimmer unit paper exit tray capacity is exceeded due to the print quantity selected remove the copied sets as they exit otherwi...

Страница 283: ...tion for STAMP SET NUMBERING PAGE NUMBERING DATE TIME To use the STAMP function the optional HDD HD 106 is required to be installed in the machine Incompatible Conditions Multi Page Enlargement Reverse Image Repeat except 2 4 8 Repeat Overlay with STAMP and SET NUMBERING Overlay Memory 1 Touch APPLICATION on the Basic Screen When starting a new copying job be sure to close the RADF securely then p...

Страница 284: ...ected stamp type 4 When selecting STAMP Specify the stamp type printing position character size and printed page Touch to highlight the desired stamp key and printing position key on the screen If fine adjustment is required touch FINE ADJ OF POSITION to display the Fine Adjustment Setting Screen See p 10 55 for details Touch CHANGE OF THE CHARACTER SIZE to select LARGER or SMALLER Touch CHANGE OF...

Страница 285: ...TING No to designate the starting number if required See p 10 55 for details When selecting PAGE NUMBERING Specify the page numbering type printing position character size printed page and starting No Touch to highlight the desired page numbering type key and printing position key on the screen If fine adjustment is required touch FINE ADJ OF POSITION to display the Fine Adjustment Setting Screen ...

Страница 286: ... Touch CHANGE OF THE PRINTED PAGE to designate whether to print the selected stamp on the cover only or on all pages 5 Touch OK The Stamp Overlay Selection Screen will be restored Touch to select another stamp function key to use in combination if desired 6 Select the stamp colour Touch STAMP COLOUR SELECT to display the Stamp Colour Selection Screen Touch the desired stamp type key to highlight i...

Страница 287: ...cted remove the copied sets as they exit otherwise mishandled paper will occur DETAILS Fine Adjustment Setting Screen When FINE ADJ OF POSITION is touched the Fine Adjustment Setting Screen will be displayed Touch TOP SIDE BOTTOM SIDE RIGHT SIDE or LEFT SIDE to specify the direction then use the touch screen keypad or up down arrow key to enter the desired amount from 0 to 50 mm Touch OK to return...

Страница 288: ... or up down arrow key to enter the desired starting number for each Use to enter a minus number to print from halfway through e g 2 to print 1 from page 4 Touch OK to return to the previous screen Character Size Type Selection Screen from PAGE NUMBERING or DATE TIME When CHANGE OF THE CHARACTER is touched the Character Size Type Selection Screen will be displayed Touch to select the desired key th...

Страница 289: ... PAGE NUMBERING When copied blank insertion mode of Sheet Cover Insertion has been already selected this screen allows you to specify whether to print the page number on insertions or skip them from the page count Touch to select the desired key then touch OK to return to the Page Numbering Type Selection Screen ...

Страница 290: ...ATERMARK the optional HDD HD 106 is required to be installed in the machine Incompatible Conditions Rotation Group Rotation Sort Multi Page Enlargement Reverse Image Repeat except 2 4 8 Repeat Overlay Overlay Memory 1 Touch APPLICATION on the Basic Screen When starting a new copying job be sure to close the RADF securely then press AUTO RESET 2 Touch Stamp Overlay on the Application Selection Scre...

Страница 291: ...pecify the desired watermark type density and colour Touch to highlight the desired watermark key If fine adjustment of the centred watermark position is required touch FINE ADJ OF POSITION to display the Fine Adjustment Setting Screen See p 10 55 for details To select the density and colour of the watermark touch DENSITY or COLOUR to display the popup menu touch the desired density colour key to ...

Страница 292: ...ng No Touch to highlight the desired watermark key Touch CHANGE OF THE CHARACTER SIZE to select 20 pt or 36 pt Touch STARTING No to designate the starting number if required See p 10 55 for details To select the density and colour of the watermark numbering touch DENSITY or COLOUR to display the popup menu touch the desired density colour key to highlight it then touch OK ...

Страница 293: ...Application Selection Screen The Basic Screen will be restored 8 Enter the desired print quantity from the control panel keypad See p 3 10 for details on setting print quantity 9 Position original s FACE UP in the document feeder or FACE DOWN on the platen glass For details on positioning originals see p 3 4 to p 3 9 10 Press START When the finisher trimmer unit paper exit tray capacity is exceede...

Страница 294: ...ion Combination Image Insert Dual page Program Job Multi Page Enlargement Reverse Image Repeat AUTO Layout Reduce Shift in Image Shift STAMP SET NUMBERING WATERMARK WATERMARK NUMBERING 1 Touch APPLICATION on the Basic Screen When starting a new copying job be sure to close the RADF securely then press AUTO RESET 2 Touch Stamp Overlay on the Application Selection Screen The Stamp Overlay Selection ...

Страница 295: ... released and 1 000 100 is selected as a magnification ratio 7 Enter the desired print quantity from the control panel keypad See p 3 10 for details on setting print quantity 8 Position the overlaying original Position the original FACE UP in the document feeder or FACE DOWN on the platen glass For details on positioning originals see p 3 4 to p 3 9 9 Press START to scan The original image will be...

Страница 296: ...ay continued 10 64 13 Touch STORE to exit the Store mode then press START to print When the finisher trimmer unit paper exit tray capacity is exceeded due to the print quantity selected remove the copied sets as they exit otherwise mishandled paper will occur ...

Страница 297: ...b Paper Sheet Cover Insertion Chapter Combination Booklet Image Insert Dual Page Program Job Multi Page Enlargement Non Image Area Erase Reverse Image Repeat AUTO Layout Image Shift Stamp Overlay Incompatible Conditions with Output Rotation Group Rotation Sort Face Up Multi Page Enlargement Reverse Image Repeat except 2 4 8 Repeat STAMP SET NUMBERING WATERMARK WATERMARK NUMBERING in Stamp Overlay ...

Страница 298: ...tamp Overlay on the Application Selection Screen The Stamp Overlay Selection Screen will be displayed 3 Touch OVERLAY MEMORY The Overlaying Image Selection Screen will be displayed Proceed to step 9 when recalling only the stored image 4 Touch IMAGE STORE to display the Image Name Entry Screen ...

Страница 299: ...elete each character then enter the correct name 6 If the image name is correct touch OK The Basic Screen to store the overlaying image will be displayed Select the desired copy conditions The popup menu may be displayed to prompt you that the entered image name has been already used See p 10 69 for details 7 Position the overlaying original on the platen glass The document feeder cannot be used f...

Страница 300: ...played on the Overlay Image Selection Screen you can delete the stored image and name Select the image name using up down arrow key to scroll then touch IMAGE DELETE 10 Touch OK to return to the Application Selection Screen 11 Touch OK to return to the Basic Screen The Store mode is automatically selected and APS and AMS are released Set the desired conditions on the Basic Screen 12 Enter the desi...

Страница 301: ... for Name Duplication If the popup menu with YES and NO keys is displayed instead of the Basic Screen the entered name is duplicated Touch YES to enter a new name or NO to create a duplicate name If the popup menu with OK key is displayed the entered name is duplicated Touch OK then enter a new name Changing the popup menu for duplicate name and displaying the IMAGE DELETE key is available in the ...

Страница 302: ......

Страница 303: ...eb Utilities 11 2 To Display Information on Machine 11 4 To Display Current Machine Status Job Status 11 5 Setting E Mail Transmission Function 11 7 Setting E K C Function 11 9 Setting Scan Transmission Function 11 19 Transmitting Editing Machine Setting File 11 23 ...

Страница 304: ...ork environment and E K C function Browser Internet Explorer 5 5 SP2 Netscape Navigator 4 7 or later Follow the procedure below to access the Web Utilities of the machine using the web browser 1 Turn on the power to the PC connected with the machine over a network Contact your network manager for details on the network system 2 Activate the web browser then select Open from the File menu 3 Enter t...

Страница 305: ...e and the maintenance item if required Service call JAM Paper supply Toner supply Staple cartridge supply Complete Job Non Complete Job Finisher tray full Dispose of Trimmer waste basket Dispose ot Punch waste basket PM call Click on REFRESH in the Web Utilities window to update the information The Web Utilities window is subject to change without notice ...

Страница 306: ...he web browser 1 Open the Web Utilities window 2 Click on the Machine Status The window now provides the paper tray configuration engine configuration and option information The same information will be provided also in the Job Status window See p 11 5 Click on REFRESH in the window to update the information ...

Страница 307: ...ob status job list including reserved jobs and job information and information on up to 16 previous jobs 1 Open the Web Utilities window 2 Click on Job Status The current job status number of jobs in waiting and remaining time before the print job is completed Click on REFRESH to update the information ...

Страница 308: ...he second Job List area If no print job or reserved job exists Job Empty will be displayed in the first Job List area 4 Display the previous job information Click on the desired Job ID No under the Job Status The information on the specified previous job will appear in the second Job Status area If no job has been printed after the machine has been powered on Jobs don t exist will be displayed in ...

Страница 309: ...ng refer to p 14 8 1 Open the Web Utilities window 2 Click on Environment Setup 3 Display the E Mail Transmission Setting window Enter the 4 digit Key Operator password then click on Apply Click on E Mail transmission setting The E Mail Transmission Setting window will be displayed The Extension for maintenance option will be exclusively used by your service representative ...

Страница 310: ...ded time difference and E mail address to be informed of the machine status Click on the check box of the desired transmission item Click on Apply to complete the setting and return to the Web Utilities window Clicking on Reset will void the setting and restore the Web Utilities window Clicking on Sending test will send a test mail to the manager ...

Страница 311: ...on settings Switching the E K C ON OFF Effect when the copy limit is reached Immediately After job Warning E K C password 8 digits under 8 digits E K C password input timing Auto reset timer Complete job Wrong E K C password from printer Accept Reject The above settings can also be made on the machine itself except for the Wrong E K C password from printer setting Some settings may require operati...

Страница 312: ... setting The Enter Network Password dialog box will be displayed Enter ekc in the User Name text box and an 8 digit master key code in the Password text box then click on OK The E K C Function Setting menu window will be displayed 4 Add an E K C data Click on E K C data add in the E K C Function Setting menu window ...

Страница 313: ...ror Message A duplicate password or name will be rejected with an error message However duplicating a password is possible using the Key Operator setting Refer to p 14 15 The Name entry box accepts letters capital letters only numbers and four symbols and Any other symbols will be rejected with an error message displayed in the window Max 1 000 E K C entries can be registered An error message will...

Страница 314: ...on any menu item to jump to the desired window 5 Edit the E K C data Click on E K C data list in the E K C Function Setting menu window see p 11 10 or from the menu in any subsequent window The E K C Data List window will be displayed The Another user count in the list indicates the count accumulated for the jobs performed by non registered users This data cannot be edited other than resetting the...

Страница 315: ...nge the password name or limit as desired For details in entering procedure refer to p 11 11 3 Click on Registration To clear the text boxes click on Reset To cancel editing the E K C data click on any E K C Function Setting menu item to jump to the desired window DETAILS Error Message See Details on p 11 11 if an error message is displayed after clicking on Registration ...

Страница 316: ...p to the desired window To reset E K C count 1 Click on the check box es to select the E K C data of the counter to be cleared If all the counters are to be cleared click on SelectAll 2 Click on the radio button a white circle heading the Count reset selected item s 3 Click on Apply The Count Reset Confirmation window will be displayed To cancel resetting the E K C data click on any E K C Function...

Страница 317: ...ssage Setting was changed will be displayed DETAILS Error Message If an error message is displayed after clicking on Apply a counter has not been reset due to a machine operation in progress The machine must be in an idle state when you click on Apply Click on Back to return to the E K C Data List window ...

Страница 318: ...ll the data are to be cleared click on SelectAll 2 Click on the radio button a white circle heading the Delete selected item s Except for Another user count 3 Click on Apply The Delete Confirmation window will be displayed To cancel deleting the E K C data click on any E K C Function Setting menu item to jump to the desired window ...

Страница 319: ...dow or any menu item to jump to the desired window 6 Set the E K C function Click on E K C function setting in the E K C Function Setting menu window see p 11 10 or from the menu in any subsequent window The E K C Function Setting window will be displayed Click on the radio button white circle of the desired selection item s so that a black dot appears in it Click on Apply The change made in the s...

Страница 320: ...is displayed after clicking on Apply a setting has not been completed due to a machine operation in progress The machine must be in an idle state when you click on Apply Click on Back to return to the E K C Function Setting menu window or any menu item to jump to the desired window ...

Страница 321: ...g is available only when the Printer Controller is installed in the machine 1 Open the Web Utilities window 2 Click on Environment Setup 3 Display the Scan Transmission Setting window Enter the 4 digit Key Operator password then click on Apply The Environment Setup menu window will be displayed Click on Scan transmission setting The Scan Transmission Setting window will be displayed The Scan trans...

Страница 322: ...of the printer controller The symbols that cannot be displayed in the entry box will be ignored if entered The HDD Box No will be registered as a 4 digit number For example entering 1 will be registered as 0001 Click on Registration to complete the entry The registered content will be displayed Click on Back to return to the Scan Transmission Setting window ...

Страница 323: ...n to the Scan Transmission Setting window 6 Change the registered contents Display the Entry List of the desired item as described in step 5 Click on the entry name to be changed The window for changing the selected item will be displayed Change the contents as desired then click on Registration The registered content will be displayed Click on Back to return to the Entry List window ...

Страница 324: ...e Delete column of the item to be deleted then click on Delete If all the items are to be deleted click on SelectAll then click on Delete The window for deleting the selected item will be displayed Click on the check box again to release the selection Confirm the registered name to be deleted then click on Yes Click on Back on the web browser to return to the Entry List window ...

Страница 325: ...e returned to the machine at any time and is available for common use if you have two or more machines The file transmitted to a PC being converted to a file type for batch processing can be edited efficiently and returned to the machine The file transmitted to a PC normally contains the four data types mentioned above however each data type can be made into a file and transmitted separately For d...

Страница 326: ...rt Export The Enter Network Password dialog box will be displayed Enter ekc in the User Name text box and an 8 digit master key code in the Password text box then click on OK The Setting File Import Export window will be displayed 4 Export the machine setting file Select the desired file type from the pull down menu then click on Export ...

Страница 327: ...ly assigned as described below Select the data to be exported changing the name if desired ekc_tab txt E K C data ip_email txt E mail data of Scan Transmission Setting data ip_hdd txt HDD data of Scan Transmission Setting data ip_ftp txt FTP data of Scan Transmission Setting data DETAILS Error Message The file cannot be accessed when the machine is operating If an error message is displayed try ag...

Страница 328: ... The result message will be displayed when the registration is completed DETAILS Error Message If the registration cannot be completed successfully error messages will be displayed as follows Can t transfer data The machine is busy Try again to import the data after the machine operation in progress is completed The data cannot be recognized Confirm that the data is the machine setting file Data s...

Страница 329: ...LIMIT COPY MONO LIMIT PRINT COLOUR LIMIT PRINT MONO LIMIT LIMIT TARGET COLOUR PERMISSION and MONO PERMISSION separated by a tab Use up to 8 digits numbers 0 9 only to specify PASSWORD Use numbers alphabets capital letters only and four symbols and only to specify NAME Use up to 6 digits numbers 0 9 only to specify LIMIT 0 999 999 Specify 0 for Common set or 1 for Separate set in LIMIT TARGET Speci...

Страница 330: ...umbers 0 9 only to specify a BOX NUMBER FTP data setting file Begin the file name with IP_FTP Max 30 files can be edited A line should include PROFILE NAME HOST ADDRESS FILE PATH LOGIN PORT No and FIREWALL being separated by a tab PROFILE NAME should be 18 bytes or less HOST ADDRESS should be 63 bytes or less FILE PATH should be 127 bytes or less LOGIN should be 47 bytes or less PASSWORD should be...

Страница 331: ...12 Section 12 Paper and Original Information Paper Information 12 2 Original Information 12 9 ...

Страница 332: ...t Tray 1 2 and 3 Main body tray 64g m2 209g m2 The tray number for paper weight is specified in the Key Operator mode 1 64g m2 74g m2 2 75g m2 80g m2 3 81g m2 105g m2 4 106g m2 162g m2 5 163g m2 209g m2 LCT C 208 64g m2 256g m2 The tray number for paper weight is specified in the Key Operator mode 1 64g m2 74g m2 2 75g m2 80g m2 3 81g m2 105g m2 4 106g m2 162g m2 5 163g m2 209g m2 6 210g m2 256g m...

Страница 333: ...bypass tray Paper Trays Weight ADU 64 g m2 209 g m2 Finisher FN 120 FN 9 50 g m2 256 g m2 60 g m2 105 g m2 for Staple sort Stitch Fold mode 60 g m2 105 g m2 for Three Fold mode Cover Inserter D 50 g m2 200 g m2 50 g m2 128 g m2 for Manual punching 60 g m2 105 g m2 for Manual three fold Punch kit PK 5 50 g m2 128 g m2 Trimming unit TMG 3 64 g m2 105 g m2 Exit tray 50 g m2 256 g m2 ...

Страница 334: ... FS 215 1 500 sheets 12 x18 11 x17 8 5 x14 A3 B4 Staple sort mode 80 g m2 paper 1 000 sheets Variable according to the number of pages to be stapled See p 12 5 for details Finisher FN 9 Booklet tray 100 sheets A3 B4 12 x18 11 x17 8 5 x14 80 g m2 paper Fold 33 sets for 3 sheet folded booklet 33 x 3 99 sheets 396 pages Stitch Fold 20 sets for 5 sheet folded booklet 20 x 5 100 sheets 400 pages 5 sets...

Страница 335: ... 30 31 40 41 50 50 sets 50 30 25 20 100 sets 50 30 25 20 A3 A3W 12 x18 11 x17 11 x17 W B4 B4R A4 A4W A4R A4WR B5 B5W 8 5 x14 8 5 x11 8 5 x11 W 8 5 x11 R 8 5 x11 WR Paper size No of copies Paper Capacity for Staple sort mode of FN 120 FN 9 Finisher ...

Страница 336: ...2 x18 11 x17 8 5 x14 8 5 x11 STD special Detects F4 8 5 x14 R instead of A4R 5 5 x8 5 R instead of A5R Non STD size Max 330 mm x 487 mm 13 x19 2 Min 140 mm x 210 mm Wide size A3W B4W A4W B5W B5RW A5RW 11 x17 W 8 5 x11 W 8 5 x11 WR 5 5 x8 5 RW LCT C 208 STD size A3 B4 A4 B5 13 x19 12 x18 11 x17 8 5 x14 8 5 x11 Non STD size Max 330 mm x 487 mm 13 x19 2 Min 182 mm x 210 mm Wide size A3W B4W A4W B5W 1...

Страница 337: ...ts Available Sizes ADU STD size STD special 330 mm x 487 mm 13 x19 2 to A5R Non STD size 330 mm x 487 mm 13 x19 2 to 140 mm x 182 mm Wide size A3W to A5RW Finisher FN 120 FN 9 Primary main tray 314 mm x 458 mm 12 x18 100 mm x 148 mm 314 mm x 458 mm 12 x18 A4R in Sort Group Staple sort mode Secondary sub tray 330 mm x 487 mm 13 x19 2 100 mm x 148 mm Booklet tray 314 mm x 458 mm 12 x18 A4R in Fold o...

Страница 338: ... paper type other than the above mentioned select Excl A to D as the paper type in Paper type size setting for the Multi sheet bypass tray To Store Copy Paper Store paper in a cool dry area Using damp copy paper may cause a paper misfeed Keep partially used packages tightly wrapped during storage Do not place paper packages vertically to store Paper curl due to the vertical storage may cause a pap...

Страница 339: ... Max original size 303 mm x 438 mm sheet or book Max book weight thickness 6 8 kg 30 mm Original placement Face down on left depth side of glass Detectable paper size can be changed from only A series to Inch series AB series or AB series and Inch series mixed by Key Operator See p 14 37 to p 14 42 Do not place too heavy originals or do not press strongly when thick original is placed and is under...

Страница 340: ...9 g m2 paper or Thick mode for 129 g m2 200 g m2 paper Max feeder capacity 100 sheets 80 g m2 paper Curling tolerance 10 mm or less Original placement Face up Mixed Original mode Use Mixed Original mode to copy mixed size originals See p 9 6 for details Original size Three types of size combination are determined by the RADF guide width A3 B4 A4 A4R B5 and A5 mixed B4 A4R B5 B5R and A5 mixed B5R a...

Страница 341: ...ails Detectable original size A3 B4 A4 A4R B5 B5R A5 A5R 11 x17 8 5 x13 8 5 x11 Original weight Simplex 35 g m2 200 g m2 Dulpex 50 g m2 200 g m2 Use Thin mode for 35 g m2 49 g m2 paper or Thick mode for 129 g m2 200 g m2 paper Max feeder capacity 100 sheets 80 g m2 paper Curling tolerance 10 mm or less Original placement Face up see p 3 7 for details orientation same as copy paper ...

Страница 342: ......

Страница 343: ...Inserting a New Staple Cartridge into FN 120 FN 9 Finisher 13 7 Empty Waste Basket of PK 5 Punch Kit 13 10 Empty Waste Basket of TMG 3 Trimming Unit 13 12 Exchanging Toner Recovery Box 13 14 Cleaning Image Scanning Section 13 16 Checking Copy Count 13 18 Periodic Maintenance 13 20 ...

Страница 344: ...DD TONER icon display on the touch screen The toner colour to be supplied is indicated by an alphabet C cyan M magenta Y yellow or K black Use the toner bottle with the same color label as the one on the toner bottle cover Add toner according to the procedure as follows color label ...

Страница 345: ...ner continued 13 3 1 Loosen toner by tapping both top and bottom of the new toner bottle on a solid surface at least five times then shake the bottle at least five times 2 Open the toner access door 5 6cm 5 6cm ...

Страница 346: ... 3 Unlock and open the toner bottle cover of the empty toner bottle 4 Partially withdraw the toner bottle then turn it to set the Up arrow mark at the top 5 Fully withdraw the toner bottle straightforward to remove the bottle 1 2 ...

Страница 347: ...he same cap to the removed bottle 7 While positioning the Up arrow mark at the top and aligning the two hollow parts of the toner bottle with the salients on the bottle entrance fully insert the new toner bottle until it locks in place 1 2 3 New toner bottle Empty toner bottle 1 2 ...

Страница 348: ...locked if the toner bottle is not set in place Do not throw the empty toner bottle into a fire If it is thrown into a fire the toner may ignite and cause a dangerous situation Keep the toner bottle away from children The toner is non toxic however if you inhale or contact with eyes by accident flush with water and seek medical advice ...

Страница 349: ...empty the Basic Screen displays the following message in the message area Follow the procedure below to replace the staple cartridge Use only the staples supplied by us Please contact your service representative to purchase 1 Open the Finisher door 2 Pull out the stacker unit by holding the stacker unit handle ...

Страница 350: ...the empty cartridge from the cartridge housing 5 Insert the new cartridge into the housing Firmly insert the cartridge into the housing while aligning the arrow sides of both case and housing then remove the lock tape from the cartridge Do not remove the staples remaining inside the housing otherwise the first sheet output after the replenishment will not be stapled 1 2 ...

Страница 351: ...nto FN 120 FN 9 Finisher continued 13 9 6 Insert the cartridge housing while sliding it along the stapler rail then push down and in to secure it in place 7 Return the stacker unit to its original position 8 Close the Finisher door 1 2 ...

Страница 352: ... of Punching kit is full Please empty waste basket message will be displayed on the touch screen and the finished set will be output without being punched even if Punch mode is selected Follow the procedure below to empty the waste basket 1 Open the Finisher door 2 Withdraw the waste basket ...

Страница 353: ...Empty Waste Basket of PK 5 Punch Kit continued 13 11 3 Empty the waste basket 4 Return the waste basket to its original position then close the Finisher door securely ...

Страница 354: ...t of Trimmer is full Please empty waste basket message will be displayed on the touch screen and the finished set will be output without being trimmed even if Trimming mode is selected Follow the procedure below to empty the waste basket 1 Open the trimmer front door 2 Withdraw the waste basket ...

Страница 355: ...Empty Waste Basket of TMG 3 Trimming Unit continued 13 13 3 Empty the waste basket 4 Return the waste basket to its original position then close the trimmer front door securely ...

Страница 356: ...an icon will be displayed on the touch screen Follow the procedure below to exchange the toner recovery box DO NOT THROW the toner recovery box into a fire If it is thrown into a fire the toner may ignite and cause a dangerous situation 1 Open the toner recovery box door on the rear right side of the machine 2 Withdraw the toner recovery box ...

Страница 357: ...anging Toner Recovery Box continued 13 15 3 Remove the sticker on the toner recovery box then put it on the inlet of the used toner 4 Set the new toner recovery box then close the toner recover box door 1 2 ...

Страница 358: ...htly with water if it is difficult to clean Never use paint solvents such as benzene or thinners to clean the platen glass Cleaning the RADF Platen Guide Cover The RADF platen guide cover should be kept clean otherwise soil marks may be copied or the original size cannot be detected correctly Raise the original cover and clean the RADF platen guide cover with a clean soft cloth Never use paint sol...

Страница 359: ...en Cover Keep the glass clean otherwise soil marks may be copied resulting in dark lines on the copies Raise the original cover and clean the left partition glass with a clean soft cloth Never use paint solvents such as benzene or thinners to clean the original cover ...

Страница 360: ...unter Monochrome counter Copier counter Printer counter Counter start date Check the list then print it from the Counter List Screen if desired To Display the Counter List Screen 1 Press P COUNTER on the control panel The Counter List Screen will be displayed The Counter List Screen can be displayed even when the copying job is in progress 2 Touch EXIT to return to the Basic Screen ...

Страница 361: ...n the control panel The Counter List Screen will be displayed 2 Touch COUNTER MENU The Basic Screen will be displayed 3 Touch the desired tray key to select the paper size 4 Press START The Counter list will be printed out and the Management list mode will be released automatically ...

Страница 362: ... performance When preventive maintenance is due a message and the icon will prompt you to contact your service representative for maintenance To Check the PM Counter Follow the procedure below to check the PM counter to estimate the time when Periodic Maintenance is due 1 Press P COUNTER on the control panel The Counter List Screen will be displayed ...

Страница 363: ...tenance continued 13 21 2 Press CHECK The PM counter will appear under the Printer counter on the screen To print the Counter list including the PM counter see p 13 19 3 Touch EXIT The Basic Screen will be restored ...

Страница 364: ......

Страница 365: ...24 8 Key Operator Data Setting 14 25 9 Weekly Timer 14 26 10 Control Panel Adjustment 14 34 11 Tray Auto Select Setting 14 35 12 Power Save Setting 14 36 13 Memory Switch Setting 14 37 14 Machine Management List Print 14 43 15 Call Remote Centre 14 44 16 Finisher Adjustment 14 45 17 Front Back Density Setting 14 47 18 Scan Transmission Setting 14 48 19 Non Image Area Erase Setting 14 50 20 AE Adju...

Страница 366: ...erator mode is being accessed a Key Operator password will not be required To ensure the security of Key Operator mode it is recommended that you establish a unique Key Operator password and keep it in a confidential file How to Access the Key Operator Mode 1 Press HELP on the control panel to display the Help Screen 2 Touch KEY OPERATOR MODE on the Help Screen 3 Enter the Key Operator Password th...

Страница 367: ...display menus 11 to 20 of the Key Operator Mode Screen touch the lower arrow key to scroll To return the previous menu touch the upper arrow key The menus 21 to 25 will be displayed and available by service setting Contact your service representative if desired 5 Touch PREVIOUS SCREEN to exit the Key Operator Mode The Basic Screen will be restored ...

Страница 368: ...itial setting to display the System Initial Setting Menu Screen 2 Touch 1 Date Time setting to display the Date Time Setting Screen 3 Adjust the time The time indicated by the copier is displayed in the upper line and ordered by date month year and time in 24 hour expression 1 In the lower line the highlighted section can be changed by using the keypad on the screen 2 Touch SET to move the highlig...

Страница 369: ...time is earlier than the Universal time or when the local time is later 3 Use the keypad on the screen to enter the time difference between the Universal time and the local time in the machine setting area e g Enter 0600 for 6 hours later than the Universal time 4 Touch OK to return to the Date Time Setting Screen 6 Touch OK to update the Present time by the Setting time and return to the System I...

Страница 370: ...itial Setting Menu Screen 2 Touch 2 Language select setting to display the Language Selection Screen 3 Select the desired English mode 4 Touch OK to complete the setting and return to the System Initial Setting Menu Screen or touch CANCEL to restore the previous setting 5 Touch PREVIOUS SCREEN to restore the Key Operator Mode Screen System Initial Setting Menu Screen Language Selection Screen ...

Страница 371: ...e left To scroll to the next page touch the arrow key at the lower left corner on the screen 2 Enter the address numbers using the screen keypad 3 Touch SET to fix the numbers or touch RESET to clear Touching SET shifts the cursor to the right 4 Customize the line speed 1 Touch Line speed setting to display the Line Speed Setting Screen 2 Touch the desired key to highlight it 3 Touch OK to restore...

Страница 372: ...rm this setting Incorrect setting may cause a trouble with other network systems Procedure 1 Touch 1 System initial setting to display the System Initial Setting Menu Screen 2 Touch 4 E Mail Transmission Setting to display the E Mail Transmission Setting Screen 3 Specify the IP address of the mail server 1 Touch 1 IP address setting to display the IP Address Setting Screen 2 Enter the IP address o...

Страница 373: ...reen keypad Touch OK to restore the E Mail Set Condition Inform Screen 3 Touch OK to restore the E Mail Transmission Setting Screen 6 Select the information items 1 Touch 4 E Mail transmission item set to display the Information Setting Screen 2 Touch the desired item key to highlight it More than one item can be selected Touching ALL CLEAR will release all the selections 3 Touch OK to restore the...

Страница 374: ...ed settings are established at installation Before changing any of the copier settings be sure that you understand the overall and long range effect of the change Procedure 1 Touch 2 Copier initial setting to display the Copier Initial Setting Screen 2 Make a selection for each mode as initial settings Touch RADF to select or deselect it NOTE The machine will restore the initial settings specified...

Страница 375: ...changed Default setting USERSET1 4 000 USERSET2 2 000 USERSET3 0 500 Procedure 1 Touch 3 User setting mode to display the User Setting Mode Menu Screen 2 Touch 1 User lens mode ratio setting to display the User Lens Mode Ratio Setting Screen 3 Touch the USERSET you want to change then enter a ratio from 0 250 4 000 using the keypad If a ratio under 0 250 is entered 0 250 will be displayed If a rat...

Страница 376: ...r service representative The following EKC settings can be made by the Key Operator 1 E K C data edit Assign an account number to an individual user or a group and specify an EKC password name and copy limit for each The registered EKC data will be listed on the screen allowing you to change the data reset the copy count or even delete the individual account 2 E K C all count reset Clear the copy ...

Страница 377: ... master key code will be specified by your service representative and should be kept secret by the Key Operator 2 If an invalid EKC master key code is entered continue by entering the valid 8 digit code 3 Touch CANCEL on the EKC Master Key Code Screen to return to the Key Operator Mode Screen 3 Select the desired EKC function and make settings as required 4 To exit the EKC mode touch PREVIOUS SCRE...

Страница 378: ...perator for user User Name Max 8 characters Limit Limit target Count 0 to 999 999 copies Permission for use Procedure 1 Display the EKC Setting Menu Screen referring to p 14 13 2 Touch 1 E K C data edit The EKC Data Edit Screen will be displayed NOTE The EKC Data Edit Screen provides three sorts of EKC data copier printer and scanner Touch COPY PRINTER or SCANNER to display the desired screen EKC ...

Страница 379: ...OTES 1 We recommend that you make a list of all EKC passwords and account numbers 2 If an invalid user name or numeric value is entered continue by entering the valid one 8 Touch OK to complete the setting and to verify whether the same password or name has been already used for another account number When a password is duplicated The Password Duplication Screen will be displayed Touch YES to re e...

Страница 380: ...played Touch OK to re enter new name 4 If any duplication has not occur the EKC Data Edit Screen will be restored To Delete EKC Data 1 Touch c or d key on the right side of the list to highlight the EKC data to be deleted then touch Delete The Delete Confirmation Screen will be displayed 2 Touch YES to delete or NO to cancel To Clear EKC Count 1 Touch c or d key on the right side of the list to hi...

Страница 381: ... count reset The EKC All Count Reset Screen will be displayed 3 Touch YES to reset all counters to zero and to return to the EKC Setting Menu Screen or touch NO to cancel Touching PREVIOUS SCREEN will also cancel this function and return to the EKC Setting Menu Screen 4 Touch PREVIOUS SCREEN on the EKC Setting Menu Screen to restore the Key Operator Mode Screen EKC Setting Menu Screen EKC All Coun...

Страница 382: ...d machine condition when the count limit is reached The selected key will be highlighted Touch Immediately to stop the machine at once when the copy limit is reached In this case copy conditions selected for the current job will be cleared To continue the job using the same user password change the copy limit of the password or clear the copy count Touch After job to stop the machine after the cur...

Страница 383: ...ure 1 Display the EKC Setting Menu Screen referring to p 14 13 2 Touch 4 Scanner function setting The Scanner Function Setting Screen will be displayed 3 Touch EKC On to activate EKC or touch EKC Off to de activate EKC The selected key will be highlighted 4 Touch OK to complete the setting and return to the EKC Setting Menu Screen or touch CANCEL to cancel 5 Touch PREVIOUS SCREEN to restore the Ke...

Страница 384: ... The previously locked Job will be unlocked when selected and the lock icon on the touched key will disappear NOTE The settings of a locked Job cannot be changed To delete a Job memory 1 Touch the Job number key you want to delete The selected key will be highlighted 2 Touch Delete Selected programs and the name will be deleted from the Job memory NOTE A locked job can also be deleted with the loc...

Страница 385: ...ypes Excl A to D Contact your service representative if desired Procedure 1 Touch 6 Paper type Special size set to display the Paper Type Special Size Setting Menu Screen 2 Touch 1 Paper type Special size set The Paper Type Setting Screen will be displayed Key Operator Mode Screen Paper Type Setting Screen Main Body Trays Special Size Setting Screen STD size special Special Size Setting Screen STD...

Страница 386: ...ailable paper sizes to be specified Use arrow keys on the popup menu to select the desired size Select Non STD size to display the popup menu to enter the paper size by using arrow keys or touch screen keypad The selected tray key will indicate SPECIAL instead of the entered numeric value Select Wide size paper to display the popup menu to show available wide paper sizes to be specified Use arrow ...

Страница 387: ...l be displayed 3 Select the paper type and weight in combination to be loaded in the Multi sheet bypass tray 1 Touch the desired key in the Special setting section to highlight it 2 Touch the desired paper type and weight keys to highlight them The selected paper type and number indicating the paper weight will appear on the tray key Repeat steps 1 and 2 for all the six keys 4 Touch OK on the Pape...

Страница 388: ...anel Contrast Key Sound Adjustment Screen 2 Adjust the Backlight contrast or Buzzer volume as desired Touch the Dimmer arrow key to make the backlight contrast dimmer than currently displayed or touch the Brighter arrow key to make the panel or backlight contrast brighter than currently displayed Touch the Small or Big arrow key to regulate the buzzer volume of the touch keys 3 Touch OK to complet...

Страница 389: ...y operator name up to 8 characters from the touch screen keypad 3 Touch Key Operator Tel No to highlight it then enter a 5 digit extension number from the touch screen keypad If the extension number is less than 5 digits use a hyphen to make it five The hyphen added in the beginning will be indicated as a space on the Help Screen 4 Touch OK to complete the setting and return to the Key Operator Mo...

Страница 390: ...be activated on your machine contact your service representative Conditions required to use the Weekly Timer The power plug is inserted into the socket The Weekly Timer will not function with the machine being unplugged while the setting data will remain The power switch is turned on The current date and time are correctly set The following Weekly Timer settings can be made 1 Weekly timer ON OFF s...

Страница 391: ...ded that you establish a unique password 2 If the Weekly Timer Password Setting Screen is displayed use the keypad on the touch screen to enter your 4 digit Weekly Timer password then touch OK to display the Weekly Timer Setting Menu Screen NOTE If an invalid Weekly Timer password is entered continue by entering the valid 4 digit password 3 Select the desired Weekly Timer function and make setting...

Страница 392: ... timer Off to deactivate Weekly Timer The selected key will be highlighted The default setting is Weekly Timer Off NOTE If you select Weekly timer On to activate this function be sure to keep the power switch turned on 3 Touch OK to complete the setting and return to the Weekly Timer Setting Menu Screen or touch CANCEL to restore the previous setting 4 Touch PREVIOUS SCREEN on the Weekly Timer Set...

Страница 393: ...SET repeatedly will shift the input section from Monday ON Monday OFF Tuesday ON Tuesday OFF When setting Sunday OFF time Monday ON time is highlighted again If ON time and OFF time are the same power will not go on If the setting is 00 00 00 00 you will not be able to set the copiers off on condition for specific days Be sure to enter the ON OFF time for a day off also so that you can specify the...

Страница 394: ...n Off Time Collective Setting Screen to complete the setting and return to the Weekly Timer Setting Menu Screen Touching CANCEL will restore the previous setting and return to the Weekly Timer Setting Menu Screen 5 Touch PREVIOUS SCREEN on the Weekly Timer Setting Menu Screen to restore the Key Operator Mode Screen ...

Страница 395: ...uch the key for that day to change its indication To change the month use arrows to scroll to the desired month 3 To collectively set the on off data for the entire month by the day of the week touch the ON or OFF key for the desired day on the right half of the screen to highlight it 4 If any change is made in the collective setting area the Timer Action Change Confirmation Screen will be display...

Страница 396: ...activate the Lunch hour off function Set OFF time and Restart time using the touch screen keypad and then touch SET after each entry 3 Touch Function Invalid to de activate the Lunch hour off function The time setting area will appear grayed out and cannot be selected The Function Invalid setting is the factory default setting 4 Touch OK to complete the setting and return to the Weekly Timer Setti...

Страница 397: ...een 2 Use the touch screen keypad to enter a 4 digit password and then touch OK to complete the setting and return to the Weekly Timer Setting Menu Screen NOTE When the password setting is 0000 Timer Interrupt can be used simply by turning the copier OFF then ON In this case you will be asked to enter the duration of use a period of time to turn the copier power on 3 If other Weekly Timer setting ...

Страница 398: ...creen 3 Check that the X coordinate and Y coordinate displayed in the first line of the message area fall within the standard value displayed in the second line 4 Touch the CHECK BUTTONs at the upper left and lower right corners on the screen to check if the buzzer tone functions normally 5 If the coordinates fall out of the range of the standard value in step 3 or the buzzer tone does not sound i...

Страница 399: ...ight each tray key then select OFF or ON to specify whether the selected tray is to be automatically detected or not when ATS APS functions Tray keys specified as ATS APS ON will appear on the right half of the screen 3 Specify the priority of the trays Touch to highlight the desired tray key then change its priority by using Up c and Down d arrow keys 4 Touch OK to complete the setting and restor...

Страница 400: ...o Shut Off indicators Touch the arrow keys c and d in each area to select a specific waiting period before activating the Auto Low Power or Auto Shut Off NOTES The period of time selected for Auto Low Power cannot exceed the Auto Shut Off setting If the same period of time as Auto Shut Off is selected for Auto Low Power the Auto Shut Off will function instead of Auto Low Power 3 Touch OK on the Ti...

Страница 401: ...ntial tray Tray 1 Tray 2 Tray 3 Tray 4 Bypass tray No 15 Platen original size detect Only A series Full size AB series Inch series No 16 RADF original size detect Only A series Full size AB series Inch series No 17 Platen orig size detect SMALL A5R B6R 5 5 x8 5 R B5 A4 8 5x11 A6R No 18 Rotation ON APS AMS only ON APS AMS Reduce only ON Always No 19 Staple mode reset function OFF ON No 20 Job offse...

Страница 402: ...othTone Use No 42 Side 2 drum clock adjust mode OFF ON No 43 Screen FullColour Text Photo HighCompression LineScreen HighResolution LineScreen SmoothTone DotScreen HighResolution DotScreen SmoothTone No 44 Screen FullColour Photo HighCompression LineScreen HighResolution LineScreen SmoothTone DotScreen HighResolution DotScreen SmoothTone No 45 Screen Monochrome Text Photo HighCompression LineScree...

Страница 403: ...n when original is set on RADF in non RADF mode with RADF unit closed 4 Job memory auto recall 30 Job memory number 30 is automatically recalled when power is turned on or when Auto reset is restored This job recall function works only when Job number 30 is registered 5 Finisher mode by Full auto Set the Output Mode to be recalled when AUTO RESET is pressed 6 Initial by Key counter insert Set the ...

Страница 404: ...ion function activate Rotation only when APS AMS functions or activate Rotation only when APS AMS Reduce functions 19 Staple mode reset function Staple mode is automatically canceled after a job is completed with Staple sort mode ON Sort mode is selected 20 Job offset operating Set the copier to offset the copies of different jobs 21 Continuation print Set the copier to output multiple reserve job...

Страница 405: ...ed folded sheets in non standard size or wide size 36 Timer which prohibits Print Set the timer to allow the printing job after operating the copying job 37 Bookmark function Select to set the Bookmark function only for the current job set for all the following jobs or deactivate the function 38 Delete of overlay image When selecting or storing overlaying image data in HDD using Overlay Memory sel...

Страница 406: ... Specify the initial state of the SCREEN setting in Black mode with Photo specified in Special Original setting 47 Screen MonoColour Text Photo Specify the initial state of the SCREEN setting in Single Colour mode with Text Photo specified in Special Original setting 48 Screen MonoColour Photo Specify the initial state of the SCREEN setting in Single Colour mode with Photo specified in Special Ori...

Страница 407: ... Procedure 1 Touch 14 Machine management list print on the Key Operator Mode Screen to display the Management List Print Menu Screen 2 Touch the desired item on the screen The Basic Screen will resume automatically 3 Press START to start printing the selected list To suspend printing press STOP Press P and C in order to return to the Management List Print Menu Screen 4 Touch PREVIOUS SCREEN on the...

Страница 408: ...roblem Call for JAM concerns Call for SC concerns Toner bottle supply call Paper supply call Call for Image quality Call for others Procedure 1 Touch 15 Call remote centre on the Key Operator Mode Screen to display the Call Remote Service Centre Screen 2 Touch the desired item key The Start Call Screen will be displayed 3 Touch Start to call 4 Touch PREVIOUS SCREEN on the Start Call Screen to rest...

Страница 409: ... Menu Screen Fold Stopper Position Adjustment Screen Stitch Fold Stopper Position Adjustment Screen Punch Adjustment Menu Screen Trimming Stopper Position Adjustment Screen Punch Kit Horizontal Position Adjustment Screen Punch Kit Vertical Position Adjustment Screen 2 Positions Staple Pitch Adjustment Screen Three Fold Position Adjustment Screen ...

Страница 410: ...n Touch to select or as desired enter the value then touch SET Check the entered value on the left side of the second line in the message area If provided touch NEXT ADJUSTMENT or PREVIOUS ADJUSTMENT to move to the next or previous adjustment item Touch PREVIOUS SCREEN to restore the Finisher Adjustment Menu Screen 4 Touch PREVIOUS SCREEN to restore the Key Operator Mode Screen Output Quantity Lim...

Страница 411: ...edure 1 Touch 17 Front Back Density setting to display the Front Back Density Setting Screen 2 Touch the desired adjustment key to make an adjustment for each side 3 Touch OK to complete the setting and restore the Key Operator Mode Screen or touch CANCEL to restore the previous setting Front Back Density Setting Screen Key Operator Mode Screen ...

Страница 412: ... function only when Print Controller is installed in the machine Procedure 1 Touch 18 Scan transmission setting on the Key Operator Mode Screen to display the Scan Transmission Setting Screen 2 Select the desired address type Touch E Mail HDD or FTP to display the registered name keys on each page 3 Select the name key to be changed or deleted Touch the Lower arrow key to scroll or Upper arrow key...

Страница 413: ...e will be displayed 2 Touch to highlight the registered item key on the left touch Input key indicate to display the Input Key Screen then change the information under the registered item key using the alphabet keys on the screen Touch OK to return to the previous screen 3 Touch OK on each screen to complete the setting and restore the Scan Transmission Setting Screen 4 Touch OK on the Scan Transm...

Страница 414: ...9 Non image area erase setting on the Key Operator Mode Screen to display the Non Image Area Erase Setting Screen 2 Touch AUTO to let the machine select the density level automatically or manually select the density level from the five exposure levels provided on the screen 3 Touch OK to complete the setting and restore the Key Operator Mode Screen or touch CANCEL to restore the previous setting N...

Страница 415: ...NT or PREVIOUS ADJUSTMENT to select the mode to be adjusted The selected mode will be displayed in the message area 3 Specify the adjustment level Touch to select or as desired enter the value then touch SET Check the entered value on the left side of the second line in the message area The AE will function suitable for text originals if specified value is positive or for photo originals if negati...

Страница 416: ...only when the above conditions appear in cyan or magenta colour layer If you find them in yellow or black layer please contact your service representative to change the setting of this function Procedure 1 Touch 21 Execute adjust operation on the Key Operator Mode Screen to display the Execute Adjustment Operation Screen 2 Touch the desired item key to highlight it 3 Touch OK to complete the setti...

Страница 417: ...enu Screen 2 Touch the desired menu key to display the adjustment screen for each function 3 Make fine adjustment on the screen Touch to select or as desired enter the value then touch SET Check the entered value on the left side of the second line in the message area If provided touch NEXT ADJUSTMENT or PREVIOUS ADJUSTMENT to move to the next or previous adjustment item Touch PREVIOUS SCREEN to r...

Страница 418: ... start timing adj adjusts re start timing for original scanning RADF registration loop adj adjusts the original loop amount in the RADF registration roller section Procedure 1 Touch 23 Timing adjustment on the Key Operator Mode Screen to display the Timing Adjustment Menu Screen 2 Touch the desired menu key to display the adjustment screen for each function Key Operator Mode Screen Timing Adjustme...

Страница 419: ... touch SET Check the entered value on the left side of the second line in the message area If provided touch NEXT ADJUSTMENT or PREVIOUS ADJUSTMENT to move to the next or previous adjustment item Touch PREVIOUS SCREEN to restore the Timing Adjustment Menu Screen 4 Touch PREVIOUS SCREEN to restore the Key Operator Mode Screen ...

Страница 420: ...t Menu Screen 2 Touch the desired menu key to display the adjustment screen for each function 3 Make fine adjustment on the screen Touch to select or as desired enter the value then touch SET Check the entered value on the left side of the second line in the message area If provided touch NEXT ADJUSTMENT or PREVIOUS ADJUSTMENT to move to the next or previous adjustment item Touch PREVIOUS SCREEN t...

Страница 421: ...ting Touching Adj data reset will display the Reset Confirmation Screen Touch YES to reset the adjustment value to the initial state or touch NO to cancel 3 Touch COPY SCREEN to move to the Basic Screen to print a chart Load several sheets of A4 paper on the Multi sheet bypass tray then press START to output the test chart When output is completed the Printer Gamma Sensor Adjustment Screen will be...

Страница 422: ... will not start even if the Start key is touched The message Completed will be displayed when the adjustment is completed normally NOTE If an error code Error 1 2 or 10 is displayed check that the test chart is placed properly If any other error code is displayed please contact your service representative 6 Repeat the steps 2 to 5 as desired 7 Touch PREVIOUS SCREEN to restore the Key Operator Mode...

Страница 423: ...Index ...

Страница 424: ......

Страница 425: ...4 Booklet 10 13 Booklet tray 2 10 Brightness B 7 3 C Call for Service Screen 5 2 Call Remote Centre 14 44 Cartridge housing 2 11 CAUTION 1 5 Caution indicator 1 2 Caution label 1 2 Centring Adjustment 14 56 Chapter 10 7 CHECK key 2 6 Check Mode 4 4 Cleaning Image Scanning Section 13 16 Clearing Mishandled Paper 5 4 CMYK Model 7 2 CMYK value 7 24 Colour Adjustment 7 19 Colour Balance Adjustment 7 2...

Страница 426: ...asure 10 40 FREE JOB key 2 8 Front Back Density Setting 14 47 Front door 2 3 FULL COLOUR mode 3 2 G Gloss Mode 7 14 7 29 Group mode with Finisher 3 45 Group mode without Finisher 3 41 H HELP key 2 6 Help Mode 4 16 Help Screen 4 16 High Compression 7 26 High Resolution 7 26 HSB Model 7 3 HSB value 7 21 Hue H 7 3 I Image adjust icon 2 8 IMAGE ADJUST key 2 9 Image Detection 7 12 Image Insert 10 17 Im...

Страница 427: ...al Form 9 4 Original Image 7 34 Original Information 12 9 Original Thickness 9 10 Original Type 7 34 Output icon area 2 9 Output Mode 3 41 3 45 Overlay 10 62 Overlay Memory 10 65 P Panel Contrast Key Sound Adjustment 14 24 Paper indicator 2 22 Paper Information 12 2 Paper loading button 2 13 Paper Size 3 14 12 6 Paper Type Special Size Set 14 21 Paper Type Set Bypass 14 23 Paper Weight 12 2 Period...

Страница 428: ... 2 9 Stitch Fold mode 8 8 STOP key 2 6 STORE key 2 9 Store mode 3 33 System Initial Setting 14 4 T Tab paper mode 9 4 Thick original mode 9 10 Thin original mode 9 10 Three primary colours of light 7 2 Three primary colours of pigment 7 2 Three Fold mode 8 14 Timer Action On Off Setting 14 31 TIMER indicator 2 6 Timer Interrupt Password Setting 14 33 Timer Setting 14 29 Timing Adjustment 14 54 TMG...

Страница 429: ...x continued v Weekly Timer Key Operator Mode 14 26 Weekly Timer On Off Setting 14 28 Weekly Timer password 14 26 Weekly Timer Setting Menu Screen 14 27 Work table 2 3 Z Z Folded Original 9 8 Zoom mode 3 23 ...

Страница 430: ......

Страница 431: ...65AN97100 01 ...

Страница 432: ...ed in China The information contained in this manual is subject to change without notice to incorporate improvements made on the product or products the manual covers Marunouchi Center Building 1 6 1 Marunouchi Chiyoda ku Tokyo 100 0005 JAPAN ...

Отзывы: