


VCA and POP groups
159
PRO6 Live Audio System
Owner’s Manual
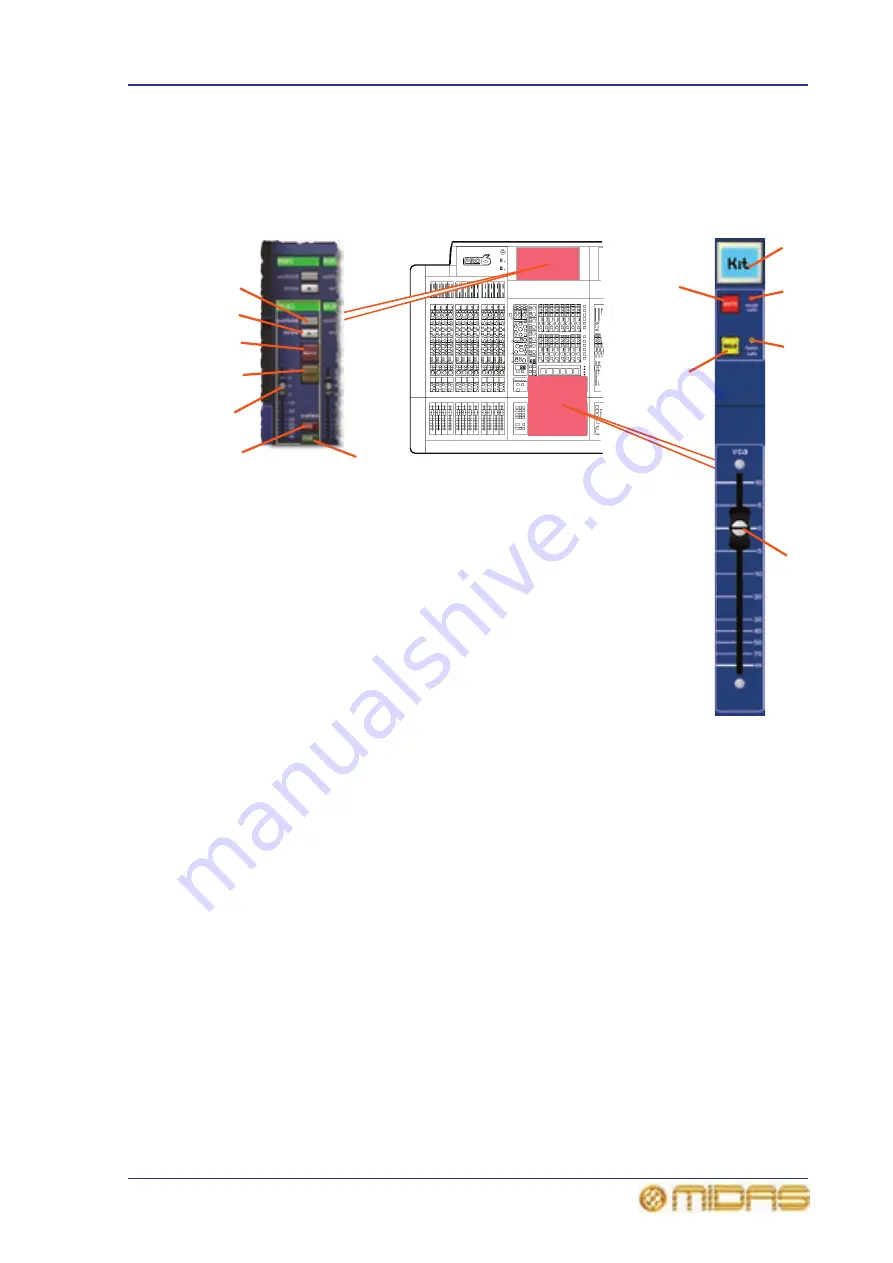
VCA fast strips
The VCA groups section contains 10 VCA fast strips. Each strip contains an LCD select
button, a solo routing section and a fader. The solo routing section activates solo
routing and selects which monitor section (A or B) the signals are routed to. The GUI
has additional controls.
POP groups
The POP groups have limited functionality. Each group has an LCD select button on the
control surface and an unfold and area B button on the GUI. These controls function in
a similar way to those in the VCA groups (see above).
1
LCD select button, selects the VCA group
and is also used for group membership
management. For more information, see
Table 1 “Description of the navigational
controls” on page 48.
2
mute safe LED, illuminates to show that
mute safe is on.
3
fader safe LED, illuminates to show that
the VCA control group fader has been removed
from scene recall.
4
vca control group fader, adds its level
control on top of the local channel fader
controls of the group members.
5
SOLO button activates signal routing from
all assigned channels to the monitor A section
of the control centre. It is used to monitor the
VCA master faders by creating a mix on the
solo buses, which consists of all input channels
and audio mix groups that are assigned to
control from corresponding VCA masters.
6
MUTE switch. This is, technically, not a
mute but a fader minus infinity (-
∞
) switch that
overrides the VCA group master (without
moving its physical position). The VCA group
mutes can be stored and recalled as part of the
scene automation. When on, it mutes all
post-fader signals from channels that have
been assigned to the VCA group master
(regardless of local press, scene mute and SIP
mute, which affect only the mute status
indicator while channel is
muted by VCA). However, it
does not update the mute
status indicator on the
channel (only channel
outputs). On removal of the
VCA mute, the channel
outputs are updated to the
current state of the channel
mute status indicator.
The VCA control group mute
has been removed from
scene recall and auto-mute
action. When mute safe is
active all channel mute
activation methods, other
than by local press, are ignored. De-activating
the mute safe condition re-evaluates and
applies the current status of auto-mute and
SIP mute.
7
Area B button (GUI only), changes input
channel selection from default (area A) to
those input channels set to area B mode — in
the input bays.
8
unfold button (GUI only), assigns the
VCA group to the control surface, unfolding the
group members to the input bays.
9
VCA/POP group ID, fixed and
user-configured name of group.
8
7
6
5
4
2
3
1
2
3
6
5
4
Содержание PRO6
Страница 2: ......
Страница 4: ......
Страница 6: ......
Страница 10: ......
Страница 14: ...xvi Precautions PRO6 Live Audio System Owner s Manual...
Страница 24: ...xxvi Contents PRO6 Live Audio System Owner s Manual...
Страница 25: ...PRO6 Live Audio System Owner s Manual Volume 1 Overview...
Страница 26: ......
Страница 30: ...4 Chapter 1 Introduction PRO6 Live Audio System Owner s Manual...
Страница 42: ...16 Chapter 2 PRO6 Live Audio System PRO6 Live Audio System Owner s Manual...
Страница 50: ...24 Chapter 3 About The PRO6 Control Centre PRO6 Live Audio System Owner s Manual...
Страница 51: ...PRO6 Live Audio System Owner s Manual Volume 1 Getting Started...
Страница 52: ......
Страница 59: ...PRO6 Live Audio System Owner s Manual Volume 2 Basic Operation Of The PRO6...
Страница 60: ......
Страница 64: ...38 Chapter 5 Before You Start PRO6 Live Audio System Owner s Manual...
Страница 104: ...78 Chapter 8 Patching PRO6 Live Audio System Owner s Manual...
Страница 131: ...PRO6 Live Audio System Owner s Manual Volume 3 Advanced Operation And Features...
Страница 132: ......
Страница 136: ...110 Chapter 10 Stereo Linking PRO6 Live Audio System Owner s Manual...
Страница 144: ...118 Chapter 11 Panning PRO6 Live Audio System Owner s Manual...
Страница 148: ...122 Chapter 12 Soloing PRO6 Live Audio System Owner s Manual...
Страница 150: ...124 Chapter 13 Muting PRO6 Live Audio System Owner s Manual...
Страница 192: ...166 Chapter 18 Copy And Paste PRO6 Live Audio System Owner s Manual...
Страница 242: ...216 Chapter 24 User Libraries Presets PRO6 Live Audio System Owner s Manual...
Страница 246: ...220 Chapter 25 File Management PRO6 Live Audio System Owner s Manual...
Страница 250: ...224 Chapter 26 Using Other Devices With The PRO6 PRO6 Live Audio System Owner s Manual...
Страница 267: ...PRO6 Live Audio System Owner s Manual Volume 4 Description...
Страница 268: ......
Страница 335: ...PRO6 Live Audio System Owner s Manual Volume 5 Appendices...
Страница 336: ......
Страница 365: ...Audio signal path 339 PRO6 Live Audio System Owner s Manual Audio signal path...
Страница 366: ...340 Appendix C Klark Teknik DN370 GEQ PRO6 Live Audio System Owner s Manual...
Страница 372: ...346 Appendix D Klark Teknik DN780 Reverb PRO6 Live Audio System Owner s Manual...
Страница 376: ...350 Appendix E I O Modules PRO6 Live Audio System Owner s Manual...
Страница 400: ...374 Appendix I Documentation PRO6 Live Audio System Owner s Manual...
Страница 511: ...Return 485 XL8 Live Performance System Owner s Manual Gate Not applicable EQ Not applicable...
Страница 524: ...498 Appendix N Parameters Affected By Copy And Paste XL8 Live Performance System Owner s Manual...
Страница 568: ...542 Appendix O Parameters Affected By Stereo Linking XL8 Live Performance System Owner s Manual...
Страница 612: ...586 Glossary PRO6 Live Audio System Owner s Manual...


