


Configuring the channels, groups and internal units
229
PRO6 Live Audio System
Owner’s Manual
is used in combination with the Delay Compensation section underneath (see “GUI
Delay Compensation options” on page 232).
• Redundant DSP? — if you have a redundant DSP connected in the system, select
Yes. Otherwise, select No.
Configuring the channels, groups and internal units
You can change the default name and colour of the input and output channels, groups,
internal rack units and GEQs of the PRO6 that appear on the control surface (LCD select
buttons) and GUI. This is done via the ‘Sheet’ screen of each item, which is accessible
via the GUI menu.
The procedure for configuring the VCA/POP groups is shown in “Configuring VCA/POP
groups” on page 85, and this is principally the same for each of the above items.
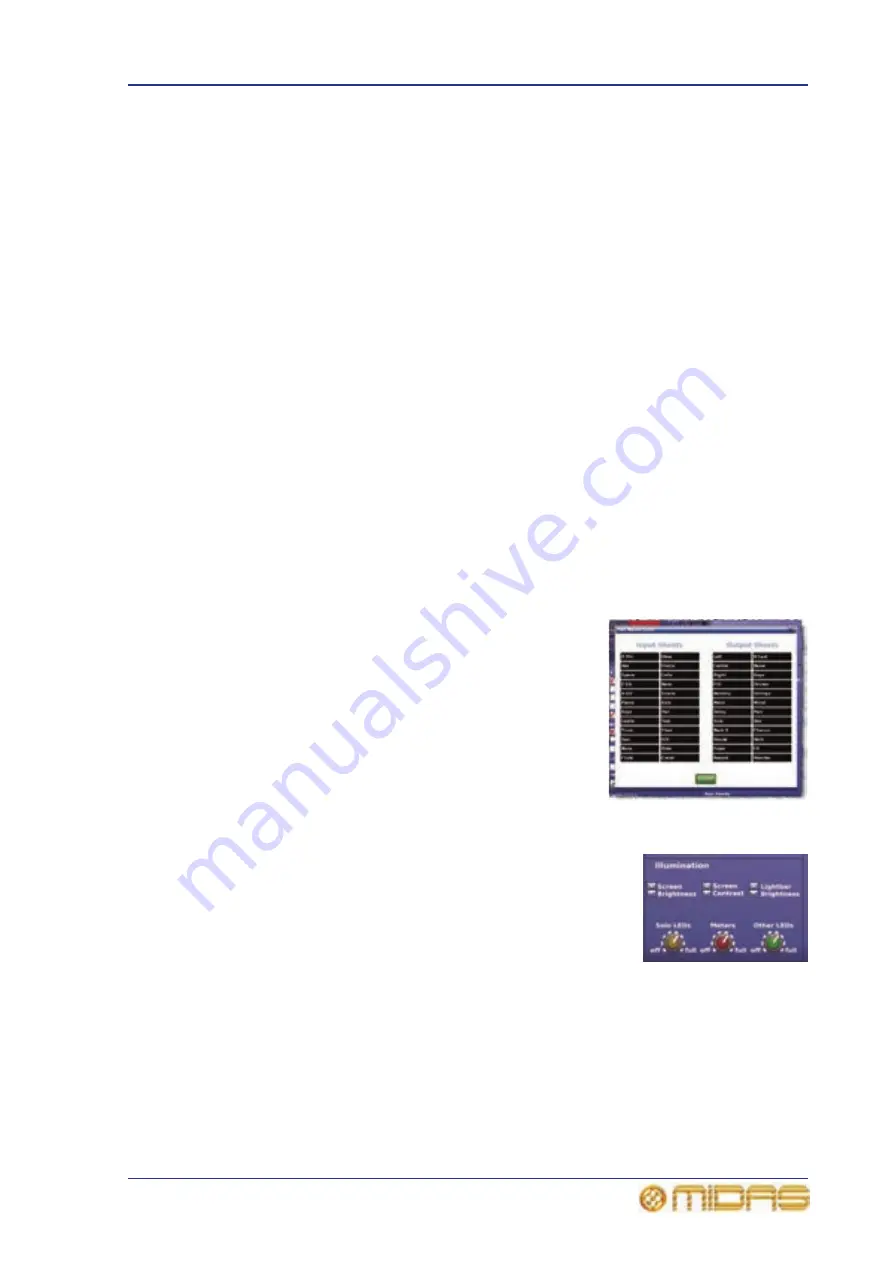
Changing the default input/output names
You can change the names that appear in the lists on the Input Sheet and Output
Sheet. These lists provide you with a number of default names from which you can
choose when naming your inputs and outputs in the GUI menu.
>> To change the set names in the Input/Output Sheets
1
At the GUI, choose home
Preferences
General.
2
In the Names Lists section of User Interface Preferences, click SET NAMES.
This opens the Set Name Lists window.
3
In the Set Name Lists window (shown right), click
within the field containing the name you want to
change. Type in the new name (see “Text editing”
on page 45).
Repeat for any other names you want to change.
4
Click OK.
Adjusting PRO6 illumination
The Illumination section of the Preferences screen lets you
adjust the brightness and contrast of both GUI screens
individually to suit the operating conditions. You can also
adjust the brightness of the lightbar (under the hood) that
illuminates the control surface and the brightness of the LEDs
(including meters) on the control surface.
>> To adjust the GUI screen brightness and contrast
1
At the desired GUI screen, choose home
Preferences
General.
2
In the Illumination section, do the following:
• To increase/decrease GUI screen brightness, click the up/down Screen
Brightness spin buttons.
• To increase/decrease GUI screen contrast, click the up/down Screen
Contrast spin buttons.
Содержание PRO6
Страница 2: ......
Страница 4: ......
Страница 6: ......
Страница 10: ......
Страница 14: ...xvi Precautions PRO6 Live Audio System Owner s Manual...
Страница 24: ...xxvi Contents PRO6 Live Audio System Owner s Manual...
Страница 25: ...PRO6 Live Audio System Owner s Manual Volume 1 Overview...
Страница 26: ......
Страница 30: ...4 Chapter 1 Introduction PRO6 Live Audio System Owner s Manual...
Страница 42: ...16 Chapter 2 PRO6 Live Audio System PRO6 Live Audio System Owner s Manual...
Страница 50: ...24 Chapter 3 About The PRO6 Control Centre PRO6 Live Audio System Owner s Manual...
Страница 51: ...PRO6 Live Audio System Owner s Manual Volume 1 Getting Started...
Страница 52: ......
Страница 59: ...PRO6 Live Audio System Owner s Manual Volume 2 Basic Operation Of The PRO6...
Страница 60: ......
Страница 64: ...38 Chapter 5 Before You Start PRO6 Live Audio System Owner s Manual...
Страница 104: ...78 Chapter 8 Patching PRO6 Live Audio System Owner s Manual...
Страница 131: ...PRO6 Live Audio System Owner s Manual Volume 3 Advanced Operation And Features...
Страница 132: ......
Страница 136: ...110 Chapter 10 Stereo Linking PRO6 Live Audio System Owner s Manual...
Страница 144: ...118 Chapter 11 Panning PRO6 Live Audio System Owner s Manual...
Страница 148: ...122 Chapter 12 Soloing PRO6 Live Audio System Owner s Manual...
Страница 150: ...124 Chapter 13 Muting PRO6 Live Audio System Owner s Manual...
Страница 192: ...166 Chapter 18 Copy And Paste PRO6 Live Audio System Owner s Manual...
Страница 242: ...216 Chapter 24 User Libraries Presets PRO6 Live Audio System Owner s Manual...
Страница 246: ...220 Chapter 25 File Management PRO6 Live Audio System Owner s Manual...
Страница 250: ...224 Chapter 26 Using Other Devices With The PRO6 PRO6 Live Audio System Owner s Manual...
Страница 267: ...PRO6 Live Audio System Owner s Manual Volume 4 Description...
Страница 268: ......
Страница 335: ...PRO6 Live Audio System Owner s Manual Volume 5 Appendices...
Страница 336: ......
Страница 365: ...Audio signal path 339 PRO6 Live Audio System Owner s Manual Audio signal path...
Страница 366: ...340 Appendix C Klark Teknik DN370 GEQ PRO6 Live Audio System Owner s Manual...
Страница 372: ...346 Appendix D Klark Teknik DN780 Reverb PRO6 Live Audio System Owner s Manual...
Страница 376: ...350 Appendix E I O Modules PRO6 Live Audio System Owner s Manual...
Страница 400: ...374 Appendix I Documentation PRO6 Live Audio System Owner s Manual...
Страница 511: ...Return 485 XL8 Live Performance System Owner s Manual Gate Not applicable EQ Not applicable...
Страница 524: ...498 Appendix N Parameters Affected By Copy And Paste XL8 Live Performance System Owner s Manual...
Страница 568: ...542 Appendix O Parameters Affected By Stereo Linking XL8 Live Performance System Owner s Manual...
Страница 612: ...586 Glossary PRO6 Live Audio System Owner s Manual...


