


Mic amp input gain (preliminary input processing)
265
PRO6 Live Audio System
Owner’s Manual
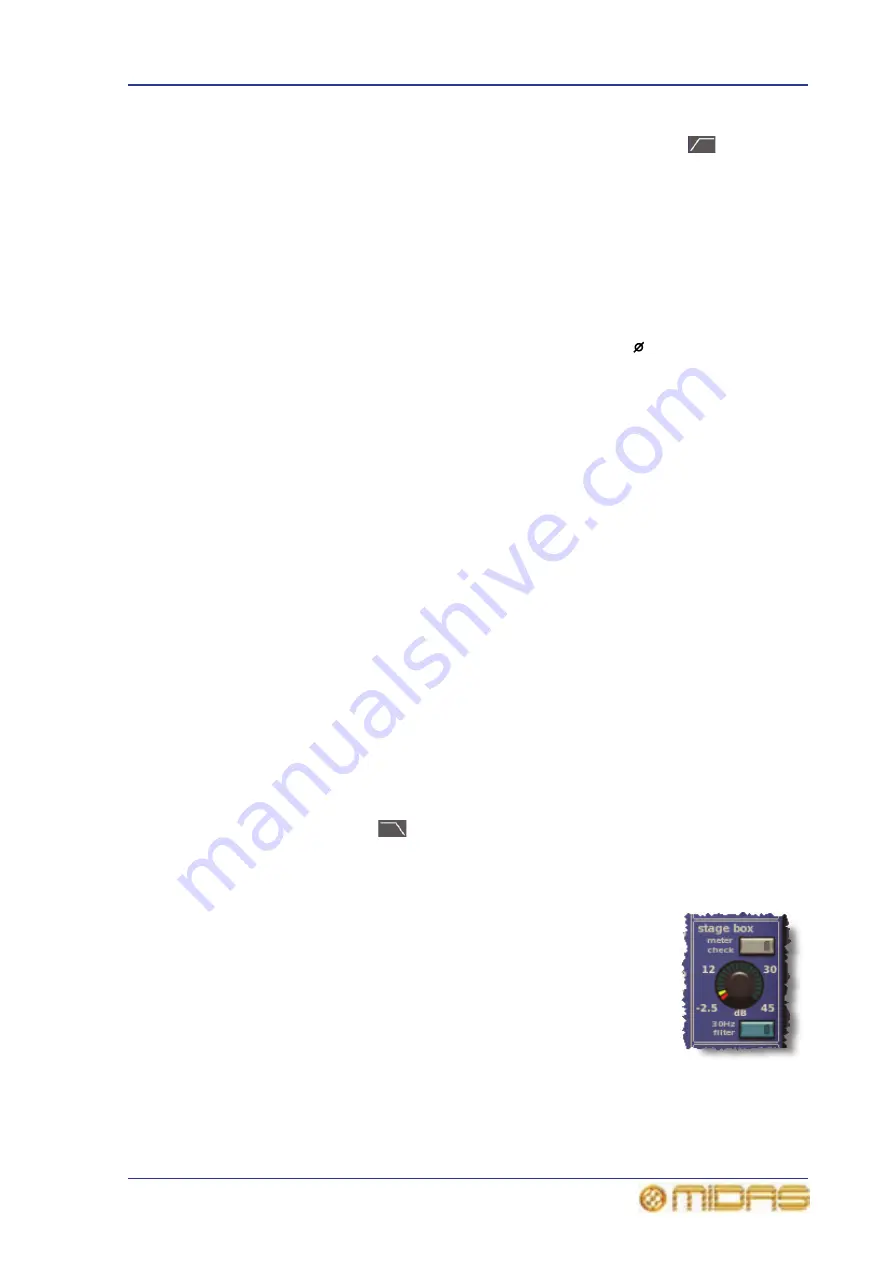
Note: If the inputs are from a DL431 Mic Splitter the section under
gain trim will be similar to the one shown right.
1
48V switch (stage box only), connects
48 volts of phantom power to the XLR mic
input channel connector. Suitable for a
condenser microphone or DI box.
2
TALK switch, connects talk mic and/or
tone and noise generators to the input
channel.
3
Gain swap button (see “Using gain swap”
below).
4
SLOPE switch (digital trim only) for
selecting the value of the high pass filter.
Where, switch on (illuminated) = 24dB slope
and switch off = 12dB slope.
5
SLOPE switch (digital trim only), for
selecting the low pass filter. Where, switch on
(illuminated) = 12dB slope and switch off =
6dB slope.
6
Stage box control knob adjusts the input
gain of the remote amplifier in 5dB steps,
ranging from -5dB to +40dB. Note that the
stage box control knob on the control surface
will only adjust the gain currently selected to
the GUI input channel strip, that is, stage box
or digital trim.
7
CHECK switch (stage box only), monitors
the mic amp input after the 30Hz filter, but
before any further processing. (The 30Hz
subsonic filter switch accesses high pass filter
on DL431 Mic Splitter if the PRO6 is connected
to an XL8. In this case, gain steps would be
2.5dB to +45dB.)
8
30Hz subsonic filter switch (DL431 Mic
Splitter only), acts on remote amplifier (mic
splitter) to remove very low frequencies in the
audio signal — usually caused by noise on
stage. This avoids wasting valuable headroom
trying to digitise it. This button changes meter
to monitor mic amp output directly.
9
Low pass control knob (digital trim only),
adjusts frequency of low pass filter in the
range 2kHz to 20kHz.
10
Low pass filter switch
(digital trim
only), activates low pass filter in the input
channel signal path before the insert points
and EQ.
11
High pass filter switch
(digital trim
only), activates high pass filter in the input
channel signal path before the insert points
and EQ.
12
High pass control knob (digital trim only),
adjusts frequency of high pass filter in the
range 10Hz to 400Hz.
13
Input fast strip quick access button,
navigates local channel to control surface and
selects channel. Also, assigns the channel’s
configuration processing area to the GUI
channel strip.
14
Phase switch , applies a 180° inversion
of the input signal polarity within the input
amplifier, such that channel signal will have
opposite polarity to the input signal.
This is used to correct input signal phase
problems when trying to sum signals that are
180° out of phase. For example, where two
mics are facing each other when using a mic on
both the top and bottom of a snare drum.
Ordinarily, the two mics would be out of phase
- causing cancellation when the control centre
sums the two signals into the output.
Reversing the phase of one signal causes the
mics to have the same phase, thus avoiding
cancellation
15
Gain trim (digital trim) control knob,
applies continuous trim adjustment (small
digital steps) of the input signal level in the
range –40dB to +20dB. Gives a further 40dB
of fine adjustment (DSP) on top of the remote
amplifier gain setting. Note that this control
knob (control surface only) will only adjust the
gain currently selected to its GUI input fast
strip, that is, stage box or digital trim.
16
Graph showing the effects of currently
applied filter.
17
Channel strip quick access button, assigns
configuration processing area of the currently
selected input channel to the GUI channel
strip, without affecting channel selection.
Содержание PRO6
Страница 2: ......
Страница 4: ......
Страница 6: ......
Страница 10: ......
Страница 14: ...xvi Precautions PRO6 Live Audio System Owner s Manual...
Страница 24: ...xxvi Contents PRO6 Live Audio System Owner s Manual...
Страница 25: ...PRO6 Live Audio System Owner s Manual Volume 1 Overview...
Страница 26: ......
Страница 30: ...4 Chapter 1 Introduction PRO6 Live Audio System Owner s Manual...
Страница 42: ...16 Chapter 2 PRO6 Live Audio System PRO6 Live Audio System Owner s Manual...
Страница 50: ...24 Chapter 3 About The PRO6 Control Centre PRO6 Live Audio System Owner s Manual...
Страница 51: ...PRO6 Live Audio System Owner s Manual Volume 1 Getting Started...
Страница 52: ......
Страница 59: ...PRO6 Live Audio System Owner s Manual Volume 2 Basic Operation Of The PRO6...
Страница 60: ......
Страница 64: ...38 Chapter 5 Before You Start PRO6 Live Audio System Owner s Manual...
Страница 104: ...78 Chapter 8 Patching PRO6 Live Audio System Owner s Manual...
Страница 131: ...PRO6 Live Audio System Owner s Manual Volume 3 Advanced Operation And Features...
Страница 132: ......
Страница 136: ...110 Chapter 10 Stereo Linking PRO6 Live Audio System Owner s Manual...
Страница 144: ...118 Chapter 11 Panning PRO6 Live Audio System Owner s Manual...
Страница 148: ...122 Chapter 12 Soloing PRO6 Live Audio System Owner s Manual...
Страница 150: ...124 Chapter 13 Muting PRO6 Live Audio System Owner s Manual...
Страница 192: ...166 Chapter 18 Copy And Paste PRO6 Live Audio System Owner s Manual...
Страница 242: ...216 Chapter 24 User Libraries Presets PRO6 Live Audio System Owner s Manual...
Страница 246: ...220 Chapter 25 File Management PRO6 Live Audio System Owner s Manual...
Страница 250: ...224 Chapter 26 Using Other Devices With The PRO6 PRO6 Live Audio System Owner s Manual...
Страница 267: ...PRO6 Live Audio System Owner s Manual Volume 4 Description...
Страница 268: ......
Страница 335: ...PRO6 Live Audio System Owner s Manual Volume 5 Appendices...
Страница 336: ......
Страница 365: ...Audio signal path 339 PRO6 Live Audio System Owner s Manual Audio signal path...
Страница 366: ...340 Appendix C Klark Teknik DN370 GEQ PRO6 Live Audio System Owner s Manual...
Страница 372: ...346 Appendix D Klark Teknik DN780 Reverb PRO6 Live Audio System Owner s Manual...
Страница 376: ...350 Appendix E I O Modules PRO6 Live Audio System Owner s Manual...
Страница 400: ...374 Appendix I Documentation PRO6 Live Audio System Owner s Manual...
Страница 511: ...Return 485 XL8 Live Performance System Owner s Manual Gate Not applicable EQ Not applicable...
Страница 524: ...498 Appendix N Parameters Affected By Copy And Paste XL8 Live Performance System Owner s Manual...
Страница 568: ...542 Appendix O Parameters Affected By Stereo Linking XL8 Live Performance System Owner s Manual...
Страница 612: ...586 Glossary PRO6 Live Audio System Owner s Manual...


