


Page 69 P/N 03521015 Rev U1
Bio-Medical Devices Intl
17171 Daimler Street Irvine, CA 92614 800-443-3842 www.maxair-systems.com
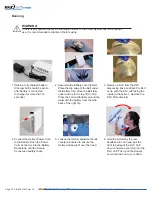
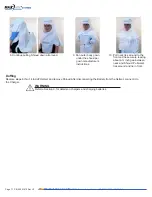
3. Align FCC front TurnClip horizontally,
snap the DLC Front Alignment Hole
over the TurnClip. Position the
TurnClip vertically to lock DLC in
place.
4. Align and snap one
DLC Side Attachment
Hole over the
respective FCC Side
Attachment Post.
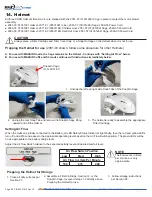
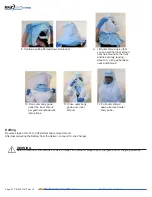
Replacing a DLC for continued use with the Helmet donned
1. Obtain the correct replacement
DLC from the corresponding DLC
dispensing Box.
2. Pull the DLC Peel Tab up, over
and to the left to remove the Lens
Protective Cover off the Lens.
5. Align and Snap the other
DLC Side Attachment Hole
over the other FCC Side
Attachment Post.
WARNING
After donning, if conditions 1 and 2 both are not achieved, switch to the
other size DLC and repeat steps 1 through 6 above.
Condition 1:
Ensure the DLC Flappers
are away from the Lens, positioned
perpendicular to your temples, and in
front of the FCC Side Tabs.
Condition 2:
Ensure slight tension
on the cuff is felt continuously
while sliding the index or first finger
between the cuff and the face all
along the chin and up to the temples,
from the right side of the face to the
left.
6. Slide your fingers between the
Cuff and face from each temple
down and under your chin to
pull the DLC Flappers away
from the lens, and to properly
position the cuff.
DLC Flappers
FCC Side Tabs