


3-48
IT
EN
DE
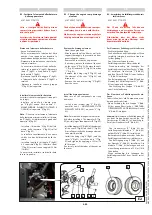
D6 – Change main circuit delivery filter
The filter “1” (Fig. D6) is provided with a
clogging indicator “6” (Fig. D6) which indica-
tes “red” when the oil filter cartridge “4” (Fig.
D6) is clogged.
Cartridge “4” (Fig. D6) is present inside the
filter “1” (D6) and to replace it:
-Unscrew the filter body “2” (Fig.D6) with a
spanner and remove “3” (Fig.D6) from the
filter head “5” (Fig.D6).
- Remove the cartridge 4 (Fig.D6) from the
filter head “5” (Fig.D6) and replace it with
a new one: (see “FILTER ELEMENTS AND
BELTS TABLE”).
- Then screw the filter body “2” (Fig.D6) back
on the head “5” (Fig.D6) and start up the
forklift truck and check to make sure there
are no leaks. (Check the working of the fil-
ter periodically by means of the indicator
“6” (Fig. D6).
D6
6
3
2
1
5
4
2
D6 - Sostituire filtro in mandata circuito
principale
Il filtro “1” (fig.D6) è munito di un indicatore
“6” (fig.D6) di intasamento che indica “rosso”
quando la cartuccia filtro olio “4” (fig.D6) è
intasata.
La cartuccia “4” (fig.D6) si trova all’interno
del filtro “1” (D6) e per sostituirla occorre:
- Svitare il corpo filtro “2” (fig.D6) con una
chiave e smontarlo “3” (fig.D6) dalla testata
del filtro “5” (fig.D6).
- Estrarre la cartuccia 4 (fig.D6) dalla tes-
tata del filtro “5” (fig.D6) e sostituirla con
una nuova vedi (“TABELLA ELEMENTI
FILTRANTI E CINGHIE”).
- Infine riavvitare bene il corpo filtro “2” (fig.
D6) alla testata “5” (fig.D6) e avviare il car-
rello e controllare che non ci siano perdite.
(Controllare periodicamente l’efficacia del
filtro mediante l’indicatore “6” (fig.D6).
D6 - Filter in der Druckleitung des
Hauptkreislaufes ersetzen
Der Filter “1” (Abb. D6) ist mit einem
Verstopfungsanzeiger “6” (Abb. D6) aus-
gestattet, der auf "rot" zeigt, wenn der
Ölfiltereinsatz “4” (Abb. D6) verstopft ist.
Der Filtereinsatz "4" (Abb. D6) befindet sich
im Inneren des Filters “1” (D6). Zur Ersetzung
wie folgt vorgehen:
- Den Filterkörper "2" (Abb. D6) mit einem
Schlüssel losschrauben und den Filter "3"
(Abb. D6) aus dem Kopfteil des Filters "5"
(Abb. D6) ausbauen.
- Den Filtereinsatz 4 (Abb. D6) aus dem
Kopfteil des Filters "5" (Abb. D6) heraus-
ziehen und ihn durch einen neuen Filter
ersetzen (vgl.: TABELLE FILTERELEMENTE
UND RIEMEN").
- Den Filterkörper "2" (Abb. D6) schließlich
gut am Kopfteil "5" (Abb. D6) befestigen,
den Teleskoplader anlassen und über-
prüfen, dass keine Leckagen vorhanden
sind. (Die Funktionstüchtigkeit des Filters
regelmäßig auf der Anzeige "6" (Abb. D6)
kontrollieren).
649050
IT-EN-DE
(01/06/2017)
MRT
EASY
55P
400
ST4
S2,
MRT
EASY
55P
360
ST4
S2,
MRT
EASY
75P
400
ST3B
S2,
MRT
EASY
75P
360
ST3B
S2,
MRT-X
EASY
75P
400
ST3A
S2,
MRT-X
EASY
75P
360
ST3A
S2