


3-40
IT
EN
DE
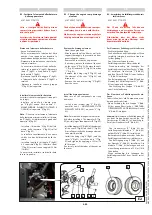
Fill the oil cup
Remove the oil filler plug “5” (D1/3).
Fill the oil cup with the right amount of
clean engine oil. (quantity: min.5 l - max.7 l)
Start the engine and run it “LOAD-FREE AT
MINIMUM SPEED” for two minutes.
This operation is carried out to ensure that
the oil flows in the lubrication system and
that the filters are filled with oil.
Check the filters for leaks.
Stop the engine and wait for at least 10
minutes to allow the oil to return to the cup
Remove the dipstick 6 (D1/3) to check the
level.
The oil level must remain between “MIN” “X
“(D1/3) and “MAX” “Y“(D1/3) on the dipstick.
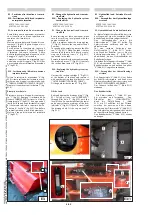
D1A - Change the engine sump drainage
element
The hot oil and components can cause per-
sonal injury. Avoid contact with the skin.
Make sure the engine is stationary before
carrying out maintenance or repairs on it.
Make sure the engine is stationary before
carrying out maintenance or repairs on it.
- Place a container under the base vent filter
“1” (D1A) to collect the oil (if any) that
flows out.
- Wipe the outside of the filter and use a
suitable tool to remove it.
- Lubricate sealing ring “2” (D1A) of the new
filter with clean engine oil.
- Insert the new filter in the seat of the filter
removed.
- Tighten the filter using a 12 Nm torque.
Do not tighten the filter excessively.
- Remove the container, dispose off the
used filter and oil drained out in a safe
place.
D1/3
D1A
6
5
1
2
Riempire la coppa dell’olio
Togliere il tappo di rifornimento dell’olio
“5” (D1/3).
Riempire la coppa dell’olio con la giusta
quantità di olio motore fresco. (quantità:
min.5 l - max.7 l)
Avviare il motore e farlo funzionare al
“REGIME DI MINIMO SENZA CARICO” per
due minuti.
Eseguire questa operazione per assicurare
che l’olio circoli nell’impianto di lubrificazio-
ne e che i filtri siano pieni di olio.
Controllare che i filtri non perdano.
Arrestare il motore e attendere per almeno
10 minuti che l’olio ritorni nella coppa
Estrarre l’astina di livello dell’olio 6 (D1/3)
per controllare il livello.
Mantenere il livello dell’olio tra i segni “MIN”
“X “(D1/3) e “MAX” “Y“(D1/3) sull’astina di
livello.
D1A - Sostituire l’ elemento dello sfiata-
toio della coppa motore
L’olio e i componenti bollenti possono
causare lesioni personali. Evitare il cont-
atto con la pelle.
Accertarsi che il motore sia fermo prima di
eseguire qualunque operazione di manu-
tenzione o riparazione.
Accertarsi che il motore sia fermo prima di
eseguire qualunque operazione di manu-
tenzione o riparazione
- Collocare un apposito recipiente sotto il
filtro sfiatamento basamento “1” (D1A) per
raccgliere eventuale olio che potrebbe
fuoriuscire
- Pulire l’esterno del filtro e usare un attrezzo
adatto per rimuovere lo stesso.
- Lubrificare l’anello “2” (D1A) di tenuta del
nuovo filtro con olio motore pulito.
- Inserire il filtro nuovo nella sede del prece-
dente.
- Serrare il filtro a 12 Nm.
- Non serrare eccessivamente il filtro.
- Rimuovere l’apposito recipiente, smaltire
il fitrto usato ed eventuale olio versatosi
in luogo sicuro.
Die Ölwanne auffüllen
Den Einfüllstopfen des Öls “5” entfernen (D1/3).
Die Ölwanne mit der korrekten Menge fri-
schem Motoröl auffüllen. (Menge: min.5
l - max.7 l)
Den Motor starten und für zwei Minuten mit
“MINDESTDREHZAHL OHNE LAST” betreiben.
Nach dieser Tätigkeit sicherstellen, dass das
Öl in der Schmieranlage zirkuliert und dass
die Filter voll mit Öl sind.
Überprüfen, dass die Filter nicht lecken.
Den Motor anhalten und mindestens 10
Minuten abwarten, bis das Öl in die Wanne
zurückfließt
Den Ölmessstab 6 (D1/3) herausziehen, um
den Ölstand zu kontrollieren.
Den Ölstand zwischen dem Zeichen “MIN”
“X “(D1/3) und “MAX” “Y“(D1/3) auf dem
Ölmessstab sein.
D1A - Auswechslung des
Entlüftungsventilelements der
Motorwanne
Das Öl und die heißen Teile können
Verletzungen an der eigenen Person ver-
ursachen. Den Hautkontakt vermeiden.
Sicherstellen, dass der Motor steht,
bevor man irgend eine Wartungs- oder
Reparaturarbeit ausführt.
Sicherstellen, dass der Motor steht, bevor irgendei-
ne Wartungs- oder Reparaturarbeit ausgeführt wird
- Einen eigenen Behälter unter dem
Entlüftungsfilter der Kurbelwelle “1” (D1A) posi-
tionieren, um etwaige Ölaustritte aufzufangen
- Die Außenseite des Filters reinigen und mit
einem geeigneten Werkzeug den Filter
entfernen.
- Den Dichtring “2” (D1A) des neuen Filters
mit sauberem Motoröl abschmieren.
- Den neuen Filter in der Aufnahme des
vorigen Filters einsetzen.
- Den Filter mit 12 Nm anziehen.
- Den Filter nicht zu stark festziehen.
- Den betreffenden Behälter entfernen, den
alten Filter und ggf. das Altöl an einem
sicheren Ort entsorgen.
649050
IT-EN-DE
(01/06/2017)
MRT
EASY
55P
400
ST4
S2,
MRT
EASY
55P
360
ST4
S2,
MRT
EASY
75P
400
ST3B
S2,
MRT
EASY
75P
360
ST3B
S2,
MRT-X
EASY
75P
400
ST3A
S2,
MRT-X
EASY
75P
360
ST3A
S2