System reliability guidelines
To help ensure proper cooling and system reliability, strictly follow these guidelines:
• Each of the drive bays has a drive or a dummy tray installed; or there is an electromagnetic interface (EMI)
protective panel or EMI shield installed to protect the drive cage.
• Leave adequate space around the server to ensure that the server cooling system works well. Leave
approximately 50 mm (2 inches) of open space around the front and rear of the server. Do not place
objects in front of the fans. For proper cooling and airflow, install the server cover before you turn on
the server. Operating the server for extended periods of time (more than 30 minutes) with the server
cover removed might damage server components.
• Properly route the cables. For some options, such as PCI cards, follow the cabling instructions that come
with the options in addition to the instructions in this manual.
• If your server has air ducts or air baffles, do not remove them while the server is running. Operating the
server without the air ducts or air baffles might cause the microprocessors to overheat.
• For servers that support up to two microprocessors, ensure that the second microprocessor socket
always contains a microprocessor or is protected by a microprocessor socket cover.
Removing the server cover
Attention:
Do not open your server or attempt any repair before reading and understanding “Safety information”
on page iii and “Guidelines” on page 53.
Before you begin, print all the related instructions or ensure that you can view the PDF version on another
computer for reference.
Note:
Depending on the model, your server might look slightly different from the illustrations in this topic.
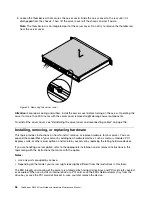
To remove the server cover, do the following:
1. Remove all media from the drives and turn off all attached devices and the server. Then, disconnect all
power cords from electrical outlets and disconnect all cables that are connected to the server.
2. If the server is installed in a rack cabinet, remove the server from the rack cabinet and place it on a flat,
clean, and static-protective surface.
Chapter 6
.
Installing, removing, or replacing hardware
55
Содержание ThinkServer RS140
Страница 1: ...ThinkServer RS140 User Guide and Hardware Maintenance Manual Machine Types 70F2 70F3 70F8 and 70F9 ...
Страница 16: ...4 ThinkServer RS140 User Guide and Hardware Maintenance Manual ...
Страница 18: ...6 ThinkServer RS140 User Guide and Hardware Maintenance Manual ...
Страница 48: ...36 ThinkServer RS140 User Guide and Hardware Maintenance Manual ...
Страница 122: ...110 ThinkServer RS140 User Guide and Hardware Maintenance Manual ...
Страница 128: ...116 ThinkServer RS140 User Guide and Hardware Maintenance Manual ...
Страница 132: ...120 ThinkServer RS140 User Guide and Hardware Maintenance Manual ...
Страница 145: ......
Страница 146: ......

