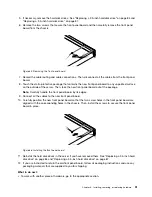
9. Remove the protective cover that protects the gold contacts on the bottom of the new microprocessor.
Do not touch the pins on the microprocessor socket and the gold contacts on the bottom of the new
microprocessor.
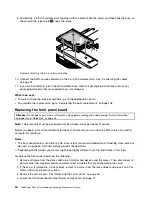
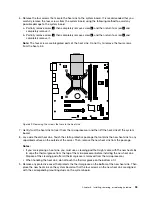
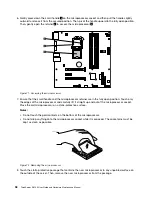
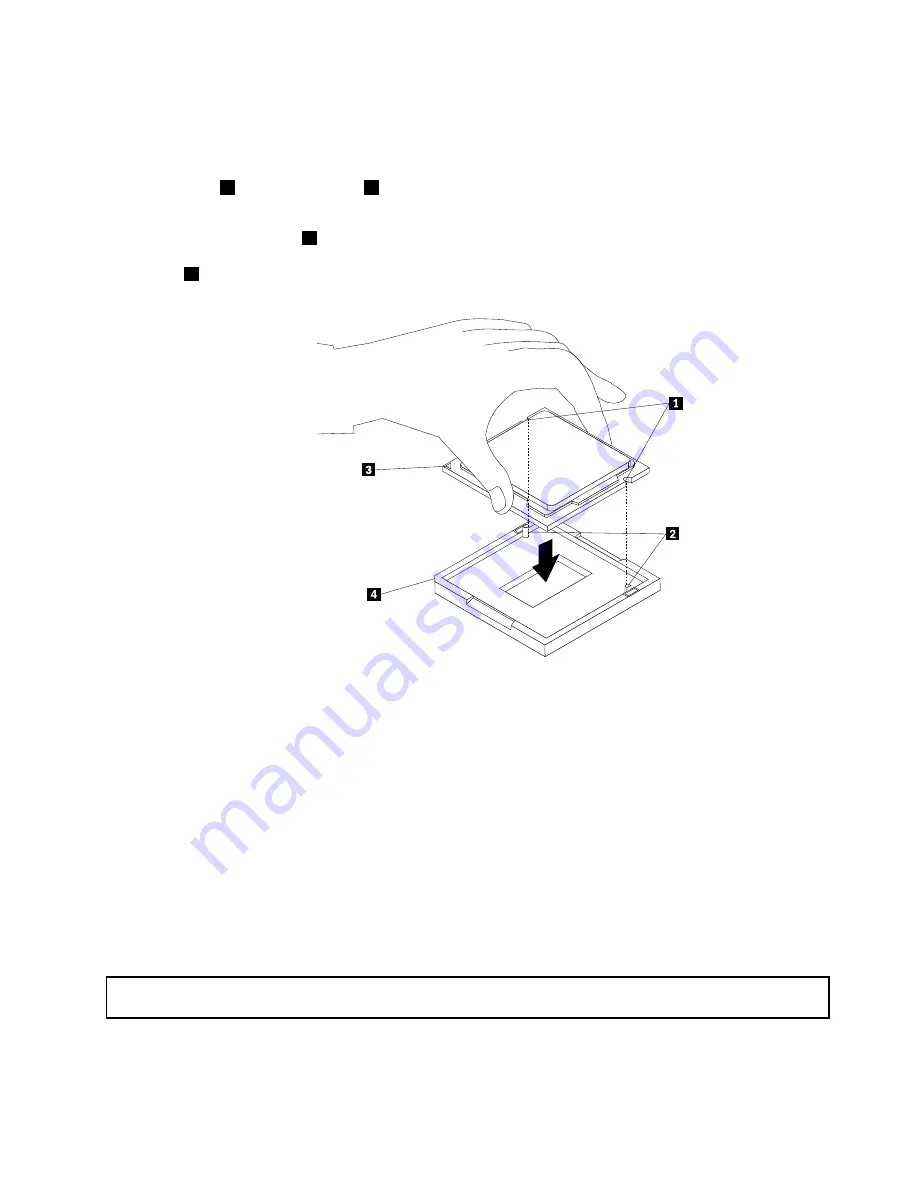
10. Note the orientation of the new microprocessor. Hold the new microprocessor by its edges and align
the notches
1
on it with the tabs
2
in the microprocessor socket. Then, carefully lower the new
microprocessor straight down into the microprocessor socket.
Note:
The small triangle
3
on one corner of the new microprocessor is the microprocessor orientation
indicator. The new microprocessor is in the correct orientation when this indicator faces the beveled
corner
4
of the microprocessor socket.
Figure 73. Installing the microprocessor
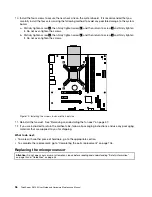
11. Carefully close the microprocessor retainer. Then, carefully close the small handle to lock the retainer
into position and secure the new microprocessor in the socket.
12. Reinstall the heat sink. See “Replacing the heat sink” on page 94.
13. Reinstall the fan duct. See “Removing and reinstalling the fan duct” on page 57.
14. If you are instructed to return the old microprocessor, follow all packaging instructions and use any
packaging materials that are supplied to you for shipping.
What to do next:
• To work with another piece of hardware, go to the appropriate section.
• To complete the replacement, go to “Completing the parts replacement” on page 106.
Replacing the coin-cell battery
Attention:
Do not open your server or attempt any repair before reading and understanding “Safety information”
on page iii and “Guidelines” on page 53.
Your server has a special type of memory that maintains the date, time, and configuration information for
built-in features. The coin-cell battery keeps the information active when you turn off the server. The
coin-cell battery normally requires no charging or maintenance throughout its life; however, no battery lasts
Chapter 6
.
Installing, removing, or replacing hardware
99
Содержание ThinkServer RS140
Страница 1: ...ThinkServer RS140 User Guide and Hardware Maintenance Manual Machine Types 70F2 70F3 70F8 and 70F9 ...
Страница 16: ...4 ThinkServer RS140 User Guide and Hardware Maintenance Manual ...
Страница 18: ...6 ThinkServer RS140 User Guide and Hardware Maintenance Manual ...
Страница 48: ...36 ThinkServer RS140 User Guide and Hardware Maintenance Manual ...
Страница 122: ...110 ThinkServer RS140 User Guide and Hardware Maintenance Manual ...
Страница 128: ...116 ThinkServer RS140 User Guide and Hardware Maintenance Manual ...
Страница 132: ...120 ThinkServer RS140 User Guide and Hardware Maintenance Manual ...
Страница 145: ......
Страница 146: ......

