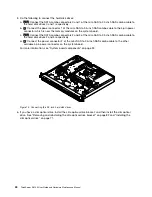
6. If you have a slim optical drive, install the slim-optical-drive bracket, and then install the slim optical
drive. See “Removing and reinstalling the slim-optical-drive bracket” on page 82 and “Installing the
slim optical drive” on page 71.
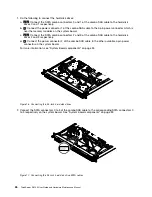
7. Do the following to connect the slim optical drive:
a.
1
: Connect one end of the available SATA cable to the SATA 4 connector on the system board.
See “System board components” on page 32.
b.
2
: Connect the other end of the SATA cable to the rear of the slim optical drive.
c.
3
: Connect the slim-optical-drive power connector of the mini-SAS to 3.5-inch SAS combo cable to
the power connector at the rear of the slim optical drive.
Figure 21. Connecting the slim optical drive
Note:
Ensure that the SATA cable and the power cable for the slim optical drive are routed under the
power supply cable and the mini-SAS to SAS combo power cable.
8. Route the cables using the cable ties in the chassis. See “Reinstalling the server cover and reconnecting
cables” on page 106.
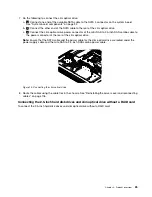
Connecting the 3.5-inch hard disk drives and slim optical drive without a RAID card
To connect the 3.5-inch hard disk drives and slim optical drive without a RAID card:
Chapter 3
.
Product overview
29
Содержание ThinkServer RS140
Страница 1: ...ThinkServer RS140 User Guide and Hardware Maintenance Manual Machine Types 70F2 70F3 70F8 and 70F9 ...
Страница 16: ...4 ThinkServer RS140 User Guide and Hardware Maintenance Manual ...
Страница 18: ...6 ThinkServer RS140 User Guide and Hardware Maintenance Manual ...
Страница 48: ...36 ThinkServer RS140 User Guide and Hardware Maintenance Manual ...
Страница 122: ...110 ThinkServer RS140 User Guide and Hardware Maintenance Manual ...
Страница 128: ...116 ThinkServer RS140 User Guide and Hardware Maintenance Manual ...
Страница 132: ...120 ThinkServer RS140 User Guide and Hardware Maintenance Manual ...
Страница 145: ......
Страница 146: ......


