46
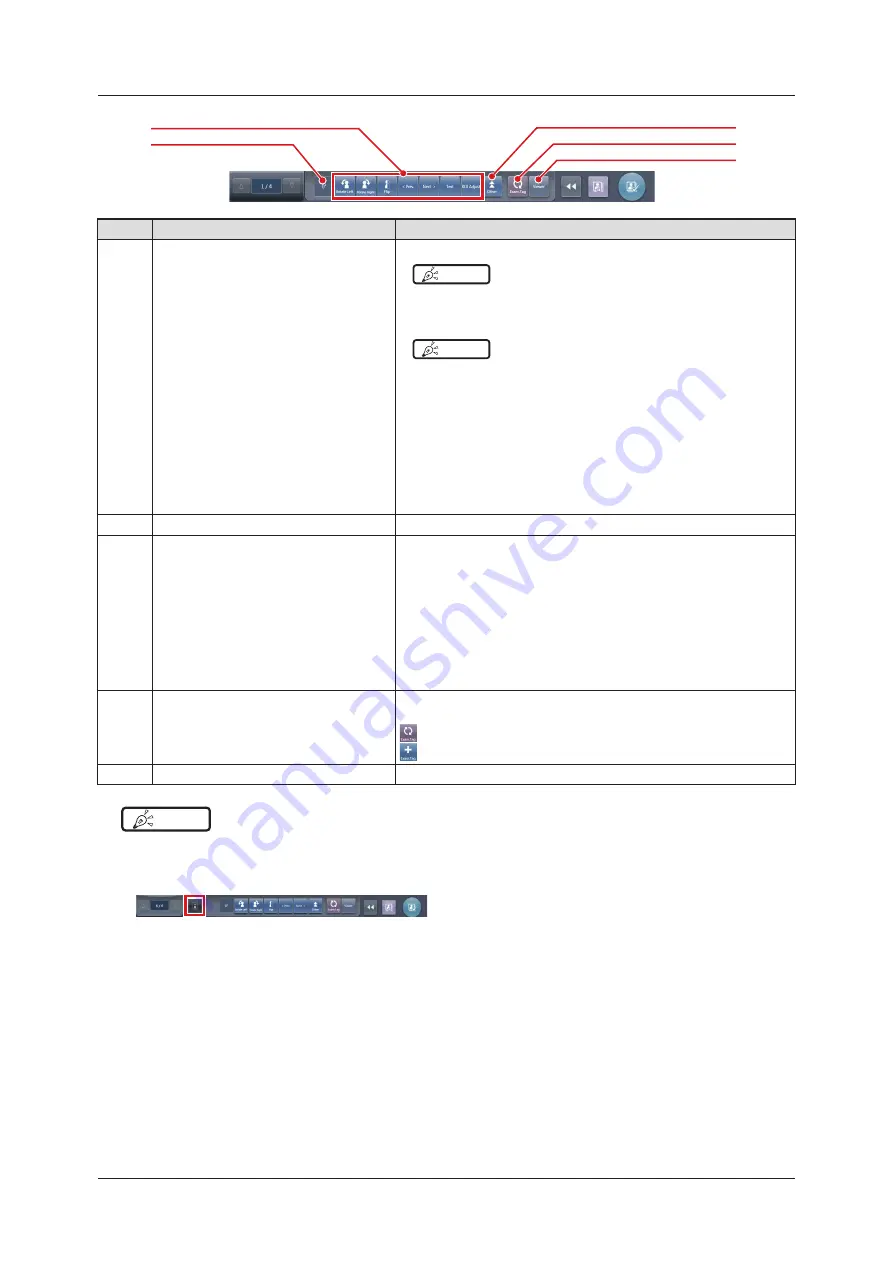
3.5 Exposure screen
(9)
(8)
(10)
(11)
(12)
Number
Name
Functions
(8)
Function button
[Rotate Left]: Turns the image to the left.
HINT
• The image is rotated by 90 degree to the left from the 360 degree
position .
[Rotate Right]: Turns the image to the right.
HINT
• The image is rotated by 90 degree to the right from the 0 degree
position .
[Flip]:
Flips the image. When the image is flipped, the icon is in the selected
state .
[< Prev.]: Displays the previous image.
[Next >]: Displays the next image.
[Text]: The viewer screen is displayed. You can add an annotation.
[ROI Adjust]:
The viewer screen is displayed . You can change the ROI area .
(9)
Status display
Displays the current rotation status by the angle value .
(10)
Extended area display button
Function buttons more than the maximum number of function buttons that can
be placed are stored. The stored function buttons pop up when the extended
area display button is pressed .
The following function buttons are set by default .
[S/G Drag]:
Switches to the operation mode used to adjust the S/G value . Pressing
it again cancels the operation mode for adjustment . You can adjust the
S and G values by dragging the image while the operation mode for
adjustment is turned on .
[Invert]: Inverts the black and white colors of the image.
(11)
Exam. Tag button
Changes or adds the Exam.Tag. The Exam. Tag buttons can be switched by
pressing and holding this button .
: Changes the Exam. Tag.
: Adds the Exam. Tag.
(12)
Viewer button
The viewer screen is displayed .
HINT
•••••••••••••••••••••••••••••••••••••••••••••••••••••••••••••••••••••••••••••••••••••••••••••••••••••
• The patient information display area can be small-sized by setting . Emergency and medical warning marks are not displayed in
the small-sized area .
• The Reject Image button may be displayed on the tool bar depending on the setting .
• The tool bar may also be displayed vertically on the right of the work area .
•
Both of the Exam.Tag buttons may be displayed simultaneously depending on the setting.
•
For the [Rotate Left] and [Rotate Right] buttons, you can configure the setting to switch whether to display both the buttons
or display either one . If either one is displayed, hold down the button to switch to the other button .
•
The types and locations of function buttons can be configured using the user tool.
•••••••••••••••••••••••••••••••••••••••••••••••••••••••••••••••••••••••••••••••••••••••••••••••••••••••••••••••••••••
Содержание CS-7
Страница 1: ...0197 Operation Manual EN 15 DIRECT DIGITIZER Version 1 30 ...
Страница 2: ......
Страница 8: ...8 ...
Страница 9: ...9 Introduction ...
Страница 18: ...18 ...
Страница 30: ...30 ...
Страница 31: ...31 Chapter 2 Product Overview This chapter describes the overview of this device ...
Страница 34: ...34 ...
Страница 74: ...74 ...
Страница 75: ...75 Chapter 4 General Operations This chapter describes general operation methods of this device ...
Страница 84: ...84 ...
Страница 120: ...120 ...
Страница 121: ...121 Chapter 6 Functions of each screen This chapter describes the functions of each screen of this device ...
Страница 197: ...197 Chapter 7 Various Functions This chapter describes the functions of this device ...
Страница 282: ...282 7 9 SIGMA stitching exposure 2 Press Return when image adjustment is completed The exposure screen is displayed ...
Страница 353: ...353 Chapter 8 Displayed Messages This chapter describes the displayed messages and the countermeasures ...
Страница 375: ...375 Chapter 9 Troubleshooting This chapter describes the countermeasures when the problems occur ...
Страница 383: ...383 Chapter 10 Error Codes This chapter describes the error codes and countermeasures ...
Страница 413: ...413 Chapter 11 Maintenance This chapter describes the items that require periodic maintenance ...
Страница 416: ...416 ...
Страница 417: ...417 Chapter 12 Specifications This chapter describes the specifications of this device ...
Страница 422: ...422 ...
Страница 423: ......
Страница 424: ...A47FBA01EN15 2017 01 12 JD ...


