TP-6255 7/06
58
Section 7 Controller
Procedure to disconnect the continuous power
mode jumper (optional).
Note:
The P7 jumper was available on generator sets
with serial numbers before 2051415.
Note:
For most applications, it is not necessary to
disconnect the continuous power mode jumper.
1. Prevent the generator set from starting.
a. Move the generator set master switch to the
OFF/RESET position.
b. Disconnect power to the battery charger, if
equipped
c. Disconnect the generator set engine starting
battery, negative (--) lead first.
2. Remove the controller from the generator set
housing.
a. Disconnect
the
engine
wiring
harness
connector P1 plug (35-pin) from the controller.
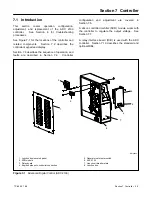
Disconnect the J15 and J16 connectors. See
Figure 7-13.
b. Remove the controller from the generator set
housing in order to access the back of the
controller.
3. Remove the controller’s back cover to access the
jumper.
a. Note the labels on the three leads connected to
the
generator
set
master
switch
for
reconnection later. Disconnect the leads at the
pink connectors. See Figure 7-13.
b. Remove the cover screws and remove the
controller’s back cover. See Figure 7-13.
4. Locate the P7 connector near the top of the
controller. See Figure 7-13. Remove the jumper
from pins 1 and 2 of the P7 connector. If the P7
connector has three pins, connect the jumper
across pins 2 and 3 for storage.
5. Replace the controller’s back cover and secure the
cover screws.
6. Reconnect the three pink connectors to the
generator set master switch.
7. Reconnect the J15 and J16 connectors.
8. Reconnect the engine wiring harness connector
P1 plug (35-pin) to the controller.
9. Reconnect the generator set engine starting
battery, negative (--) lead last.
10. Reconnect power to the battery charger, if
equipped.
11. Place the generator set master switch in the AUTO
position.
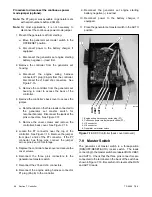
1. Engine wiring harness connector plug (P1)
2. Continuous power mode jumper location (P7)
3. J15 connector
4. J16 connector
5. Generator set master switch
tp6196
1
5
3
4
2
AUT
O
VBA
T
RUN
Figure 7-13
ADC Controller (back cover removed)
7.9 Master Switch
The generator set master switch is a three-position
(RUN\OFF/RESET\AUTO) rocker switch.
The leads
connecting to the master switch are labeled RUN, VBAT,
and AUTO. Check that the three pink connectors are
connected to the terminals on the back of the switch as
shown in Figure 7-13. Be careful not to reverse the RUN
and AUTO leads.
Содержание 6.5-27EFOZD
Страница 1: ...Marine Generator Sets Models 8 32EOZD 6 5 27EFOZD TP 6255 7 06a Service ...
Страница 12: ...TP 6255 7 06 12 Service Assistance Notes ...
Страница 22: ...TP 6255 7 06 22 Section 1 Specifications Notes ...
Страница 28: ...TP 6255 7 06 28 Section 3 Intake and Exhaust System Notes ...
Страница 62: ...TP 6255 7 06 62 Section 7 Controller Notes ...
Страница 78: ...TP 6255 7 06 78 Section 8 Component Testing and Adjustment Notes ...
Страница 87: ...TP 6255 7 06 87 Section 10 Wiring Diagrams GM46351 Figure 10 2 Wiring Diagram for 9EOZD 7EFOZD Model ...
Страница 88: ...TP 6255 7 06 88 Section 10 Wiring Diagrams ADV6845A F Figure 10 3 Wiring Schematic for All Models ...
Страница 89: ...TP 6255 7 06 89 Section 10 Wiring Diagrams ADV6845B F Figure 10 4 Wiring Diagram Schematic for All Models ...
Страница 92: ...TP 6255 7 06 92 Section 10 Wiring Diagrams Notes ...
Страница 100: ...TP 6255 7 06 100 ...
Страница 101: ...TP 6255 7 06 101 ...
Страница 102: ...TP 6255 7 06 102 ...
Страница 103: ...TP 6255 7 06 103 ...

