


Configuring IP/Ethernet
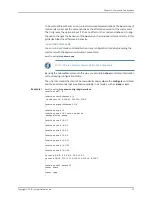
The E Series router supports IP/Ethernet. When you select an Ethernet interface, you can
assign an IP address to it, as the following example shows:
host1(config)#
interface fastethernet 4/1
host1(config-if)#
ip address 192.5.127.8 255.255.255.0
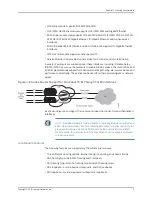
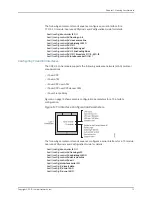
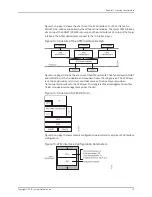
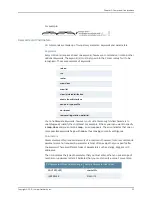
Figure 20 on page 22 shows an IP/Ethernet interface stack.
Figure 20: Example of IP over Ethernet Stacking Configuration Steps
Configuring IP Tunnels, Shared IP Interfaces, and Subscriber Interfaces
The E Series router supports IP tunnels, shared IP interfaces, and subscriber interfaces.
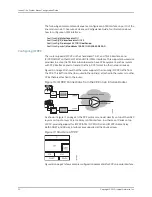
Configuring IP Tunnels
IP tunnels provide a way of transporting datagrams between routers separated by
networks that do not support all the protocols that those routers support. To configure
an IP tunnel, you must first configure a tunnel-service interface. (See “Configuring Tunnel
Service Interfaces” on page 16.)
When you have configured a tunnel-service interface, treat it in the same way as any IP
interface on the router. For example, you can configure static IP routes or enable routing
protocols on the tunnel interface. The IP configurations that you apply to the tunnels
control how traffic travels through the network.
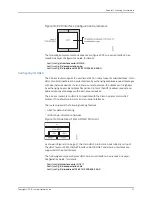
Configuring Shared Interfaces and Subscriber Interfaces
A shared IP interface is one of a group of IP interfaces that use the same layer 2 interface.
Shared IP interfaces are unidirectional—they can transmit but not receive traffic. A
subscriber interface is an extension of a shared IP interface. Subscriber interfaces are
bidirectional—they can both receive and transmit traffic.
You can create multiple shared IP interfaces over the same layer 2 logical interface—for
example, atm 5/3.101—enabling more than one IP interface to share the same logical
resources. This capability is useful, for example, when data received in one VRF needs
to be forwarded out an interface in another VRF, such as for BGP/MPLS VPNs (see
JunosE
BGP and MPLS Configuration Guide
, for more information). You can configure one or more
shared IP interfaces. Data sent over shared interfaces uses the same layer 2 interface.
You can configure shared interfaces as you would other IP interfaces. Each shared
interface has its own statistics.
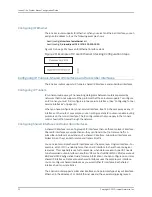
The E Series router supports subscriber interfaces on a particular type of layer 2 interface,
Ethernet. In the absence of VLANS, Ethernet does not have a demultiplexing layer. A
Copyright © 2010, Juniper Networks, Inc.
22
JunosE 11.3.x System Basics Configuration Guide
Содержание JUNOSE 11.3
Страница 6: ...Copyright 2010 Juniper Networks Inc vi...
Страница 8: ...Copyright 2010 Juniper Networks Inc viii JunosE 11 3 x System Basics Configuration Guide...
Страница 24: ...Copyright 2010 Juniper Networks Inc xxiv JunosE 11 3 x System Basics Configuration Guide...
Страница 32: ...Copyright 2010 Juniper Networks Inc 2 JunosE 11 3 x System Basics Configuration Guide...
Страница 146: ...Copyright 2010 Juniper Networks Inc 116 JunosE 11 3 x System Basics Configuration Guide...
Страница 166: ...Copyright 2010 Juniper Networks Inc 136 JunosE 11 3 x System Basics Configuration Guide...
Страница 432: ...Copyright 2010 Juniper Networks Inc 402 JunosE 11 3 x System Basics Configuration Guide...
Страница 488: ...Copyright 2010 Juniper Networks Inc 458 JunosE 11 3 x System Basics Configuration Guide...
Страница 524: ...Copyright 2010 Juniper Networks Inc 494 JunosE 11 3 x System Basics Configuration Guide...
Страница 554: ...Copyright 2010 Juniper Networks Inc 524 JunosE 11 3 x System Basics Configuration Guide...
Страница 566: ...Copyright 2010 Juniper Networks Inc 536 JunosE 11 3 x System Basics Configuration Guide...
Страница 588: ...Copyright 2010 Juniper Networks Inc 558 JunosE 11 3 x System Basics Configuration Guide...
Страница 613: ...PART 3 Index Index on page 585 583 Copyright 2010 Juniper Networks Inc...
Страница 614: ...Copyright 2010 Juniper Networks Inc 584 JunosE 11 3 x System Basics Configuration Guide...
Страница 632: ...Copyright 2010 Juniper Networks Inc 602 JunosE 11 3 x System Basics Configuration Guide...


