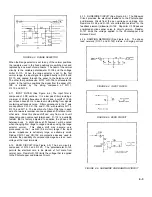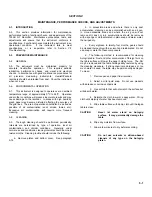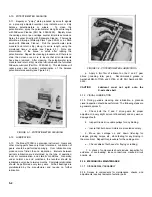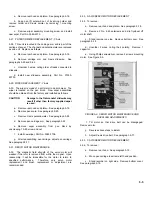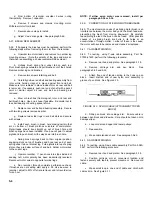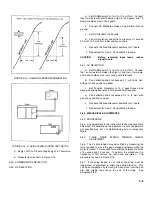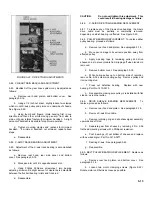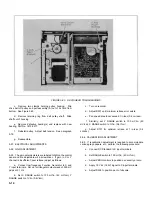
FIGURE 5-18. Y-AXIS PEN CARRIAGE ADJUSTMENT
b.
Adjust setscrew to minimize sideplay of block with
arm (Adjustment wrench provided in Accessory kit.)
c.
Move pen block to upper end of arm so as to align
upper setscrew with notch at upper end of arm. Repeat
operation.
NOTE: Care should be taken not to adjust out all
sideplay. This will cause mechanical drag and
result in a poor trace.
5-72. Y-AXIS ALIGNMENT
5-73. If a vertical pen trace deviates from perpendicular when
compared with correctly aligned paper grids, the carriage arm
should be adjusted as follows:
a.
Remove rear hood. See paragraph 5-18.
b.
Remove pen scale. See paragraph 5-20.
c.
Remove X-axis slidewire to prevent accidental
damage. See paragraph 5-24.
d.
Replace pen in notched holder.
e.
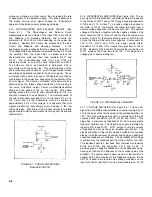
Partially loosen 2 shouldered screws, A and B, at
upper end of arm, see Figure 5-19.
f.
Manually move arm in indicated direction until pen
draws a line exactly parallel to vertical grid lines on graph
paper.
g.
Retighten both screws. Recheck alignment. Remove
pen.
h.
Reassemble.
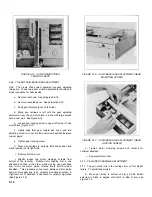
5-74. X-AXIS CABLE TENSION CHECK/ADJUSTMENT
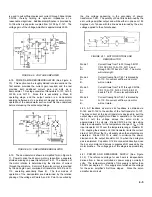
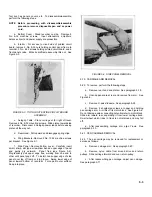
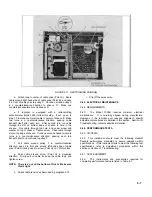
5-75. The X cable tension should be verified by measuring the
force required to displace it at a given distance. With the arm
at the extreme right, the force required to displace (in a plane
parallel to the control panel and in a direction toward the front
of the unit) the center of the longest span of the cable 1/4 inch
past the vertical wall of the motor assembly trough shall be
between the limits of 15 ounces and 32 ounces. See Figure
5-20. Some adjustment is possible by loosening and
repositioning idler pulleys.
5-76. If adjustment is not possible by moving pulleys, a new
cable must be installed, making sure that at time of installation
the tension is correct. See paragraph 5-44.
5-77.
X-AXIS DRIVE BELT TENSION CHECK/
ADJUSTMENT
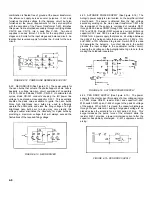
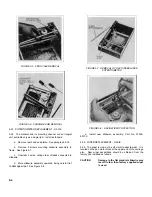
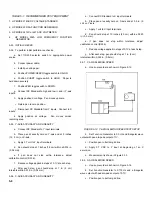
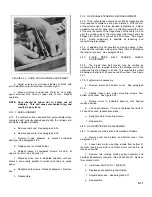
5-78. The X-axis drive belt tension may be verified by
measuring the force required to move the carriage arm to the
right while the drive sheave is locked. This required force shall
be between the limits of 20 ounces and 30 ounces. See Figure
5-21.
5-79. If adjustment is necessary:
a.
Remove platen and bottom cover. See paragraph
5-18.
b.
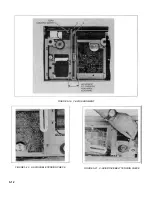
Slightly loosen two motor mounting screws from
bottom of recorder. See Figure 5-22.
c.
Rotate motor in indicated direction until desired
tension attained.
d.
Check belt tension. If force not between the limits of
20 and 30 ounces, repeat above steps.
e.
Retighten motor mounting screws.
f.
Reassemble.
5-80. X-AXIS DRIVE BELT REPLACEMENT
5-81. To replace the X-Axis drive belt proceed as follows:
a.
Remove rear hood, platen, and bottom cover. See
paragraph 5-18.
b.
Loosen two motor mounting screws from bottom of
recorder (see Figure 5-22) and rotate motor until belt is as
loose as possible.
c.
Remove two clamps holding pulley assembly and
carefully lift assembly outward. Old belt will slip off. Remove
from around motor.
d.
Install new belt, Part No. 1500-0043.
e.
Replace pulley assembly and clamps.
f.
Adjust belt tension. See paragraph 5-77.
g.
Reassemble.
5-11
Содержание HP-7035B
Страница 1: ...TECHNICAL MANUAL HEWLETT PACKARD MODEL HP 7035B ...
Страница 9: ...FIGURE 1 4 DIMENSION DRAWING FIGURE 1 5 ACCESSORIES 1 3 ...
Страница 12: ...FIGURE 1 7 TYPICAL FREQUENCY RESPONSE INPUT FILTER FIGURE 1 8 TYPICAL DYNAMIC RESPONSE 1 6 ...
Страница 14: ...FIGURE 2 1 WING BRACKET INSTALLATION FIGURE 2 2 STACKED CONFIGURATION 2 2 ...
Страница 16: ...FIGURE 3 1 FRONT PANEL CONTROLS 7035B AND 7035B 001 MODELS 3 2 ...
Страница 20: ...FIGURE 4 1 BLOCK DIAGRAM FIGURE 4 2 DETAILED BLOCK DIAGRAM 4 2 ...
Страница 48: ...TM 11 6625 2850 14 P FIGURE 6 1 EXPLODED VIEW CABINET 6 9 ...
Страница 49: ...TM 11 6625 2850 14 P FIGURE 6 2 EXPLODED VIEW CARRIAGE ARM SHEET 1 OF 2 6 10 ...
Страница 58: ...FIGURE 7 1 COMPONENT IDENTIFICATION FRAME 7 8 ...
Страница 59: ...TM 11 6625 2850 14 P Figure 7 2 Component Identification Circuit Board 7 9 ...
Страница 60: ...TM 11 6625 2850 14 P Figure 7 3 Schematic Model 7035B D 07035 92550 7 10 ...
Страница 62: ...TM 11 6625 2850 14 P FIGURE 8 1 COMPONENT IDENTIFICATION CIRCUIT BOARD 8 2 ...
Страница 66: ...TM 11 6625 2850 14 P FIGURE 8 5 EXPLODED VIEW CARRIAGE ARM 8 6 ...

