


40
V. ASSEMBLY INSTRUCTIONS
The DKB-2010 is no longer available in kit form. Chapter V has been deleted from this manual with the
exception of Section 5.13 which covers coding of the identifier.
5.13 Coding the Identifier
In addition to the regular letter and number keys, the keyboard provides three automatic sequence keys.
Each of these keys can be precoded with a series of characters which are automatically transmitted when
the key is depressed. Two of the keys, the CQ and AUX keys, can each store a three-character sequence. In
most applications, the CQ key is coded to transmit the letters C and Q plus a space. The AUX key is often
coded to transmit the letters D and X followed by a space. Note that coding a space character after the two
letters ensures that proper spacing is preserved then the sequence is transmitted repeatedly by holding the
key down. Of course, either of these keys can be programmed for any other sequence of up to three
characters. A popular use of the AUX key for RTTY operation is to generate the sequence "Carriage Return
(CR) - Line Feed (LF) - Letters". However, the AUX key is then not useful in Morse mode since the Morse
sequence would be "KN - AR - error (8 dots)". Factory wired DKB keyboards are coded for "D - X - space"
unless otherwise specified.
The third automatic key, designated HERE IS, can automatically produce a sequence of up to 15
characters. Most users prefer to precode it with a station identification message: the letters D and E,
followed by a space and the station call letters.
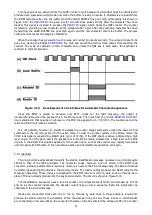
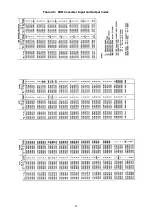
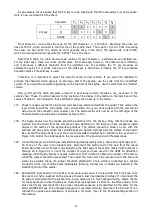
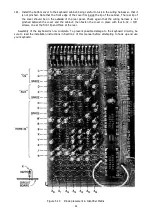
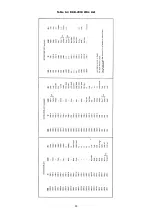
The automatic sequence keys are precoded by inserting diodes at the proper location in the diode matrix
on the logic circuit board. The diodes are positioned to represent the ASCII code for each character in the
sequence.
An enlarged view of the matrix is shown in Figure 5.13. Each horizontal path represents one character in
the precoded sequence. The first three lines are used for the three characters produced by the CQ key; the
next three are for the AUX key. The remaining 15 are for the characters of the HERE IS key sequence.
To determine the positions at which diodes should be installed it is necessary to refer to the ASCII code
chart (Table 4.2) at the end of Section 4 of this manual. The ASCII code for each character is represented
there by a series of ones and zeros.
Before starting to code the matrix, write down on a piece of scratch paper the exact message you would
like to store for each of the three keys. Be sure to include a mark to indicate where you wish spaces to
occur.
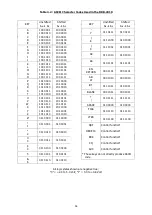
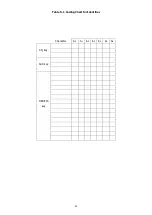
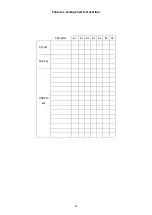
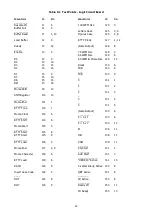
Next, enter your message in the left column of the following chart, under the heading "Character,"
starting at the top. Note that the first three spaces are for the CQ key, the next three are for the AUX key,
and the remaining spaces are for the HERE IS key.
Once you have listed the characters, refer to Table 4.2 to obtain the ASCII code for each character. Note
that in the table the code is given for bits A
6
through A
0
from left to right. In the identifier coding chart,
however, the bits are listed in the reverse order, A
0
through A
6
. When you have obtained the ASCII code
pattern (the sequence of ones and zeros) for a given character from Table 4.2, reverse the order and record
them opposite that character in the coding chart.
Содержание DKB-2010
Страница 1: ......
Страница 20: ...18...
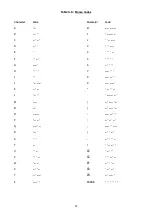
Страница 39: ...37 Table 4 3 ROM Converter Input and Output Codes...
Страница 43: ...41 Table 5 1 Coding Chart for Identifier Character A0 A1 A2 A3 A4 A5 A6 CQ key AUX key HERE IS key...
Страница 44: ...42 Table 5 1 Coding Chart for Identifier Character A0 A1 A2 A3 A4 A5 A6 CQ key AUX key HERE IS key...
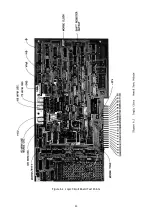
Страница 52: ...50 Figure 6 1 Logic Circuit Board Test Points...
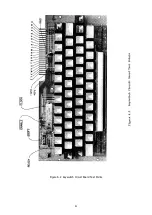
Страница 53: ...51 Figure 6 2 Keyswitch Circuit Board Test Points...
Страница 54: ...52 Figure 6 3 Power Supply Circuit Board Test Points...
Страница 57: ...55 Table 6 4 DKB 2010 Wire List...
Страница 63: ...61...
Страница 64: ...62...
Страница 65: ...63...
Страница 67: ...65...
Страница 69: ...67...
Страница 71: ...69...
Страница 73: ...71...
Страница 75: ...73...
Страница 77: ...75...
Страница 79: ...77...
Страница 81: ...79...
Страница 83: ...81...
Страница 85: ...83...
Страница 87: ...85...
Страница 89: ...87...
Страница 91: ...89...
Страница 92: ...90...
Страница 93: ...91...
Страница 94: ...92...
Страница 95: ...93...
Страница 96: ...A1 EXTENDED MEMORY OPTION FOR THE DKB 2010 KEYBOARD INSTRUCTION MANUAL...
Страница 100: ...A5...
Страница 101: ...A6...