


FlowAct Diaphragm Linear Actuator FCD VLENIMFACTA4 10/16
11
flowserve.com
3. Check the packing box bolting to ensure the correct
adjustment.
NOTICE
Over tightening can cause excessive
packing wear and high stem friction
that may impede plug movement.
4. Continuously increase load until operation parameters
are reached.
5. Minor relaxation of the flange bolting is possible after
initial assembly. Retorque the bonnet flange bolting
if necessary before installation or following an initial
temperature excursion to ensure the bonnet gaskets
do not leak.
(See User Instructions - Control Valve).
WARNING
Due to risk of crushing hazard, do
not work between the yoke legs
while the valve is in operation.
Prior to start-up, we strongly recommend that you:
1. Stroke the valve and compare the plug position
indicator on the stem clamp to the stroke indicator
plate. The plug should change position in a smooth,
linear fashion.
NOTICE
Graphite packing commonly creates
more friction than other materials,
such as PTFE. If over tightened, excessive friction may
impair smooth control.
2. Adjust instrument signals to ensure a full stroke.
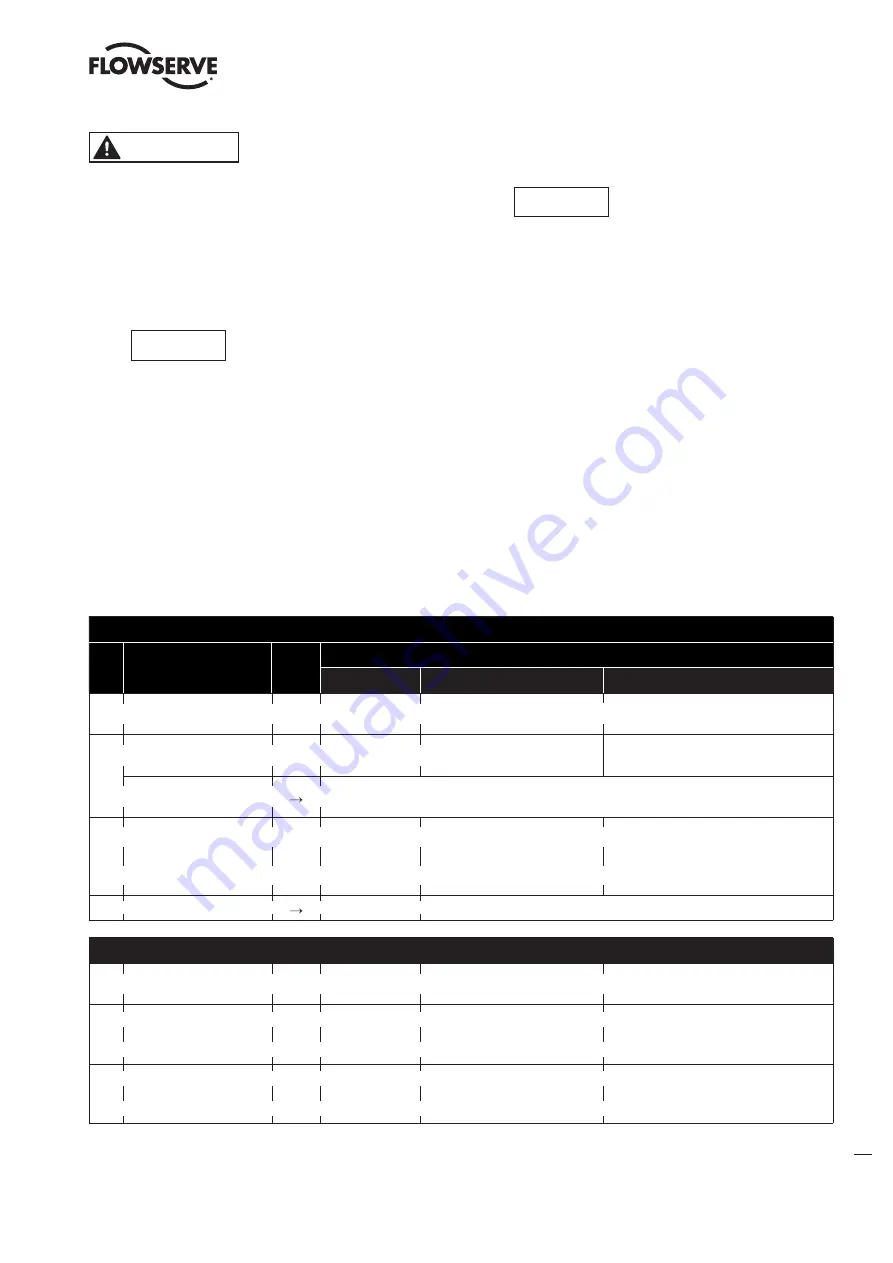
Recommended Maintenance Actions
No.
Service
Inter-
val
Valve Condition
Good
Adequate
Inadequate
1
Visual inspection of
the actuator
Bi-
weekly
No action
Clean actuator stem with a
soft cloth
Repair or replace actuator according to
product life cycle
2
Visual inspection of
the tightness
Bi-
weekly
No action
Retighten leaky air supply,
case bolting
Replace leaky air supply, diaphragm,
O-ring immediately
Preventive maintenance
of the diaphragm
Dependent upon results of previous maintenance (see numbers 1 and 2 above) or a
minimum of once every 10 years
3
Visual inspection of
case bolting
Yearly No action
Retighten case bolting if
diaphragm leaks.
Remove from service and replace
case bolting, diaphragm immedi-
ately if external leakage persists or
if bolting is damaged
4
Operation test
No action
Perform 3 full strokes using air supply; check for leakage
Recommended maintenance actions using the Logix digital positioner with ValveSight diagnostic solution software
5 Visual inspection of
diagnostic interface
Weekly No action -
valve is healthy
Take action per warning
Overhaul or replace required part per
alarm
6 Check health parameter
of actuator
Warn-
ing
No action -
actuator is
healthy
Check and retighten air
supply
Overhaul or replace actuator after
alarm
7 Check health parameter
of positioner
Warn-
ing
No action -
positioner is
healthy
Start step test
Overhaul or replace positioner after
alarm
Table 6: Service activities check list
12 Actuator Maintenance
Maintenance intervals and service life of an actuator is unique
to local environmental conditions at the site. The intervals
specified in the User Instructions are recommendations and
serve only as a guide. Under difficult operating conditions,
maintenance may be more frequent. We strongly recom-
mend a site survey followed by a documented procedure for
performing the maintenance work. Maintenance personnel
should perform and log the work accordingly. The data col-
lected can be used as a basis for dynamically determining the
maintenance intervals and activities.


