background image

Operation 


CB-640x Installation and User Guide Revision 100 

February 2021 

24 

This document does not contain any export-controlled information. 


Figure 27: Camera Web Page First-Time Login 

  Log back in with the new password. The camera’s 

View Settings home page

 opens. 

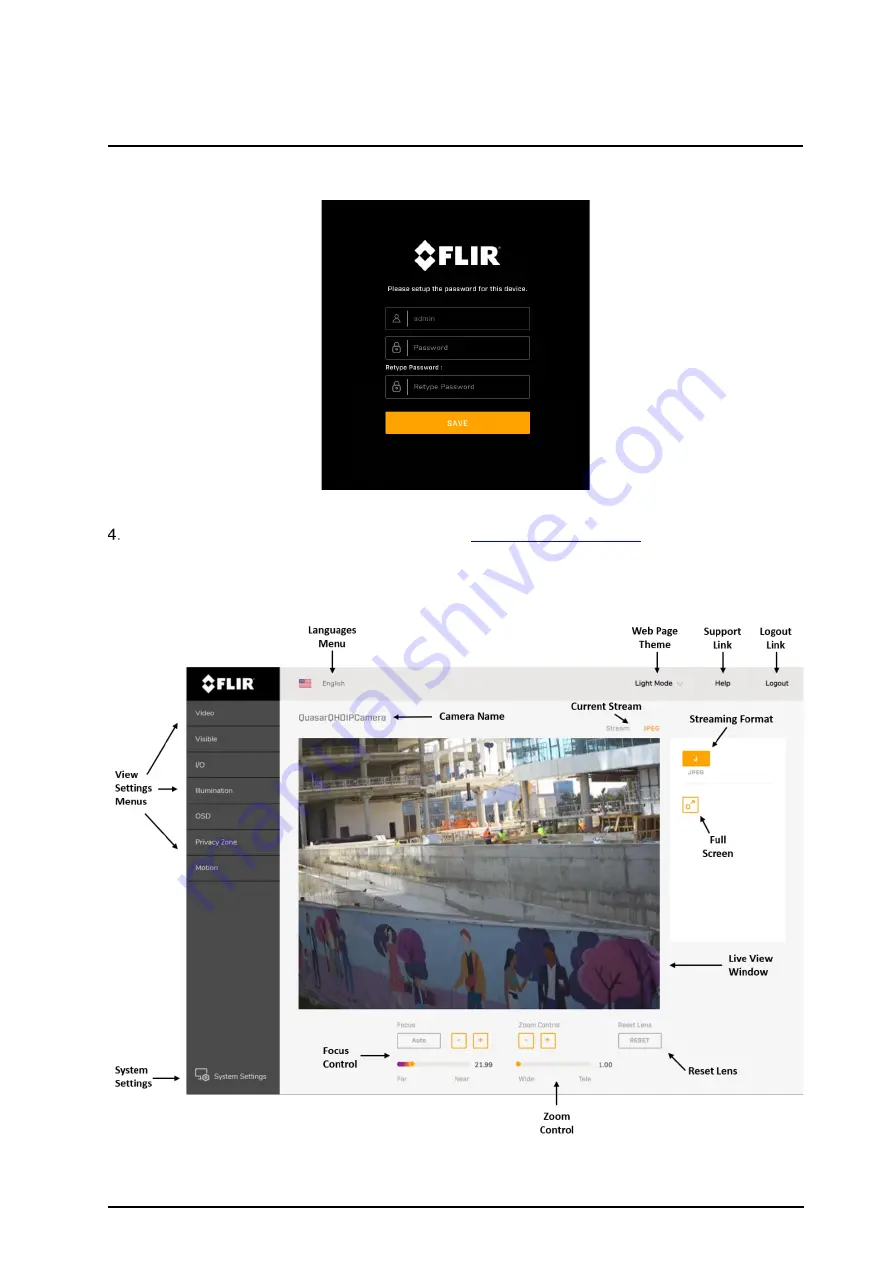
4.2  View Settings Home Page 

By default, the camera web page opens on the View Settings page. 


Figure 28: View Settings Home Page (Google Chrome) 

Содержание Quasar CB-6404

Страница 1: ...CB 640x Installation and User Guide Revision 100 February 2021 This document does not contain any export controlled information Quasar Installation and User Guide CB 6404 CB 6408 Bullet Cameras...

Страница 2: ...CC rules to operate this device Note 1 This equipment has been tested and found to comply with the limits for a Class B digital device pursuant to Part 15 of the FCC rules These limits are designed to...

Страница 3: ...tself or in the product literature must not be disposed of in regular rubbish bins mixed with regular household or other commercial waste or by other regular municipal waste collection means Instead a...

Страница 4: ...e Camera and Configure for Networking 16 3 6 2 Change the Video Format Optional 18 3 7 Mounting the Back Box and Routing the Cables 19 3 8 Mounting and Aiming the Camera 19 3 8 1 Attaching the Camera...

Страница 5: ...58 5 11 Snapshot Page 59 5 12 Recording Page 59 5 13 Email Page 60 5 14 Cyber Page 61 5 14 1 Certificates 62 5 14 2 SNMP 64 5 14 3 802 1X 65 5 14 4 TLS HTTPS 66 5 14 5 Ports 67 5 14 6 IP Filter 68 5 1...

Страница 6: ...e Video Format Window 18 Figure 17 RJ45 Insertion Tool 19 Figure 18 Single Cable Rubber Seal 19 Figure 19 Alignment Triangles 20 Figure 20 Attach Camera to Back Box 20 Figure 21 Mounting Complete 20 F...

Страница 7: ...Figure 54 Users Page 49 Figure 55 Add User Dialog Box 49 Figure 56 User Management 50 Figure 57 FTP Page 50 Figure 58 SD Card Page SD Card Not Inserted 51 Figure 59 SD Card Page SD Card Inserted and...

Страница 8: ...ed information Figure 78 Certificate Generated 63 Figure 79 Upload Certificate 63 Figure 80 SNMP Settings 64 Figure 81 802 1X Settings 66 Figure 82 TLS HTTPS Settings 67 Figure 83 Port Settings 67 Fig...

Страница 9: ...detection capabilities and their limitation as they apply to their unique site requirements FLIR Systems Inc and its agents make no guarantees or warranties to the suitability for the users intended u...

Страница 10: ...of data Attention est un message pr ventif indiquant qu une proc dure ou condition pr sente un risque potentiel de dommages permanents pour l quipement et ou de perte de donn es A Note is useful infor...

Страница 11: ...curit et de r duire les risques de blessure ou de dommages veuillez respecter les consignes suivantes Warning The unit s cover is an essential part of the product Do not open or remove it Never opera...

Страница 12: ...rn out the sensor If the camera will be fixed to a ceiling verify that the ceiling can support more than 50 newtons 50 N of gravity or over three times the camera s weight The camera should be packed...

Страница 13: ...for the type of video cabling used between the unit and the cameras and external devices Using a cable longer than the manufacturer s specifications for optimal video signal may result in degradation...

Страница 14: ...iris P Iris lens Varifocal 9 22mm 62 26 HFOV F1 6 D N motorized auto focus auto iris P Iris lens Varifocal 2 7 13 5mm 102 32 HFOV F1 4 D N motorized auto focus auto iris P Iris lens Varifocal 9 22mm 3...

Страница 15: ...SNMP v1 v2c v3 and SNMP traps 802 1X and SSL TLS security protocols Powered by 802 3at PoE Backlight compensation Gamma correction UPnP support Electronic day night ICR Shutter WDR White balance ONVI...

Страница 16: ...ge appears Figure 3 FLIR Quasar Premium Bullet Details Page on FLIR com 3 Scroll down to see the camera s specifications and related documents 4 Click Go to Product Support to open the camera s suppor...

Страница 17: ...ion and User Guide Revision 100 February 2021 9 This document does not contain any export controlled information 2 3 Camera Dimensions Following are the CB 640x camera dimensions Figure 5 Side Dimensi...

Страница 18: ...S 3 1 Supplied Components The unit package contains the following items QTY Description 1 CB 640x IR bullet camera body attached to sun shield bracket and adapter plate 1 T10 security Torx wrench 1 Ba...

Страница 19: ...hysical requirements etc Plan ahead to determine where to install infrastructure weatherproof equipment Whenever possible ground components to an outdoor ground 3 4 Hardware Description Figure 7 Hardw...

Страница 20: ...camera s Internal Interfaces 3 4 1 System Cable The camera s built in system cable includes an RJ 45 Ethernet jack and five 2 two wire leads that provide audio input and output alarm input and output...

Страница 21: ...in the card slot For recording HD video FLIR recommends an SDHC or SDXC card capable of a minimum write speed of 10 MB sec Caution Before you can record clips on the microSD card it must first be for...

Страница 22: ...re that the camera remains waterproof store the safety wire inside the camera before locking the access cover 3 5 Powering the Camera The camera can be powered by PoE or by an external DC or AC power...

Страница 23: ...ion and then proceed with initial configuration If you are mounting the camera prior to initial configuration proceed as such 1 Mounting and Connecting the Camera 2 Adjusting the Sun Shield 3 Initial...

Страница 24: ...LAN you must attach the camera via the network switch or router to the same subnet network segment or VLAN as the computer that manages the unit FLIR recommends using the DNA tool to discover the cam...

Страница 25: ...figured the camera s users and passwords Figure 13 DNA Login Window Click Login wait for Ok status to appear and then click Close In the DNA Discover List verify that the camera s status is Authentica...

Страница 26: ...y the camera s networking settings for example IP address subnet mask and default gateway 4 Click Save Applying any changes on the Network page requires rebooting the camera 3 6 2 Change the Video For...

Страница 27: ...ou are connecting the camera using a single Ethernet cable with an RJ45 plug attached attach the RJ45 insertion tool included with the camera to the RJ45 plug Then route the tool plug and cable throug...

Страница 28: ...mera to make sure the screws are not bearing the camera s weight when tightening them use the Torx wrench to tighten the three T20 screws attached to the adapter plate Figure 20 Attach Camera to Back...

Страница 29: ...adjust the camera s pan tilt and rotation Retaining ring for pan adjustment 1 Using the T10 torx wrench loosen the locking screw and rotate the camera You can also rotate the lens base until satisfied...

Страница 30: ...us and format the microSDXC card by Accessing the Camera s Web Page For more information about the camera web page s zoom and focus controls see View Settings Home Page For more information about form...

Страница 31: ...press ENTER Note When HTTPS secure HTTP is enabled by default the system uses HTTPS when you enter the IP address For example https 192 168 0 250 See TLS HTTPS If you want to use HTTP to log into the...

Страница 32: ...ontain any export controlled information Figure 27 Camera Web Page First Time Login Log back in with the new password The camera s View Settings home page opens 4 2 View Settings Home Page By default...

Страница 33: ...yed in the upper right corner of the GUI Light Mode Dark Mode Chrome and Internet Explorer only Select the camera web page theme Light Mode is the default setting Logout Link Click Logout to exit the...

Страница 34: ...bled only the H 264 codec is supported For each stream in each profile you can configure the following settings Codec Select H 265 H 264 default or MJPEG based on required image quality and storage sp...

Страница 35: ...as videoconferencing and mobile applications This is the most common profile used in IP security cameras due to the low computational cost of processing the video Resolution The specific camera model...

Страница 36: ...EG OFF 720x480 30fps H264 H265 MJPEG 720x480 30fps H264 H265 MJPEG OFF OFF 1920x1080 30fps H264 H265 15fps MJPEG OFF 720x480 30fps H264 H265 MJPEG 1280x720 30fps H264 H265 MJPEG OFF 720x480 30fps H264...

Страница 37: ...PEG 1280x720 30fps H264 H265 MJPEG OFF 720x480 30fps H264 H265 MJPEG 720x480 30fps H264 H265 MJPEG OFF 720x480 30fps H264 H265 MJPEG When PAL is selected the streams support 720x576 and 25fps instead...

Страница 38: ...Each coded video stream consists of successive GOPs GOP structure specifies the order in which intra coded frames and inter coded frames are arranged The GOP uses I Frames Intra coded Frames which are...

Страница 39: ...RL syntax is rtsp camera IP address stream name Stream Stream name Example URL Unicast stream 1 stream1 rtsp 192 168 0 250 stream1 Multicast stream 1 stream1m rtsp 192 168 0 250 stream1m Unicast strea...

Страница 40: ...figure picture quality focus zoom and other image settings Figure 32 Visible Page Brightness Specify a value between 100 and 100 which provides the highest brightness The default is 0 Exposure Represe...

Страница 41: ...posure settings and day night settings The configurable settings depend on the selected Auto Exposure Mode Auto default Sets the camera s shutter speed to automatically achieve a consistent video outp...

Страница 42: ...Iris Select a suitable shutter speed according to the environmental luminance Min Shutter Speed PAL NTSC 1 2 1 100 1 1000 1 2 1 120 1 1000 1 4 1 200 1 2000 1 4 1 200 1 2000 1 6 25 1 250 1 2500 1 7 5...

Страница 43: ...Gain only available when Auto Exposure Mode is set to Manual Increasing the gain lightens dark pictures resulting from low level lighting Move the slider or manually specify a value between 0 48 in dB...

Страница 44: ...inal image When set to 0 45 the image displayed on your screen has less contrast than the original image Day Night Setting Controls the IR Cut IRC filter for electronic day night operation Auto defaul...

Страница 45: ...n click Save The camera reboots Where relevant changing the settings on the Visible page immediately affects the live visible video images and streams To save changes click Save To discard changes and...

Страница 46: ...of alarm output pin activation Pulse Activates the alarm output pin for a configurable duration On Time between 0 1 200 seconds interval Off Time between 0 1 200 seconds and Count between 1 Infinite...

Страница 47: ...lly adjusts the exposure level in zones of the image to compensate for overexposure or underexposure For example without Smart IR an object in front of the camera might otherwise cause an overexposed...

Страница 48: ...time appears on screen o OFF default Disables OSD Background Color Black or Transparent default Text Color Black or White default Location X Determines the horizontal location of the OSD Specify a va...

Страница 49: ...e disabled Select one of the eight privacy zones Zone 1 through Zone 8 From the Privacy Color Setting drop down list select Black default Grey or White The privacy color setting applies to all zones U...

Страница 50: ...te If the camera is connected to a VMS that supports cell based motion detection FLIR recommends using the VMS to configure the motion detection zone To enable motion detection and define the detectio...

Страница 51: ...Operation CB 640x Installation and User Guide Revision 100 February 2021 43 This document does not contain any export controlled information Figure 45 Motion Detection Enabled and Zone Defined...

Страница 52: ...In addition users assigned the admin or expert role can access the Firmware Info page to upgrade the camera s firmware reset the camera to its factory defaults reboot the camera and configure other pa...

Страница 53: ...t IPv6 Router Advertisement Move the slider to the right to accept IPv6 router advertisement By default Accept IPv6 Router Advertisement is disabled Enable DHCPv6 If the camera is connected to a netwo...

Страница 54: ...he camera When the camera connects to the LAN other units on the LAN detect the camera by its specified Friendly Name By default UPnP is enabled To disable it move the slider to the left Figure 49 DDN...

Страница 55: ...reams The protocol establishes the connection and controls the streaming data between the camera and a device over the web Each stream can be sent by unicast to one device or broadcasted by multicast...

Страница 56: ...e Figure 53 Date Time Page Manual Selected You can copy the PC s current time or manually specify the camera s time and date Time Zone Regardless of whether NTP or Manual is selected specify the time...

Страница 57: ...in user which cannot be deleted Users assigned the role of Admin can also specify the authentication method on this page Figure 54 Users Page You can assign one of the following roles to each user Use...

Страница 58: ...can also Modify the credentials of an existing user Delete an existing user Figure 56 User Management The default admin user cannot be deleted and the admin user name cannot be modified Authentication...

Страница 59: ...1023 server responds to client s control port o FTP server s ports 1023 from anywhere client initiates data connection to a random port specified by server o FTP server s ports 1023 to remote ports 1...

Страница 60: ...an see the card s overall capacity in MB how much free space is on it in MB search for stored files by selecting a date download files Figure 59 SD Card Page SD Card Inserted and Files Available 5 7 A...

Страница 61: ...Motion Page I O o Select the type of input that triggers an alarm Alarm Select the Type that is whether the input is Normally Open or Normally Closed Audio Specify the Sound Intensity Threshold 0 100...

Страница 62: ...ay of the week In the schedule orange indicates when the alarm is armed To modify when the alarm is armed and whether the alarm triggers the action defined for the rule click Edit The arming schedule...

Страница 63: ...a particular arming period move the slider to the left The following example shows how to arm an alarm and enable the alarm action from 8 AM 6 PM Monday through Friday Figure 64 Arm Alarm and Enable A...

Страница 64: ...Audio The Sound audio file selected between 1 10 is played through the camera s audio output You can upload audio files for the sounds on the Sound Page Snapshot Stores one or more photo snapshots You...

Страница 65: ...creating an alarm rule 4 Click Done 5 8 Audio Page On the Audio page you can configure the camera s audio input and output settings Figure 69 Audio Page Audio is enabled by default To disable it move...

Страница 66: ...ately changes When enabling or disabling I O pins changes do not immediately take effect To apply changes to these settings click Save 5 10Sound Page On the Sound page you can upload up to 10 audio fi...

Страница 67: ...ure Interval Specify the amount of time between snapshots between 1 10 seconds The default is 1 second Post Event Capture Count Specify the number of frames to capture after the event snapshot at leas...

Страница 68: ...ed either to an intranet or to the internet The networking settings including the DNS server settings are properly configured on the Network Page Authentication Select the authentication method the ma...

Страница 69: ...p to 10 email addresses to receive alarm notifications To add a contact and enable alarm notifications 1 Click Add Contact The Add Contact screen appears Figure 75 Add Contact Screen 2 Specify the con...

Страница 70: ...ificate and then be able to download it for future use click Request 2 In the Certificate area specify Country Code Specify the two letter combination code for the country in which the certificate wil...

Страница 71: ...downloading a certificate click Download Certificate 5 Click Save to apply the changes To upload a certificate Figure 79 Upload Certificate 1 Click Upload Certificate 2 Do one of the following If you...

Страница 72: ...configure the SNMP settings contact your network or system administrator To apply changes to SNMP settings click Save Figure 80 SNMP Settings SNMP v1 To enable SNMP v1 move the slider to the right By...

Страница 73: ...e privacy password Trap Mode Select V1 V2C V3 or OFF default according to the SNMP version that you enabled Target IP Specify the IP address of the Trap Host Heartbeat Sends SNMP notifications at regu...

Страница 74: ...server Inner Authentication available when the Protocol selected is TTLS Select CHAP default EAP MSCHAPV2 MD5 MSCHAP MSCHAPV2 or PAP User Name and Password Specify the user name and password Anonymous...

Страница 75: ...led Access to the Camera HTTPS HTTP On Yes Yes Yes can be disabled Off default No No Yes HTTPS Only Yes Yes No When this setting is On or HTTPS Only you can define the HTTPS port as 443 default or bet...

Страница 76: ...n restrict access to the camera by either allowing or denying up to 10 specific IP addresses Figure 84 IP Filter Settings To allow access for one or more specific IP addresses 1 For Mode select Allow...

Страница 77: ...ormation FLIR Support can use for troubleshooting Figure 85 Firmware Info Page Device Name Specify a unique friendly name for the camera using only alphanumeric characters The default name for the cam...

Страница 78: ...iquant sur R initialisation compl te la cam ra perd tous les param tres r seau Click Partial Reset to return the camera to its factory configuration except for the camera s network settings IP address...

Страница 79: ...lation and User Guide Revision 100 February 2021 71 This document does not contain any export controlled information Appendices Technical Specifications Network Settings Troubleshooting Acronyms and A...

Страница 80: ...chnical Specifications Up to date technical specifications for the camera in addition to other resources such as the Discovery Network Assistant DNA software tool and this installation and user guide...

Страница 81: ...S 443 Using the secure socket protocols SSL TLS over HTTP HTTPS must be enabled if your network uses SNMPv3 Multicast Streaming As defined in the units Video streaming multicast Uses the ONVIF address...

Страница 82: ...ically by pressing the reset button on the rear of the camera and test the camera again This will ensure the camera releases the IP address The IP address responds to a ping on the network from the wo...

Страница 83: ...plications are not causing undue latency Check that the firewall analysis or blocking is not interfering with the video stream and supports the required ports and communication protocols Bluish pictur...

Страница 84: ...Protocol H 264 Video Compression Standard H 265 Video Compression Standard HTTP Hypertext Transport Protocol HTTPS Hypertext Transport Protocol Secure IP Internet Protocol JPEG Joint Photographic Expe...

Страница 85: ...essories The following mounting accessories are available from FLIR for installing your CB 640x camera Image Name Description CM CAPX W32 Wall mount kit CX POLE G32 Pole mount adapter for CM CAPX W32...

Страница 86: ...his camera with its wall box attached to keep the camera and its cables waterproof Without the wall box attached the camera and cables are not waterproof However for indoor installations and depending...

Страница 87: ...PH 1 805 964 9797 PH 1 877 773 3547 Sales PH 1 888 747 3547 Support FX 1 805 685 2711 www flir com security Corporate Headquarters FLIR Systems Inc 27700 SW Parkway Ave Wilsonville OR 97070 USA PH 1 5...

Отзывы: