background image


Zero 88 FLX Lighting Console 

 User Manual 

Page 

24

 of 

64


out into the audience 

 as the fader moves up, the 

fixtures move up. Another application commonly used is 
to create three playbacks 

 one for Red, one for Green 

and one for Blue. To use this feature, simply select the 
attributes required using the on-screen buttons. 

Button Function


This offers 

 Flash 

 Latch 

 Solo 

 Go (Fade) 

 Go 

(Snap) 

 Pause 

 and 

 Tap Tempo 

 functionality to each 

of the playback buttons (“Tap Tempo” is only available if 

the playback is set as a chase).


A secondary “shifted” option can be chosen whilst 

holding down the Shift key on the console. 

The default option changes dependant on the “status” 

of the playback. However, once this setting has been 
changed by the user it will not change again 

automatically, even if the playback “status” changes.


For a playback with a single cue, the default is Flash 
(shifted default: Solo). For a playback with multiple cues, 
the default is GO (Fade) (shifted default: GO (Snap)). For a 
playback which is set to a chase, the default is Tap Tempo 
(shifted default: GO (Snap)) 


Playback Setup window 

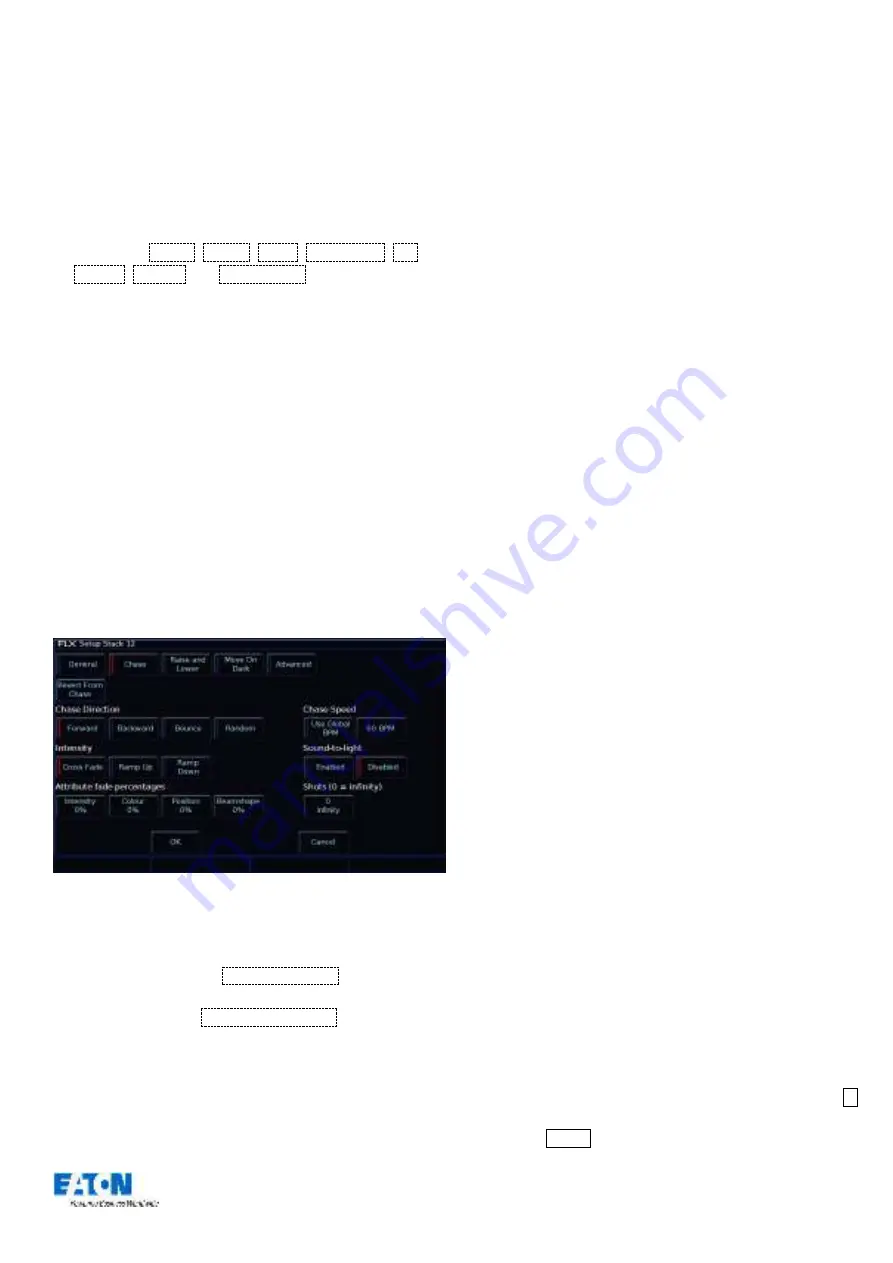
 Chase tab 

Chase 

It is possible to convert a whole playback into a chase, 
which makes the playback run automatically in sequence. 
This is done by choosing 

 Turn into Chase 

 within the 

“chase” tab of Playback Setup. 

Once converted to a chase, 

the button changes to 

 Revert from Chase 

, and additional 

options appear in the chase tab, split into six parts as 
detailed below. 

Chase Direction 

This option determines which order the steps (cues) are 
output when the chase is run: 

Forward 

 The steps are output in increasing numerical 

order (eg 1,2,3,4,5). 

Backward 

 The steps are output in reverse order (eg 

5,4,3,2,1). 

Bounce 

 Alternates between forwards and backwards 

(eg 1,2,3,4,5,4,3,2,1). 

Random 

 The steps are output in a random order. 

Intensity 

Intensities in a chase can be set to 

“Cross Fade”, 

“Ramp Up” or “Ramp Down”.


“Ramp Up” will fade up 

the intensity, and then snap it off, whereas “Ramp 

Down” will snap on the intensity, and then fade it down.


Attribute fade percentages 

Individual fade percentages can be set for each 
attribute. 

Assuming the chase speed is set to 12 Beats Per 
Minute (meaning 1 step every 5 seconds), a fade 
percentage of 20% means that attribute will fade for 1 
seconds (20% of 5 seconds), and then remain on for 
the other 4 seconds (80% of 5 seconds). 

A fade percentage of 0% is equivalent of a snap, and a 
fade percentage of 100% is the equivalent of a cross 
fade. 

Chase Speed 

The Speed option determines how fast the chase runs. 

When the Speed is set to zero, the chase runs 
according to the delay and fade times that are 
programmed into each step (cue) in the chase. 

When the Speed is set to any other value, the chase 
runs at the corresponding number of beats per minute 
(bpm). All the fade and delay times that are 
programmed in the steps (cues) are ignored and the 
transition between each step (cue) is determined by the 

“Intensity” and “Attribute fade percentages” options 

above. 

Please note: “Tap Tempo” functionality is available under “Button 

Function” in the General Tap on any playback which is a chase.


Alte

rnately, “Use Global BPM” can be selected. This 

allows multiple chases to all use the same BPM. The 
Global BPM speed can be controlled by pressing the  Z  

button and changing the “Global BPM” wheel, or by 

holding  Setup  and pressing the Playback Button of an 

Содержание FLX Lighting Console

Страница 1: ...kontakt med jord som giver forbindelse til stikproppens jord Laite on liitett v suojakoskettimilla varustettuun pistorasiaan Apparatet m tilkoples jordet stikkontakt Apparaten skall anslutas till jord...

Страница 2: ...r 16 Faders Static Active 17 Filters incl Mood boards by Lee Filters 17 Colour Edit Mode RGB CMY 17 Beam Shape 18 Palettes 18 Position 19 Palettes 19 Pan Tilt Grid 19 Multi Touch on the P T Grid 19 Ef...

Страница 3: ...tc 47 Operational Settings 47 Attribute Settings Colour Beamshape Position 47 Tracking Options 48 Inputs Outputs 50 DMX Outputs 50 MIDI Timecode 50 MIDI Show Control 50 Remote Switches 50 Defaults 51...

Страница 4: ...orking 62 Remote App not connecting 62 Want more training 62 Basic Maintenance 63 Internal battery 63 Cleaning the surface 63 Cleaning the faders 63 Transportation storage 63 Operating environments 63...

Страница 5: ...al describes the operation of the FLX lighting Console For detailed information on each function the manual has been divided into chapters one for each major area of the console Throughout this manual...

Страница 6: ...Programming desktop shows the Output Window in the top half of the screen and either the Playback window or the Multi Function Faders window in the bottom half Which one is being viewed can be switche...

Страница 7: ...l display The console will automatically detect that an external monitor is not present and display the command line and playback windows on the internal display instead when Shift is pressed When Shi...

Страница 8: ...d control A fifth attribute called Effect manipulates parameters to create effects such as Circle Ballyhoo and Rainbow These five attribute buttons can be found along the right hand side of the intern...

Страница 9: ...ude two different channels from the range 1 Thru 3 And 7 Thru 9 2 5 Enter This sets the intensity of channels 1 2 3 7 8 and 9 to 25 1 And 7 Thru 1 2 Except 9 5 Enter This sets the intensity of channel...

Страница 10: ...up 15 Record Group touch group This records whichever group you touch on the touch screen Notice how Enter doesn t need to be pressed after the last number as the Record command can take its place If...

Страница 11: ...een you can select and deselect groups directly just by touching them There are two modes available Single Select and Multiple Select selectable via the buttons along the top of the window In Single S...

Страница 12: ...ne of the following commands Group 4 Update This updates Group 4 Update Group 1 4 Enter This updates Group 14 Update Group touch group This updates whichever group you touch on the touch screen You do...

Страница 13: ...section for more information including examples page 4 5 Once a fixture or group of fixtures have been selected choose an attribute by pressing one of the attribute buttons to the right of the intern...

Страница 14: ...ettes Each soft button contains the following information Palette Number content flags that indicate the attributes that are programmed in the palette and a name Palettes can also be displayed on the...

Страница 15: ...olour 2 0 Enter An onscreen keyboard will then be displayed to type the cue s name Press Enter or OK to confirm In the same way as when recording if the Colour Palettes are displayed on the internal m...

Страница 16: ...the right allowing you to select a colour for use in colour mixing CMY RGB fixtures by just touching the built in touch screen which sets the colour of the selected fixture to the value pressed The cr...

Страница 17: ...creen with exactly the same settings as above but in Active mode Filters incl Mood boards by Lee Filters Clicking Filers along the top will take you to the Colour Filter library The first option shown...

Страница 18: ...he gobo wheel and shutter parameters of the fixture in the schedule as follows An auto palette for each Gobo present on each gobo wheel in the fixture Naming syntax is Gobo 1 1 Gobo 1 N first gobo whe...

Страница 19: ...t method of controlling Pan and Tilt The horizontal axis is pan and the vertical axis is tilt The symbol indicates the current position values for the selected fixture If multiple fixtures are selecte...

Страница 20: ...to control the speed of all the effects in one go When multiple effect palettes are being used together for example Circle Chaser Rainbow and a user s custom Iris effect each palette can be adjusted s...

Страница 21: ...required field using the touchscreen mouse or cursor keys and press the Enter key Use the cursor keys to select the required Function or enter the required numerical value for Speed Size or Offset th...

Страница 22: ...cue and the playback raise u lower d time By default pressing one of the buttons will open the Playback s Settings window for quick access However this functionality can be changed in Setup System Se...

Страница 23: ...ather than the highest If one active playback has a fixture at 100 and another playback is at 50 set to LTP as this fader is raised the fixture will fade down to 50 as this is the latest command LTP C...

Страница 24: ...e output in increasing numerical order eg 1 2 3 4 5 Backward The steps are output in reverse order eg 5 4 3 2 1 Bounce Alternates between forwards and backwards eg 1 2 3 4 5 4 3 2 1 Random The steps a...

Страница 25: ...Time This time simulates a time the physical fader is raised over So setting it to 5 seconds and pulling up the fader instantly will instead take 5 seconds to fade up the playback Lower Time This time...

Страница 26: ...elds provided and then select the OK button in the window Block When this option is selected all the cues in the cue stack are changed into block cues ie this programs and tags all the parameters at t...

Страница 27: ...the fixtures remain selected Subsequent cues can then be set up and recorded in a similar way As you become more experienced with the desk you will find the most efficient way of programming cues int...

Страница 28: ...ws the update to follow through into the following cues If you choose to update with Track Forwards enabled remember to undo the change you made in one scene when you move to the next particularly if...

Страница 29: ...and the number of the cue you wish to copy it to in the to field Pressing either Down or Enter will move to the next field or alternatively just touch the field you wish to type in So either of the fo...

Страница 30: ...list window just tap the time displayed along the bottom of the window to cycle through the available options on FLX there s Real time and MIDI Time Code Next cue Next cue is the cue number which aut...

Страница 31: ...intensity parameters set to zero A blank cue is referred to as Cue 0 zero You can either jump to Cue 0 as above by holding down the playback s Go button and typing 0 or by using the curser keys to mo...

Страница 32: ...When set to Flash the recorded lighting state is output by pressing the UDK and released when the UDK is released fade times below are ignored When set to Latch the recorded lighting state will fade a...

Страница 33: ...palette assigned to the UDK is applied to the selected fixtures when the UDK is pressed Macro UDK The Macro UDK is used to run the user defined macro assigned to the UDK The macro is run by pressing t...

Страница 34: ...y displayed on the internal monitor instead of typing a number just press an empty macro on the display This will now start recording your macro Type in the series of key commands from the front panel...

Страница 35: ...t of the encoder will be applied to each fixture individually eg each fixture will increase or decrease by a percentage from its original value Speed Override The Speed Override encoder is used to ove...

Страница 36: ...tton and typing the cue number This will load that cue into the Blind Programmer so you can view it and make changes to it without changing the output on stage After loading a cue and making changes p...

Страница 37: ...fect manipulates parameters to create effects such as Circle Ballyhoo and Rainbow On FLX these five attribute buttons can be found along the right hand side of the internal touchscreen Zero 88 Fixture...

Страница 38: ...hen more than 512 channels are needed a second DMX Universe is required to be plugged into the console The fixtures on this universe are also addressed between channels 1 512 but on Universe 2 rather...

Страница 39: ...een Outputs view This is the default patch view and displays the DMX start address for each fixture for each DMX universe Two universes are displayed vertically with each fixture listed according to i...

Страница 40: ...it Fixtures screen before commencing patching using this method Repatching a group of fixtures Once programming has begun it is possible to patch whole groups of fixtures to DMX outputs as well This i...

Страница 41: ...tant that the mode set here matches the mode set on the fixture if in doubt consult the fixture s operating manual for details Once the mode has been selected press the Next button to move on and ente...

Страница 42: ...cation These two fields are always shown within Edit Fixtures and can be edited as described above It is recommended that you take some time thinking about numbering your fixtures It is useful to renu...

Страница 43: ...ual fixture or group basis as required as described on page 42 under Edit Fixtures Alignment inverting and swapping pan tilt ZerOS is capable of making adjustments to your fixtures to take into accoun...

Страница 44: ...in the new DMX start addresses Parameters in the new fixture type that were not present in the original fixture type are left unprogrammed DMX address patch repatch and unpatch The DMX column allows y...

Страница 45: ...the Edit Fixtures table one column per duplicate address as shown in the following example Fixture 4 has an address of 4 but also has two duplicates ch 15 and 24 To add duplicated select the Add butto...

Страница 46: ...default this is set to Auto Detect This will change what s displayed on the internal monitor see Using FLX without an External Display on page 7 for more information To change the monitors resolution...

Страница 47: ...decrease their levels all together If you only plan to use this feature occasionally leave this option disabled and use the Intensity Wheel that becomes available when you press the Z button Operation...

Страница 48: ...hange you make across all the selected fixtures so the last fixture s parameter doesn t change the first fixture s parameter changes as expected and all the fixtures in between will scale between thes...

Страница 49: ...grammed to contain only the changes you ve programmed This means that if a parameter is programmed in one cue it will track through all subsequent cues until it is programmed to do something else If y...

Страница 50: ...track and be used to automatically trigger lighting cues at precise moments during that media You can disable MIDI Timecode altogether or select the frame rate of the MIDI timecode being fed to the d...

Страница 51: ...and Position attributes can be change in this window delay options are not available for UDKs Cue 1 of each playback is always recorded with a 0s fade time by default This can be changed during the r...

Страница 52: ...compatibility it is suggested that both consoles are running the same software version When selecting ZerOS Showfile you are given the option to Save Complete Show Save Setup Only or Save Setup Palett...

Страница 53: ...tion has several limitations such as only supporting dimmer channels not moving lights etc and a basic cue stack However it is very useful especially when touring User Fixture Types User Fixture Types...

Страница 54: ...hese are available free of charge from the iOS App Store and Google Play respectively ZerOS Remote is designed to work as a rigger s remote to wirelessly control fixtures etc especially during a focus...

Страница 55: ...cast and Unicast Visit the Art Net website for more information about this Devices Art Net is outputted in blocks of four Art Net ports equivalent of DMX Universes These blocks are called Devices To o...

Страница 56: ...streaming CAN UUID The Universally Unique IDentifier is not user configurable and is included for information purposes only Each DMX universe is offered as a line item with configuration options for...

Страница 57: ...the Zero Wire DMX user manual which can be found on the Zero 88 website The Wings and ZeroWire section of Setup Network devices Network devices allow you to configure the functionality of external Art...

Страница 58: ...res selection and patching via the Ethernet connection For more information on Light Converse please visit their website at lightconverse net WYSIWYG Recent versions of WYSIWYG support Art Net directl...

Страница 59: ...Mask indicates what a network device can see on the network the standard subnet mask for an Ethernet network is 255 255 255 0 indicating that a device with an IP address of 192 168 0 1 can see any de...

Страница 60: ...ter using straight Ethernet cables EtherN 2 RDM can be powered via Power over Ethernet PoE if required A USB Wing is also used in this system giving physical controls to the software package The butto...

Страница 61: ...port and is capable of supporting various Ethernet protocols Kensington Lock A Kensington style lock slot is provided on FLX for securing the console to an operating location using a standard laptop l...

Страница 62: ...ont panel not responding Is the console fully booted check internal monitor for any errors which may have halted the boot Are the LEDs in the buttons responding correctly Power on the console with Set...

Страница 63: ...not be relied upon to keep the console safe for prolonged use Operating environments Always observe the operating environment information in the Technical Specification If this environment is exceede...

Страница 64: ...Zero 88 FLX Lighting Console User Manual Page 64 of 64 Mechanical information Dimensions 90mm H x 660mm W x 340mm D Weight 7 5 kg Operating temperature range 5 to 40 C Humidity 5 to 95 non condensing...

Отзывы: