112
Chapter 9 General Troubleshooting
9.2
SCSI Communication Problems
Symptoms
•
The following message is displayed saying that there is a
communication problem:
No communication with scanner. Turn
scanner ON and check SCSI connections
.
•
The scanner does not appear in the SCSI chain in the
SCSI
Information
panel.
Suggestions
•
Switch the scanner
OFF
, then
ON
. After 30 seconds (in
EverSmart
Pro II
and
EverSmart Supreme
, approximately after 15 seconds),
verify that the
Status
LED
is a constant green.
•
If the
Status
LED
blinks green for more than 30 seconds, or is red,
call your service center. (In
EverSmart Pro II
and
EverSmart
Supreme
, if the Status LED remains red, call your service center.)
•
Check that all cables are correctly connected, and that the SCSI
chain is no longer than 6 meters.
•
Make sure that a terminator is connected to the last device on the
SCSI chain. If the scanner is the last device, make sure that the
terminator switch on the scanner is set to on.
•
Check that two devices have
not
been assigned the same ID
number.
•
Activate the
SCSI Information
application. Check if the scanner
appears in the SCSI chain.
9.3
Scanning Quality
Symptoms
•
Vertical lines in the picture.
•
Unsharp picture.
•
Unfocused picture.
•
Shift in the crop.
•
Misregistration between channels.
Содержание EverSmart
Страница 1: ...EverSmart Scanners www creo com scanners 399Z50703F Installation Maintenance English...
Страница 2: ......
Страница 8: ......
Страница 12: ......
Страница 13: ...1 Chapter 1 Site Preparation General Requirements 2 Safety Instructions 6...
Страница 19: ...7 Chapter 2 Unpacking Unpacking Procedure 8 Unlocking Screws Removing Packing 13...
Страница 29: ...Powering on the Scanner 17 2 2 2 2 Make sure that the scanner is switched OFF...
Страница 33: ...21 Chapter 4 Software Installation Installation Procedure 22 EverSmart Application Folder Contents 26...
Страница 40: ......
Страница 41: ...29 Chapter 5 SCSI Configuration Configuration Options 30 Setting the SCSI ID 43...
Страница 92: ......
Страница 103: ...Lamp Replacement 91 6 6 6 6 Pull out the glass plate 7 7 7 7 Place the glass plate on a soft surface...
Страница 109: ...Lamp Replacement 97 4 4 4 4 Pull out the left side of the panel...
Страница 110: ...98 Chapter 8 Maintenance 5 5 5 5 Slide out the right side of the panel...
Страница 118: ...106 Chapter 8 Maintenance 2 2 2 2 Lift the two handles of the glass plate 3 3 3 3 Pull out the glass plate...
Страница 120: ......
Страница 128: ......
Страница 129: ...117 Appendix A Packing the Scanner Locking the Scanner 118 Packing the Scanner 121...
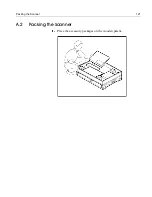
Страница 133: ...Packing the Scanner 121 A 2 Packing the Scanner 1 1 1 1 Place the accessory packages on the wooden palette...
Страница 137: ...125 Appendix B Technical Specifications...
Страница 140: ......
Страница 145: ...133 Appendix D Application Log Files...
Страница 147: ...135 Appendix E Catalog Numbers...
Страница 150: ......


