12
Chapter 2 Unpacking
2.1.1 Installation Kit (required for installation)
•
EverSmart Scanners
Installation & Maintenance Guide
•
Scanner software CD, including User Guide PDF files (in English,
French, and German)
•
Power cable, 3m (American type)
•
SCSI cable (C50M/DB25M)
•
Cleaning kit
•
Calibration slide
•
A flat screwdriver
In addition to the components mentioned above, a backup media
(diskette) that contains the scanner calibration parameters is attached to
the back of the scanner.
2.1.2 Included Kits (not required for installation)
Support kit
•
EverSmart Scanners Scanning Solutions User Guide
(Catalog No. 399Z1P555A)
•
Image correction examples
•
CD containing computer based application training
Mask kit
•
User defined masks (10 pieces)
•
35-mm framed slide holders (2 pieces for
EverSmart Pro/Supreme
,
1 piece for
EverSmart
)
•
35-mm strip mask and mix format mask example (1 piece of each)
For a list of catalog numbers, see
Appendix E Catalog Numbers on page 135
.
The contents of the accessory packages may change from time to time.
Whenever the contents listed in this manual differ from the list enclosed in the
Installation kit, the list in the Installation kit should be considered the
correct
list.
Содержание EverSmart
Страница 1: ...EverSmart Scanners www creo com scanners 399Z50703F Installation Maintenance English...
Страница 2: ......
Страница 8: ......
Страница 12: ......
Страница 13: ...1 Chapter 1 Site Preparation General Requirements 2 Safety Instructions 6...
Страница 19: ...7 Chapter 2 Unpacking Unpacking Procedure 8 Unlocking Screws Removing Packing 13...
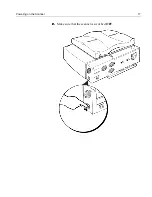
Страница 29: ...Powering on the Scanner 17 2 2 2 2 Make sure that the scanner is switched OFF...
Страница 33: ...21 Chapter 4 Software Installation Installation Procedure 22 EverSmart Application Folder Contents 26...
Страница 40: ......
Страница 41: ...29 Chapter 5 SCSI Configuration Configuration Options 30 Setting the SCSI ID 43...
Страница 92: ......
Страница 103: ...Lamp Replacement 91 6 6 6 6 Pull out the glass plate 7 7 7 7 Place the glass plate on a soft surface...
Страница 109: ...Lamp Replacement 97 4 4 4 4 Pull out the left side of the panel...
Страница 110: ...98 Chapter 8 Maintenance 5 5 5 5 Slide out the right side of the panel...
Страница 118: ...106 Chapter 8 Maintenance 2 2 2 2 Lift the two handles of the glass plate 3 3 3 3 Pull out the glass plate...
Страница 120: ......
Страница 128: ......
Страница 129: ...117 Appendix A Packing the Scanner Locking the Scanner 118 Packing the Scanner 121...
Страница 133: ...Packing the Scanner 121 A 2 Packing the Scanner 1 1 1 1 Place the accessory packages on the wooden palette...
Страница 137: ...125 Appendix B Technical Specifications...
Страница 140: ......
Страница 145: ...133 Appendix D Application Log Files...
Страница 147: ...135 Appendix E Catalog Numbers...
Страница 150: ......


