126
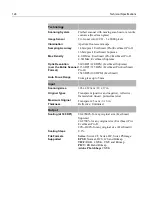
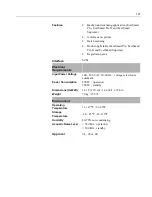
Technical Specifications
Technology
Scanning System
Flatbed scanner with moving scan head over entire
scan area (fixed scan glass)
Image Sensor
Tri-Linear color CCD - 3 x 8000 pixels
Illumination
Aperture fluorescent lamps
Sampling Accuracy
14 bits/pixel: EverSmart (Pro)/EverSmart Pro II
16 bits/pixel: EverSmart Supreme
Max Density
4.0 D Max: EverSmart (Pro)/EverSmart Pro II
4.3D Max: EverSmart Supreme
Optic Resolution
(over the Entire Scanner
Format)
5600 DPI /220 DPM (EverSmart Supreme)
3150 DPI /125 DPM (EverSmart Pro/EverSmart
Pro II)
2540 DPI/(100 DPM) (EverSmart)
Auto Focus Range
From glass up to 5 mm
Input
Scanning Area
305 x 432 mm / 12 x 17 in.
Original Types
Transparent (positive and negative), reflective,
framed slide, lineart, printed material
Maximum Original
Thickness
Transparent: 5 mm / 3/16 in.
Reflective: Unlimited
Output
Scaling (at 300 DPI)
20-49600% for any original size (EverSmart
Supreme)
20-2700% for any original size (EverSmart Pro/
EverSmart Pro II
20%-2100% for any original size (EverSmart))
Scaling Steps
0.1%
File Formats
Supported
Scitex:
Scitex CT, Scitex LW, Scitex PSImage
EPSF:
Normal, DCS, ICS and Bitmap
TIFF:
RGB, CMYK, CMY and Bitmap
PICT:
RGB and Bitmap
Adobe PhotoShop:
CMYK
Содержание EverSmart
Страница 1: ...EverSmart Scanners www creo com scanners 399Z50703F Installation Maintenance English...
Страница 2: ......
Страница 8: ......
Страница 12: ......
Страница 13: ...1 Chapter 1 Site Preparation General Requirements 2 Safety Instructions 6...
Страница 19: ...7 Chapter 2 Unpacking Unpacking Procedure 8 Unlocking Screws Removing Packing 13...
Страница 29: ...Powering on the Scanner 17 2 2 2 2 Make sure that the scanner is switched OFF...
Страница 33: ...21 Chapter 4 Software Installation Installation Procedure 22 EverSmart Application Folder Contents 26...
Страница 40: ......
Страница 41: ...29 Chapter 5 SCSI Configuration Configuration Options 30 Setting the SCSI ID 43...
Страница 92: ......
Страница 103: ...Lamp Replacement 91 6 6 6 6 Pull out the glass plate 7 7 7 7 Place the glass plate on a soft surface...
Страница 109: ...Lamp Replacement 97 4 4 4 4 Pull out the left side of the panel...
Страница 110: ...98 Chapter 8 Maintenance 5 5 5 5 Slide out the right side of the panel...
Страница 118: ...106 Chapter 8 Maintenance 2 2 2 2 Lift the two handles of the glass plate 3 3 3 3 Pull out the glass plate...
Страница 120: ......
Страница 128: ......
Страница 129: ...117 Appendix A Packing the Scanner Locking the Scanner 118 Packing the Scanner 121...
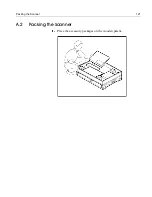
Страница 133: ...Packing the Scanner 121 A 2 Packing the Scanner 1 1 1 1 Place the accessory packages on the wooden palette...
Страница 137: ...125 Appendix B Technical Specifications...
Страница 140: ......
Страница 145: ...133 Appendix D Application Log Files...
Страница 147: ...135 Appendix E Catalog Numbers...
Страница 150: ......

