Scanning Quality
113
Suggestions
•
Run the
Scanner Check
procedure from the
Installation & Utilities
application (refer to
Scanner Checks on page 72
). Verify that all
the tests pass.
•
Run the
Create Tables
procedure from the
Installation & Utilities
application (refer to
Create Tables on page 74
).
•
Perform a scan, and compare the results with the defective scan.
•
If none of the suggested actions solves the problem, prepare the log
folder, and contact your service center.
Symptoms
•
Jagged lines.
•
Horizontal lines.
Suggestions
•
Verify that the four base screws are tightly closed (see the figure in
Base Glass Cleaning on page 105
).
•
Make sure that the original is placed on the base glass according to
one of the following:
•
The original is taped directly onto the base glass.
•
The original is taped onto a mask that is placed on the
registration pins.
•
Run the
Scanner Check
procedure from the
Installation & Utilities
application (refer to
Scanner Checks on page 72
).
Verify that all the tests pass.
Содержание EverSmart
Страница 1: ...EverSmart Scanners www creo com scanners 399Z50703F Installation Maintenance English...
Страница 2: ......
Страница 8: ......
Страница 12: ......
Страница 13: ...1 Chapter 1 Site Preparation General Requirements 2 Safety Instructions 6...
Страница 19: ...7 Chapter 2 Unpacking Unpacking Procedure 8 Unlocking Screws Removing Packing 13...
Страница 29: ...Powering on the Scanner 17 2 2 2 2 Make sure that the scanner is switched OFF...
Страница 33: ...21 Chapter 4 Software Installation Installation Procedure 22 EverSmart Application Folder Contents 26...
Страница 40: ......
Страница 41: ...29 Chapter 5 SCSI Configuration Configuration Options 30 Setting the SCSI ID 43...
Страница 92: ......
Страница 103: ...Lamp Replacement 91 6 6 6 6 Pull out the glass plate 7 7 7 7 Place the glass plate on a soft surface...
Страница 109: ...Lamp Replacement 97 4 4 4 4 Pull out the left side of the panel...
Страница 110: ...98 Chapter 8 Maintenance 5 5 5 5 Slide out the right side of the panel...
Страница 118: ...106 Chapter 8 Maintenance 2 2 2 2 Lift the two handles of the glass plate 3 3 3 3 Pull out the glass plate...
Страница 120: ......
Страница 128: ......
Страница 129: ...117 Appendix A Packing the Scanner Locking the Scanner 118 Packing the Scanner 121...
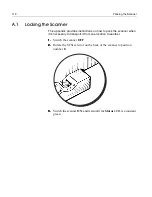
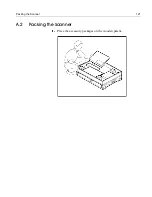
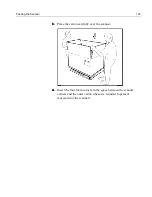
Страница 133: ...Packing the Scanner 121 A 2 Packing the Scanner 1 1 1 1 Place the accessory packages on the wooden palette...
Страница 137: ...125 Appendix B Technical Specifications...
Страница 140: ......
Страница 145: ...133 Appendix D Application Log Files...
Страница 147: ...135 Appendix E Catalog Numbers...
Страница 150: ......


