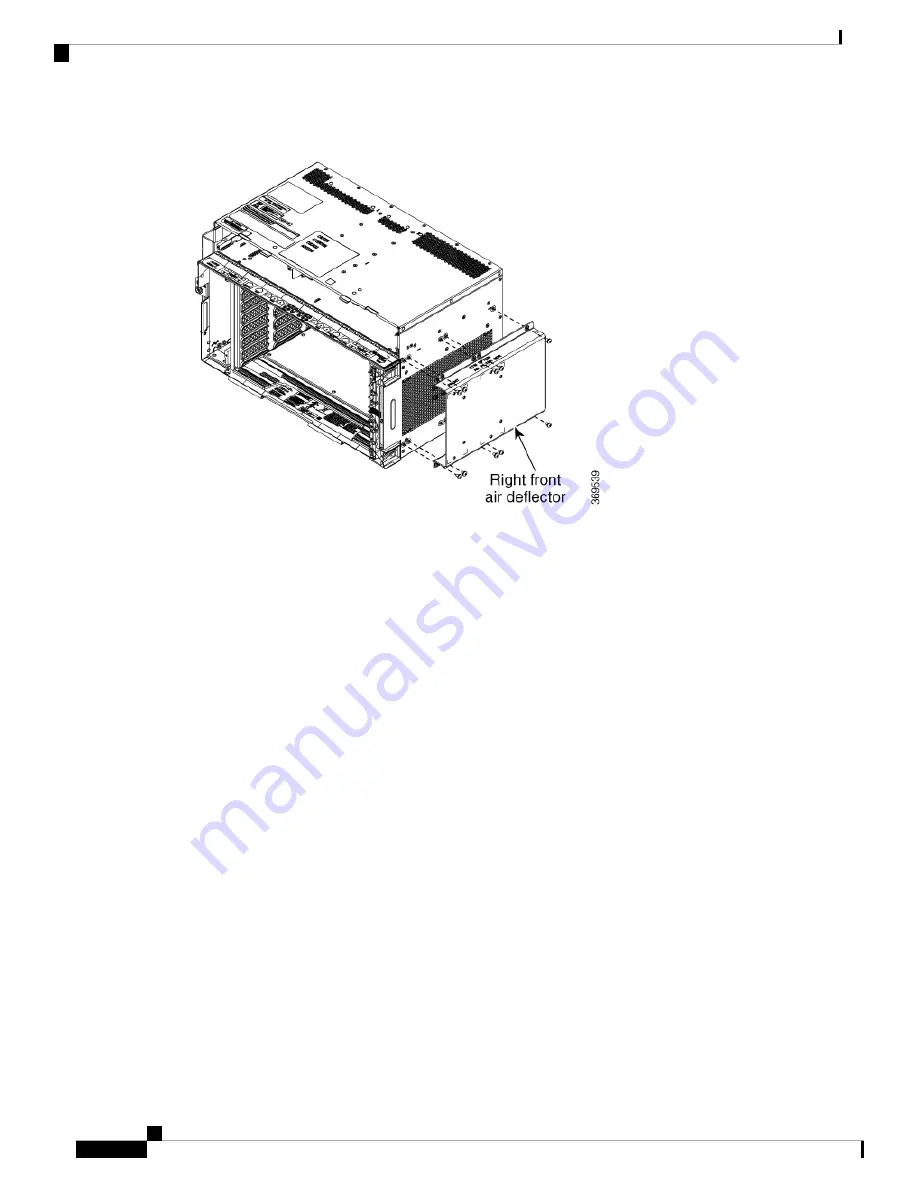
Figure 211: Mounting the Bracket with Air Deflectors (Front-to-Side) on the ONS 15454 M6 Shelf for ETSI Rack Configuration
Step 2
Align the screw holes on the right front air deflector with the screw holes on the right side of the chassis.
Step 3
Insert M4 pan-head screws and tighten them to a torque value of 11.5 in-lb (1.3 N-m).
Step 4
Place the mounting bracket flush in the middle or front position of the right front air deflector (see Diagram
1 of
Figure 212: Mounting the Bracket with Air Deflectors (Front-to-Side) on the ONS 15454 M6 Shelf for
ETSI Rack Configuration - Middle Position, on page 315
or
Figure 213: Mounting the Bracket with Air
Step 5
Align the screw holes on the mounting bracket with the screw holes on the right front air deflector .
Step 6
Insert M4 flat-head screws and tighten them to a torque value of 11.5 in-lb (1.3 N-m).
Step 7
Place the mounting bracket flush in the middle or front position on the left side of the chassis (see Diagram
2 of
Figure 212: Mounting the Bracket with Air Deflectors (Front-to-Side) on the ONS 15454 M6 Shelf for
ETSI Rack Configuration - Middle Position, on page 315
or
Figure 213: Mounting the Bracket with Air
Step 8
Align the screw holes on the mounting bracket with the screw holes on the left side of the chassis.
Step 9
Insert M4 pan-head screws and tighten them to a torque value of 11.5 in-lb (1.3 N-m).
Cisco ONS 15454 Hardware Installation Guide
314
Installing the ONS 15454 M6 Shelf
DLP-G821 Mounting the Bracket with Air Deflectors (Front-to-Side) on the ONS 15454 M6 Shelf for ETSI Rack Configuration
Содержание ONS 15454
Страница 2: ... 2019 Cisco Systems Inc All rights reserved ...
Страница 16: ...Cisco ONS 15454 Hardware Installation Guide xvi Contents ...
Страница 28: ...Cisco ONS 15454 Hardware Installation Guide xxviii Preface Preface ...
Страница 36: ...Cisco ONS 15454 Hardware Installation Guide 6 Overview Cisco ONS 15454 M6 Shelf ...
Страница 510: ...Cisco ONS 15454 Hardware Installation Guide 480 Hardware Specifications Dimensions ...


