


119
A
ss
ignable Button
s
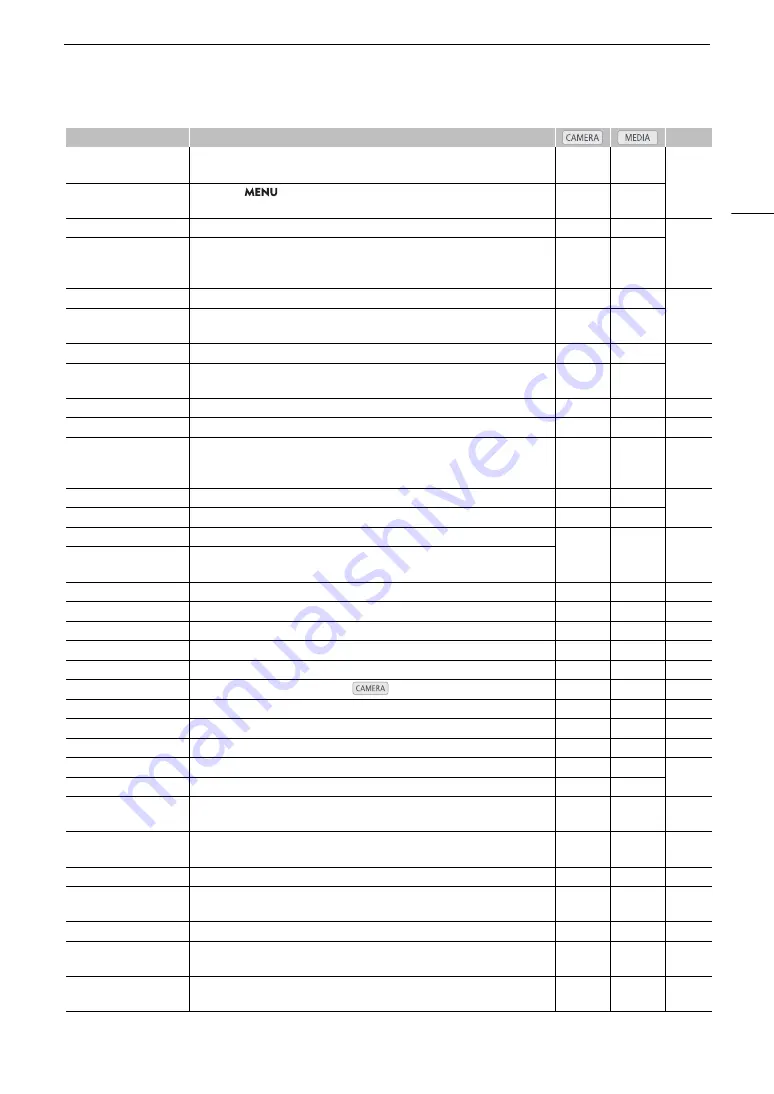
[IR Rec Color]
Change
s
the color of bright area
s
in the infrared picture between white and
green.
Ü
–
[IR Light]
Only when
>
[
v (
Camera Setup]
>
[IR Light] i
s
s
et to [Toggle],
turn
s
the camcorder'
s
infrared light on/off.
Ü
–
[Zebra: All]
Turn
s
zebra pattern
s
on/off.
Ü
–
[Zebra: LCD], [Zebra: VF],
[Zebra: SDI],
[Zebra: HDMI]
Turn
s
zebra patter
s
on/off on the LCD
s
creen, viewfinder, and video output from
the SDI terminal or HDMI OUT terminal, re
s
pectively.
Ü
–
[WFM: All]
Turn
s
the waveform monitor on/off.
Ü
Ü
[WFM: LCD], [WFM: VF],
[WFM: SDI], [WFM: HDMI]
Turn
s
the waveform monitor on/off on the LCD
s
creen, viewfinder, and video
output from the SDI terminal or HDMI OUT terminal, re
s
pectively.
Ü
Ü
[LUT: All]
Turn
s
on/off the application of the
s
elected LUT.
Ü
–
[LUT: LCD], [LUT: VF],
[LUT: SDI], [LUT: HDMI]
Turn
s
on/off the application of the
s
elected LUT on the LCD
s
creen, viewfinder,
and video output from the SDI terminal or HDMI OUT terminal, re
s
pectively.
Ü
–
[Set White Balance]
Start
s
the white balance calibration for a cu
s
tom white balance
s
etting.
Ü
–
[AWB Lock]
While u
s
ing auto white balance (AWB), lock
s
the current white balance
s
etting
s
.
Ü
–
[
¼
Daylight],
[
É
Tung
s
ten],
[
È
Kelvin]
Change
s
the white balance mode to the re
s
pective option.
Ü
–
[LCD Setup]
Open
s
the [
¢ !
Monitoring Setup] menu.
Ü
Ü
[Viewfinder Setup]
Open
s
the [
¢ "
Monitoring Setup] menu.
Ü
Ü
[OSD Output: SDI/HDMI]
Turn
s
on/off the camcorder'
s
on
s
creen di
s
play
s
on all video output
s
at once.
Ü
Ü
[OSD Output: SDI],
[OSD Output: HDMI]
Turn
s
on/off the camcorder'
s
on
s
creen di
s
play
s
on video output from the SDI
terminal or HDMI OUT terminal, re
s
pectively.
[Di
s
play]
Change
s
the on
s
creen di
s
play level.
Ü
Ü
[TL-U58], [WA-U58]
Toggle
s
the [Conver
s
ion Len
s
]
s
etting between the re
s
pective option and [Off].
Ü
–
[Marker
s
]
Turn
s
on
s
creen marker
s
on/off.
Ü
–
[Color Bar
s
]
Turn
s
color bar
s
on/off.
Ü
–
[Photo]*
Record
s
a photo.
Ü
–
[Review Recording]
Play
s
back the la
s
t clip recorded in
mode.
Ü
–
[Time Code]
Open
s
the [
B
#
Sy
s
tem Setup] menu.
Ü
–
[Time Code Hold]*
Put
s
the time code di
s
play on hold or re
s
ume
s
it.
Ü
Ü
[Add Shot Mark]
Add
s
a
s
hot mark to the clip.
Ü
Ü
[Add
$
Mark]
Add
s
an
$
mark to the clip.
Ü
Ü
[Add
%
Mark]
Add
s
a
%
mark to the clip.
Ü
Ü
[Headphone
s
+],
[Headphone
s
–]
Increa
s
e
s
/reduce
s
the headphone volume, re
s
pectively.
Ü
Ü
[Monitor Channel
s
]
Switche
s
the audio channel
s
output from the
×
(headphone) terminal and the
built-in
s
peaker.
Ü
Ü
[Audio Level Indicator]
Turn
s
the audio level meter on/off.
Ü
Ü
[FUNC]
Enter
s
the direct
s
etting mode, replicating the function of the camcorder’
s
FUNC
button.
Ü
–
[Slow Motion Recording]
Turn
s
s
low motion recording on/off.
Ü
–
[Shutter]
Enter
s
the direct
s
etting mode with the
s
hutter
s
peed highlighted and ready to be
adju
s
ted.
Ü
–
[Gain]
Enter
s
the direct
s
etting mode with the gain value highlighted and ready to be
adju
s
ted.
Ü
–
Function name
De
s
cription
A
Содержание XF705
Страница 1: ...4K Camcorder Instruction Manual PUB DIE 0524 000A ...
Страница 130: ...Saving and Loading Camcorder Settings 130 ...
Страница 142: ...Clip Operations 142 ...
Страница 152: ...Working with Clips on a Computer 152 ...
Страница 178: ...FTP File Transfer 178 ...


