background image

No.

Item

17

Service switchboard

18

Service switchboard cable

19

Chassis

20

Power supply duct

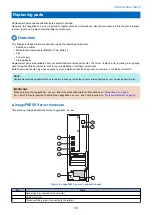
■ LED diagnostic codes

During startup, the imagePRESS Server advances through a standard diagnostic sequence.
Each diagnostic code flashes rapidly on the LED display during this sequence, until the imagePRESS Server reaches Idle.
At Idle, the LED display shows the 00 code.
If the LED display hangs on a code other than 00, one or more diagnostic tests may have failed. Look up the diagnostic code in

“If the printer does not print” on page 79

 to determine the troubleshooting actions that you should take.

 Accessing the imagePRESS Server

Always use the following procedure to disconnect the 

imagePRESS Server

 from the printer and open the unit for inspection and

service.

IMPORTANT:

Make sure that you attach an ESD grounding wrist strap and follow standard ESD (electrostatic discharge) precautions
before following this procedure. For details, see 

“Precautions” on page 3

).

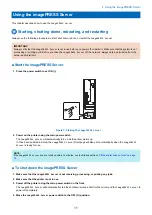
■ Access the imagePRESS Server

1. Make sure that the 

imagePRESS Server

 is not receiving, processing, or printing any jobs.

2. Shut down the 

imagePRESS Server

 (see 

“Starting, shutting down, rebooting, and restarting” on page 11

).

3. Make sure that the printer is not in use, and power off the printer using the main power switch on the front.

Wait for the printer and the 

imagePRESS Server

 to power off completely.

4. Move the 

imagePRESS Server

 power switch to the OFF (O) position.

5. Remove all external cables from the 

imagePRESS Server

 connectors.

6. Remove the 

imagePRESS Server

 from the printer. For detailed information about removing/installing the printer, see

the installation instructions that accompany the printer (not included in this service guide).

7. Wear the antistatic strap provided in this kit.

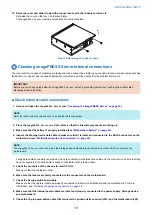
8. Remove the two screws that secure the cover of the 

imagePRESS Server

 to the chassis (see Figure 4).

Set aside the screws so that you can replace them later.

9. Place the 

imagePRESS Server

 on a flat surface. Carefully position the 

imagePRESS Server

 so that it is resting on its

side and the internal components are facing up.

3. REPLACING PARTS

18

Содержание P 400

Страница 1: ...SERVICE MANUAL imagePRESS Server P400 Canon October 11 2022 Rev 2 COPYRIGHT 2022 CANON INC CANON imagePRESS Server P400 Rev 2 PRINTED IN U S A...

Страница 2: ...ouch Mac OS X and Safari are trademarks of Apple Inc Microsoft Windows Windows Vista Windows Server Internet Explorer Microsoft Edge Excel and PowerPoint are either registered trademarks or trademarks...

Страница 3: ...1x Loosen the screw 1x Install the screw 1x Tighten the screw Cleaning is needed Measurement is needed The following rules apply throughout this Service Manual 1 Each chapter contains sections explai...

Страница 4: ...product improvement or other purposes and major changes will be communicated in the form of Service Information bulletins All service persons are expected to have a good understanding of the contents...

Страница 5: ...oting and restarting 11 3 REPLACING PARTS 15 Replacing parts 16 Overview 16 Accessing the imagePRESS Server 18 Checking imagePRESS Server internal connections 19 Removing and replacing imagePRESS Serv...

Страница 6: ...Symptoms and solutions 69 Checking the network 78 Printing to the imagePRESS Server 79 Troubleshooting information 79 Cleaning the imagePRESS Server 81 Contents ii...

Страница 7: ...Introduction 1 Introduction 2 Specifications 7...

Страница 8: ...ting system is not included in this document Illustrations In this document illustrations reflect the version of the imagePRESS Server being shipped at the time of publication Components in illustrati...

Страница 9: ...internal and external connections Tools you will need To install or service the imagePRESS Server you will need the following tools and parts ESD wrist grounding strap and antistatic mat Flathead scr...

Страница 10: ...objects away from electronic components especially the storage device Fan notice WARNING The imagePRESS Server contains hazardous moving parts When servicing the imagePRESS Server keep away from movi...

Страница 11: ...amage them reducing their life span The area around the printer is most likely not static free and electrostatic discharge could occur To avoid damage due to electrostatic discharge do the following W...

Страница 12: ...the equipment and is easily accessible Lithium battery notice CAUTION There is a danger of explosion if the battery is replaced with an incorrect type Replace a battery only with the same type recomm...

Страница 13: ...Scan Fiery Hot Folders Virtual Printers Fiery Print Controller Options Fiery Impose Fiery Compose Fiery Impose and Compose Productivity Package Web Activate Include Fiery JDF Fiery with Adobe PDF Pri...

Страница 14: ...interDriver 7 01 002 0 Win Mac PPD File 2022 9 27 Win Job Properties 3 8 0 28 Mac X Job Properties 3 4 2 003 Win Mac Impose Compose 6 3 0 18 Win Mac Command WorkStation 6 8 0 32 Win Mac Fiery Remote S...

Страница 15: ...ou need to replace the motherboard unlock the HDD first so that new motherboard can access the data in the storage 1 Obtain the Fiery Password To unlock the HDD go to WebTools and enter the Fiery pass...

Страница 16: ...Using the imagePRESS Server 2 Using the imagePRESS Server 11...

Страница 17: ...e main power switch The imagePRESS Server will automatically turn on as the printer warms up If it has been enabled in Setup the imagePRESS Server Start page will also print automatically when the ima...

Страница 18: ...e lost Figure 1a The imagePRESS Server Tools menu Printing imagePRESS Server pages This section describes how to print the Test Page Server Configuration page and other Fiery pages Test Page verifies...

Страница 19: ...ftware Restore the factory default image Reset to the factory default Use Fiery 1 to log on to the imagePRESS Server and then change the passwords Command WorkStation As a imagePRESS Server service te...

Страница 20: ...imagePRESS Server The printer control panel is the user interface on the imagePRESS Server With the printer control panel you can view information about printed jobs print system pages and set up pri...

Страница 21: ...REPLACING PARTS 3 Replacing parts 16...

Страница 22: ...llation of existing components Install new components only when necessary If you determine that a component you removed is not faulty reinstall it NOTE Replacement parts and specifications are subject...

Страница 23: ...3 14 15 16 17 19 18 12 20 Figure 3 Exploded view of components No Item 1 Chassis cover 2 Printer interface board 3 CPU cooling assembly 4 4GB DIMMs X 2 5 CPU 6 Battery 7 Motherboard 8 SATA HDD data ca...

Страница 24: ...s on page 3 Access the imagePRESS Server 1 Make sure that the imagePRESS Server is not receiving processing or printing any jobs 2 Shut down the imagePRESS Server see Starting shutting down rebooting...

Страница 25: ...stalled see Motherboard battery on page 23 4 Inspect the Storage device data cable to make sure that it is intact and connected to the SATA0 connector on the motherboard see Motherboard parts and conn...

Страница 26: ...N_1 6 Service switchboard cable Service switchboard connec tor TYAN Module Header DBG_HD1 7 10 pin power button cable Printer interface board J351 J29 connector on motherboard NOTE The cable colors in...

Страница 27: ...erver and the printer The printer interface board processes the image data and sends it to the printer through the printer interface cable It is installed in PCIE x16 slot on the motherboard IMPORTANT...

Страница 28: ...g bracket see Remove the printer interface board on page 21 Tighten the screw completely 3 Connect one end of the 10 pin power button cable to J351 connector on the printer interface board Connect the...

Страница 29: ...e system date and time on page 25 Motherboard This section describes the battery and default jumper settings on the imagePRESS Server motherboard as well as procedures for removing and replacing the m...

Страница 30: ...ter a s lo por una bater a del mismo tipo que recomienda el fabricante Deseche las bater as usadas respetando la normativa local ATTENZIONE Esiste pericolo di esplosione se la batteria viene sostituit...

Страница 31: ...the positive side of the battery faces to open side 7 Press the battery into the socket until it snaps into place Make sure that the battery is securely installed in the socket 8 Reassemble the image...

Страница 32: ...d 12 System FAN Connector SYS_FAN_1 4 Ethernet Port LAN1 13 DIMM slot 5 USB 3 1 Connector x2 J93 14 CPU FAN Connector CPU_FAN 6 Crossover Ethernet port LAN2 15 SATA connector SATA0 7 ATX Power Connect...

Страница 33: ...circuit and permanently damage the motherboard To remove motherboard components from the motherboard 1 Access and open the imagePRESS Server as described in Accessing the imagePRESS Server on page 18...

Страница 34: ...oard remove the following from the old motherboard DIMM see DIMM on page 22 CPU see Motherboard CPU and cooling assembly on page 31 Replacing the motherboard Use the following procedure to install the...

Страница 35: ...oling assemblies before installing the motherboard mounting screws You may flex and damage the motherboard if you perform the installations in the wrong order Now you are ready to replace the remainin...

Страница 36: ...therboard is customized and cannot be used in another system Entering Test Mode Use the following procedure to verify that the system functions properly after installing a new motherboard Enter Test M...

Страница 37: ...e new motherboard NOTE This procedure which takes approximately 15 20 minutes assumes that the imagePRESS Server is fully assembled with the new motherboard and verified in Test Mode see Entering Test...

Страница 38: ...he CPU socket of the old motherboard to protect the circuitry Follow standard ESD precautions while handling the motherboard and all components To remove a CPU 1 Access and open the imagePRESS Server...

Страница 39: ...l the way Lift the cooling assembly off the CPU socket and set it aside 1 2 Figure 14 Removing the CPU cooling assembly No Name 1 Screw 1 of 4 2 Loosen each screw to this position 6 Unlock the CPU soc...

Страница 40: ...te is open 3 Place the CPU in the socket see To remove a CPU on page 32 The CPU and the socket are keyed to ensure correct installation The two notches on the edges of the CPU correspond with the two...

Страница 41: ...ure 16 1 2 Figure 16 Removing replacing the service switchboard No Name 1 Screw 1 of 2 2 service switchboard Replace the service switchboard 1 If you are replacing the old service switchboard with a n...

Страница 42: ...on Remove the chassis fan 1 Access and open the imagePRESS Server see Accessing the imagePRESS Server on page 18 2 Disconnect the 3 pin fan cable connector from the motherboard 3 Remove the four plast...

Страница 43: ...n 1 If you are installing a new chassis fan attach the fan guard to the correct face of the new fan Use the fan guard and four rivets that you removed from the old chassis fan Position the guard again...

Страница 44: ...on about the power supply see Specifications on page 7 IMPORTANT Do not open the power supply for service or troubleshooting purposes Opening the power supply voids the warranty Remove the power suppl...

Страница 45: ...cable is keyed to fit only one way 5 Make sure that all power connectors are properly aligned and securely connected 6 Secure the power cables to the chassis using the two plastic clips on the base of...

Страница 46: ...or physical damage CAUTION Make sure that you attach an ESD grounding wrist strap and follow standard ESD precautions before handling imagePRESS Server components If you are replacing a storage device...

Страница 47: ...o release its lower edge from the mounting posts in the chassis and then remove the storage device assembly from the chassis 1 2 Figure 22 Removing the storage device assembly No Item 1 Screw 1 of 2 2...

Страница 48: ...new storage device unpack the drive If you are not installing a new storage device skip to Step 4 Do not drop jar or bump the storage device Do not touch the storage device with magnetic objects or pl...

Страница 49: ...After unlocking the storage device restart the imagePRESS Server IMPORTANT If the passphrase is lost and you were not able to unlock the storage device you still have five times to try the passphrase...

Страница 50: ...tall the bracket as necessary 6 Connect the external cables that you removed during inspection or service Be sure to properly connect the following cables Network cable Crossover Ethernet cable betwee...

Страница 51: ...INSTALLING SYSTEM SOFTWARE 4 Installing system software 46...

Страница 52: ...onfigure a static IP address if applicable work with the network administrator Fonts Installing system software deletes all fonts that the customer has installed on the imagePRESS Server Only resident...

Страница 53: ...key as you click to select entries NOTE You can also right click selected Paper Catalog entries and choose Export 2 Navigate to a location on the client computer or network to save the exported datab...

Страница 54: ...sing Backup and Restore on page 51 2 Backup and Restore in WebTools Backup and Re store Fiery System Image Backup Now USB New image Customized image manually backed up Includes same content as automat...

Страница 55: ...server or an external location If a backup image exists check if it is up to date Compare the date stamp of the existing backup image to the date of the last patch installation If a backup image does...

Страница 56: ...u want to back up and then click Next 5 Enter a file name and location specify if you want to add the date to the file name and then click Next 6 Click Finish Save the system configuration using WebTo...

Страница 57: ...create a backup of the imagePRESS Server for a quick recovery if any problem occurs It also allows you to create a backup of the Fiery Resources and Settings You can restore the imagePRESS Server eith...

Страница 58: ...Save Backup manually 1 In the Backup and Restore window click Fiery System Image 2 Click Backup Now 3 imagePRESS ServerLog in as an Administrator 4 In the Backup dialog box select one of the following...

Страница 59: ...e options Restore from a local image Restore from a USB storage device Restore from the factory default image NOTE Restore from a local image is displayed if a backup image of the imagePRESS Server is...

Страница 60: ...ce Internet connection enabled To download the system software files you need Internet access Install the Fiery Installer Builder on this Windows computer USB drive Use the USB drive to install the sy...

Страница 61: ...ck the exe file the file type is Application When the installation is complete the Fiery Installer Builder window appears automatically The Fiery Installer Builder icon is placed on the Windows deskto...

Страница 62: ...not have the account information for the EFI Sales Portal register to the EFI Sales Portal at https salesportal efi com account registration 4 At the Select a Brand window click a brand name and clic...

Страница 63: ...Accept to start the software download A status bar appears to show the progress Wait until the download is complete imagePRESS Server P400 V1 0 NOTE There are also the links to the Fiery Installer Bui...

Страница 64: ...you can install the system software to an existing HDD on the imagePRESS Server To prepare the USB flash drive 1 Attach the USB flash drive to an USB 3 0 port on your computer NOTE Due to Windows fil...

Страница 65: ...s USB flash drive will be formatted and all the data in this USB flash drive will be lost appears Click Next to format the USB flash drive and proceed IMPORTANT All the data on the USB flash drive wil...

Страница 66: ...rd of the customer s current Setup configuration 3 If you are reinstalling the same version of system software back up the current system configuration see Backing up the system configuration on page...

Страница 67: ...wer on the printer using the main power switch on the front Make sure that the imagePRESS Server turns on 11 Check the LED display for the file transfer activity After confirming the LED activity star...

Страница 68: ...d earlier For information about performing Setup see Configuration and Setup which is part of the user documentation set Bypass any settings if it is more appropriate for the site administrator to set...

Страница 69: ...uilder Close all the software applications except the Fiery Installer Builder Make sure that the Windows computer is configured to obtain its IP address automatically DHCP Remove any network cables be...

Страница 70: ...om Normal OFF position 2 to Service mode ON position 10 Connect the Ethernet cable between the imagePRESS Server network port and an Ethernet port on the Windows computer NOTE Ethernet port Connected...

Страница 71: ...SS Server will shut down automatically 13 Flip both of the imagePRESS Server service switches to the Normal OFF position 2 1 Figure 28 Flipping the imagePRESS Server service switches No Name 1 Flip th...

Страница 72: ...ct Apply Set Changes Yes 21 Install any required software patches If you reinstalled the same version of system software be sure to reinstall all software patches that were previously installed on the...

Страница 73: ...TROUBLESHOOTI NG 5 Troubleshooting 68...

Страница 74: ...r cannot print the imagePRESS Server Test Page a service call is probably required 2 Is the failure caused by a simple operating problem Is there a printing problem Does the imagePRESS Server Test Pag...

Страница 75: ...cable connections and verified system components 6 If the problem persists see the code symptom and suggested actions in the following pages Symptom Possible cause Suggested action 00 When the imagePR...

Страница 76: ...supply fan and feel for airflow 4 If you do not feel air from the power supply fan you may need to replace a faulty power supply 5 Replace the motherboard 6 Replace the CPU 7 Replace the printer inter...

Страница 77: ...er interface board if necessary System problems Symptom Possible cause Suggested action System problems Clock is slow time listed on Configura tion page is earlier or later than the actual time One of...

Страница 78: ...nstallation using a different USB flash drive 3 Replace the motherboard 4 Reseat the cables to the hard disk drive 5 Replace the hard disk drive cable 6 Replace the hard disk drive The LED on the im a...

Страница 79: ...printer port The printer port is reserved for the print er and for installing system software from a PC Faulty network cable or connection Faulty network Faulty Ethernet port on the mother board 1 Ma...

Страница 80: ...rd 6 Replace the printer interface cable 7 Replace the printer interface board 8 If the problem persists you may need to service the printer Corrupted system software Reinstall system software Faulty...

Страница 81: ...ation about printer files see Printing which is part of the user documentation set Application cannot find the appropriate print er description file Problem with the printer Test the printer and servi...

Страница 82: ...twork settings in Setup such as AppleTalk zone IP address subnet mask and gateway address match the settings used in the network NOTE EPS file generation is not completely standardized among applicati...

Страница 83: ...tHostMachine Print server ID for imagePRESS Servewr in Service Mode COPIER OPTION INT FACE CNT TYPE Restart the Host Machine manually also restart imgaPRESS Server imagePRESS Server recognizes Host Ma...

Страница 84: ...d imagePRESS Server reboot and wait for 4XX 3 If Reach Idle does not appear when COPIER OPTION INT FACE CNT TYPE xxx displays 4XX in the service mode of the Host Machine the imagePRESS Server system s...

Страница 85: ...Cause Solution Is the power on Turn on the imagePRESS Server using the power switch and the printer power switch Are the cables between the imagePRESS Server and the printer connected Make sure that t...

Страница 86: ...ts and additional details in the text field The followings are recommended Date and time error occurred Observed error codes if any Description of expected result Description of incorrect result Steps...

Страница 87: ...of dust on the fans may cause the following problems High temperature inside the chassis Noise from the fans Short circuit or damage on the board assembly As a regular maintenance it is important to...

Страница 88: ...cations 1 2 Figure 29 Cleaning locations No Name 1 Chassis fan use the vacuum cleaner from outside of the chassis 2 CPU fans use air dust blower After completing the cleaning reassemble the imagePRESS...

Отзывы: