8
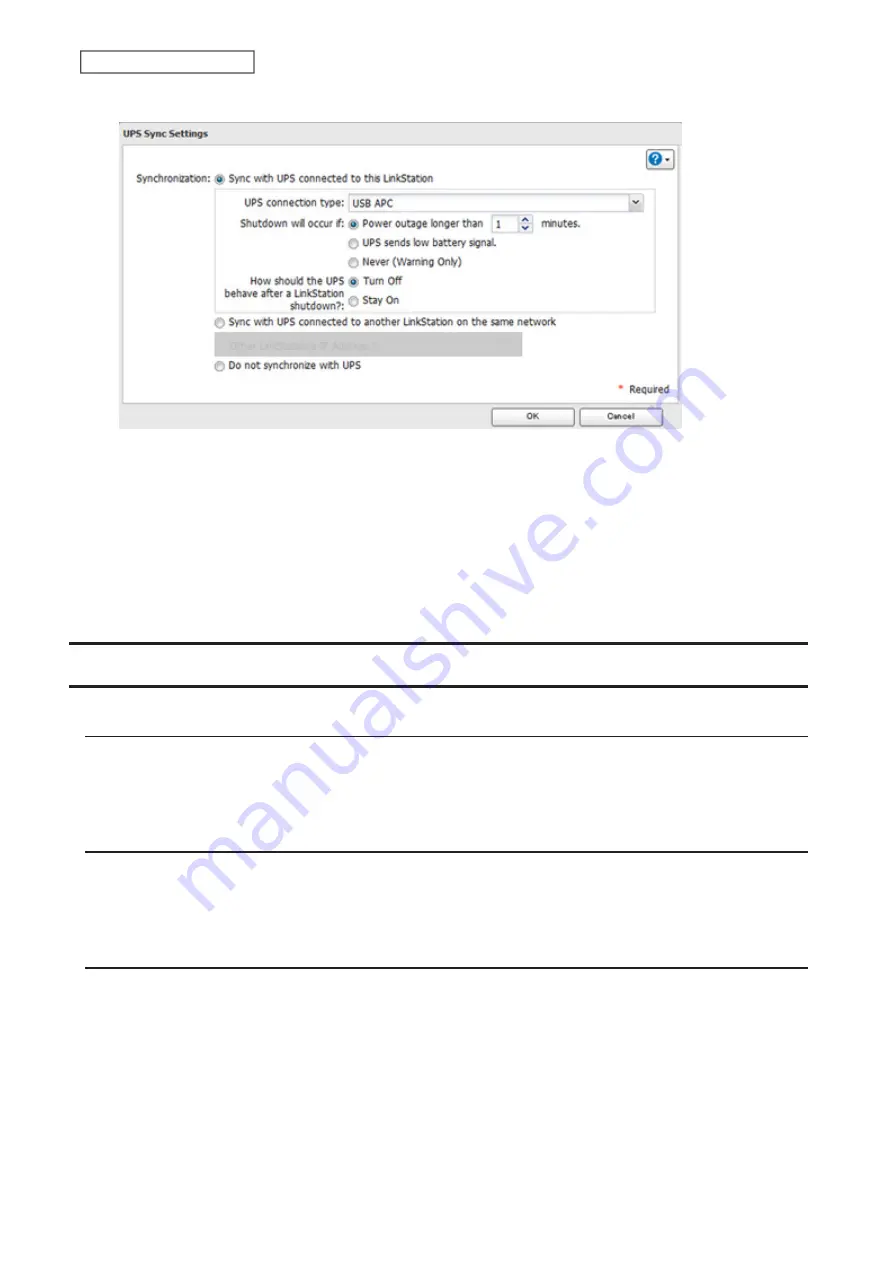
Configure the desired settings, then click
OK
.
Notes:
• If the LinkStation is connected directly to a UPS, select “Sync with UPS connected to this LinkStation”. If a
different Buffalo NAS device is connected to the UPS, select “Sync with UPS connected to another LinkStation or
TeraStation on the same network”. After making this selection, enter the IP address of the Buffalo NAS device that
will be the sync source into “Other LinkStation or TeraStation's IP Address”.
• After the LinkStation restarts following an automatic shutdown such as from a power outage or power supply
issues, verify that external power has been restored. If the LinkStation is turned on while it is still running on the
UPS and external power has not been restored, automatic shutdown will not occur, even after the specified time
elapses.
Encrypting Data Transmission
Encrypting Settings Data
All communication with Settings can use SSL encryption if you access the Settings page by changing “http://” to
“https://” in the browser address bar or click
Secure Connection
from the login window. Once you are logged in using
the HTTPS connection and wish to disable SSL encryption, click
Normal Connection
from the login window.
Encrypting FTP Transfer Data
You can encrypt passwords using SSL/TLS for secure FTP communication. First, open a shared folder’s settings and
click
Edit
; under “LAN Protocol Support”, select the “FTP” checkbox and click
OK
. Enable SSL security in the setup
screen for your FTP client. The procedure depends on the FTP client software.
SSL Keys
SSL keys are used during setup screen operations and FTP communication. SSL (Secure Socket Layer) is a type of
encryption system called public key encryption. Generally, SSL is managed by the two files below.
server.crt (SSL Certificates)
The LinkStation sends the file to a computer, and the computer uses it to perform encryption. The LinkStation
receives the encrypted data and uses server.key (the private key) to decrypt the data.
In SSL, this key contains the server certificate, and depending on your computer environment, a check may be
performed to determine the trustworthiness of the certificate. The server certificate included in the LinkStation’s
78
Chapter 8 Advanced Features
Содержание LinkStation 200B
Страница 16: ...1 Open SmartPhone Navigator on your mobile device 2 Tap Open Settings 15 Chapter 2 Configuration...
Страница 24: ...3 Click Add Group 23 Chapter 3 File Sharing...
Страница 60: ...4 Enter the backup password and click OK 5 Click Create New Job 59 Chapter 6 Backup...
Страница 67: ...6 Click Time Machine 66 Chapter 6 Backup...
Страница 68: ...7 Click Select Backup Disk 8 Select the shared folder then click Use Disk 67 Chapter 6 Backup...
Страница 85: ...4 Select the desired Ethernet frame size and click OK 84 Chapter 8 Advanced Features...
Страница 89: ...2 Tap Create User 88 Chapter 9 Configuring from Mobile Devices...
Страница 96: ...2 Tap Create Folder 3 Enter the desired folder name and tap Apply 95 Chapter 9 Configuring from Mobile Devices...
Страница 100: ...3 Tap NAS Setup 99 Chapter 9 Configuring from Mobile Devices...
Страница 101: ...4 Enter a username and password This will create a new user Tap Next 100 Chapter 9 Configuring from Mobile Devices...
Страница 102: ...5 Enter the password from the previous step again and tap Next 101 Chapter 9 Configuring from Mobile Devices...
Страница 104: ...6 Enter the BuffaloNAS com name and tap Set 103 Chapter 9 Configuring from Mobile Devices...


