Copying from a USB Device
Use Direct Copy to copy from a USB device directly to the LinkStation.
Supported Devices:
• USB mass storage devices
• Card readers (except for card readers that can recognize two or more memory cards)
• Digital cameras and other PTP devices
Configuring Direct Copy
1
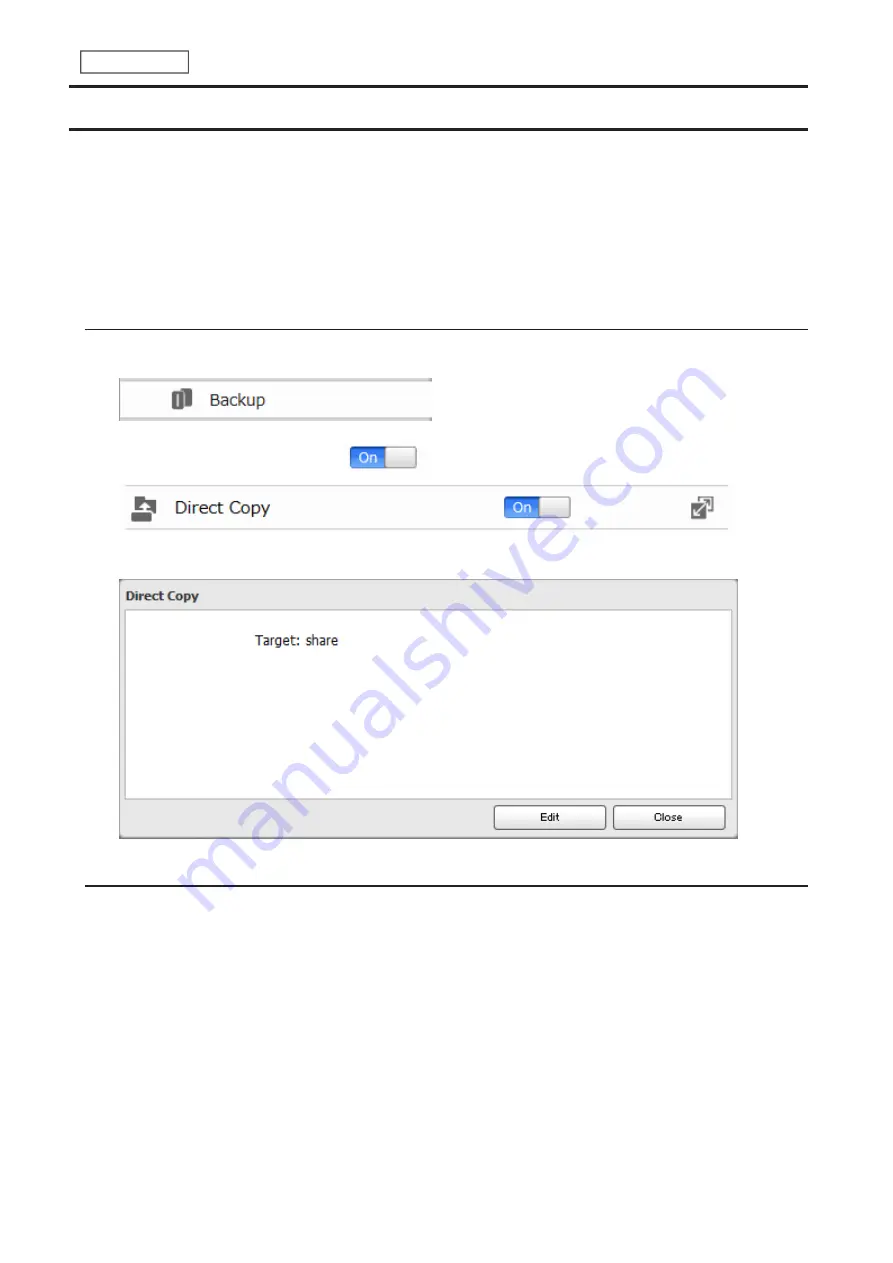
From Advanced Settings, click
Backup
.
2
Move the Direct Copy switch to the
position to enable Direct Copy.
To change the Direct Copy target folder, navigate to
Backup
>
Direct Copy
>
Edit
, select a new folder, and click
OK
.
Starting Direct Copy
1
Connect the USB device. When it mounts (about 10 seconds), the function LED will light up.
Notes:
• Devices that don’t trigger the function LED to light up are not supported.
• When you connect PTP devices, the function LED may not light up. In such case, disconnect the PTP device
from the LinkStation once, then reconnect it.
2
You now have 60 seconds to press the function button once. If you do, the function LED will flash as all the files
on the USB device are copied to the Direct Copy folder of the LinkStation.
Notes:
• While the function LED is flashing, press the function button once to cancel Direct Copy.
• For digital cameras that are not in the USB mass storage class, all files from the digital camera are copied.
69
Chapter 6 Backup
Содержание LinkStation 200B
Страница 16: ...1 Open SmartPhone Navigator on your mobile device 2 Tap Open Settings 15 Chapter 2 Configuration...
Страница 24: ...3 Click Add Group 23 Chapter 3 File Sharing...
Страница 60: ...4 Enter the backup password and click OK 5 Click Create New Job 59 Chapter 6 Backup...
Страница 67: ...6 Click Time Machine 66 Chapter 6 Backup...
Страница 68: ...7 Click Select Backup Disk 8 Select the shared folder then click Use Disk 67 Chapter 6 Backup...
Страница 85: ...4 Select the desired Ethernet frame size and click OK 84 Chapter 8 Advanced Features...
Страница 89: ...2 Tap Create User 88 Chapter 9 Configuring from Mobile Devices...
Страница 96: ...2 Tap Create Folder 3 Enter the desired folder name and tap Apply 95 Chapter 9 Configuring from Mobile Devices...
Страница 100: ...3 Tap NAS Setup 99 Chapter 9 Configuring from Mobile Devices...
Страница 101: ...4 Enter a username and password This will create a new user Tap Next 100 Chapter 9 Configuring from Mobile Devices...
Страница 102: ...5 Enter the password from the previous step again and tap Next 101 Chapter 9 Configuring from Mobile Devices...
Страница 104: ...6 Enter the BuffaloNAS com name and tap Set 103 Chapter 9 Configuring from Mobile Devices...


