background image

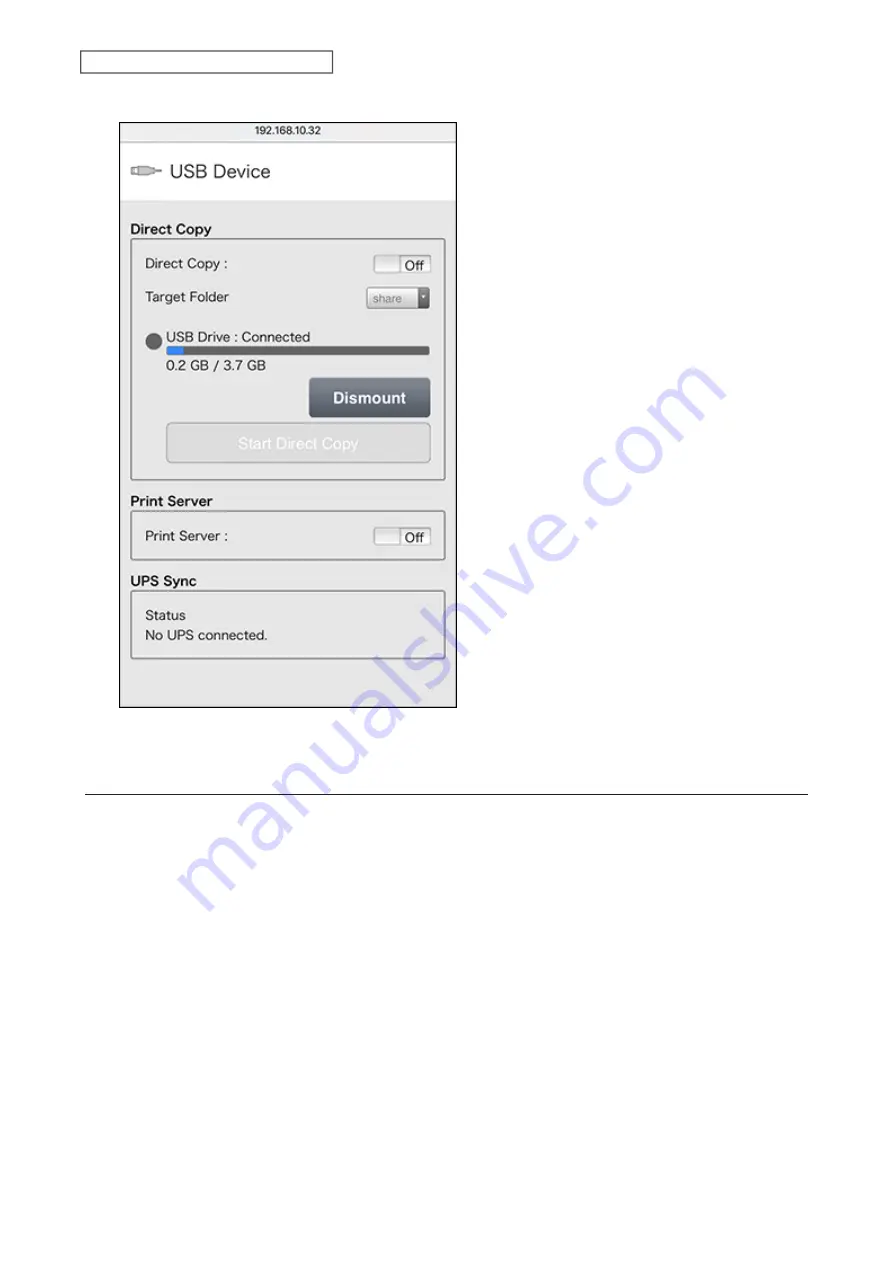
Tap 

Dismount

.

When the completion message is displayed, unplug the USB device and tap 

OK

.

Starting Direct Copy

With the specific USB devices, you can copy the data in the USB device with your mobile device.

Connect the USB device. After it mounts (about 10 seconds), the function LED will light up. Unsupported 
devices will not cause the function LED to light.

108

Chapter 9 Configuring from Mobile Devices

Содержание LinkStation 200B

Страница 1: ...d this manual before using and follow the procedures If you have any inquiries about the product contact the number on the warranty statement or the packing box Do not discard this manual the warranty...

Страница 2: ...ined by turning the equipment off and on the user is encouraged to try to correct the interference by one or more of the following measures Reorient or relocate the receiving antenna Increase the sepa...

Страница 3: ...nstalled near the equipment and shall be easily accessible 5 Only use the cables and accessories that are included in the package Don t use other accessories or cables unless specifically instructed t...

Страница 4: ...n On and Off 9 Chapter 2 Configuration 10 Opening Settings from a Computer 10 Opening Easy Admin 10 Opening Advanced Settings 12 Opening Settings from a Mobile Device 14 Chapter 3 File Sharing 17 Conf...

Страница 5: ...35 Using JBOD 35 Changing RAID Mode 36 Expanding RAID Capacity Without Deleting Data 38 RAID Scanning 39 Adding an External Drive 40 Connecting an External Drive 40 Compatibility 40 Dismounting Drives...

Страница 6: ...6 Backup 57 Backing Up Data on the LinkStation 57 Preparing a Backup Destination 57 Configuring a Backup Job 58 Backup Modes 62 Backing Up Your Mac with Time Machine 62 Copying from a USB Device 69 C...

Страница 7: ...80 Name Date Time and Language 81 Jumbo Frames 83 Changing the IP Address 85 Chapter 9 Configuring from Mobile Devices 87 Settings Available from Your Mobile Device 87 Configuring Users 87 Adding a Us...

Страница 8: ...Mounting as a Network Drive 113 Changing the IP Address 114 NAS Navigator2 for macOS 114 Mounting as a Network Drive 115 Changing the IP Address 116 NovaBACKUP 116 Chapter 11 Appendix 117 Power LED O...

Страница 9: ...er If there is new firmware available the power LED glows amber 2 Function LED This LED glows white while the LinkStation is being initialized and while dismounting USB devices It blinks white during...

Страница 10: ...his slot to secure your LinkStation with a cable lock not included 12Drive 1 Error LED If there is an error on drive 1 this LED will light 13Drive 2 Error LED If there is an error on drive 2 this LED...

Страница 11: ...al setup If you do not have NAS Navigator2 installed refer to the Chapter 10 Utilities for instructions on how to download and install it Internet Explorer 9 Microsoft Edge Firefox 18 Google Chrome 24...

Страница 12: ...tarted The wizard lets you configure the following settings Changing the administrator password Creating shared folders Configuring access restrictions WebAccess Configure WebAccess to access your Lin...

Страница 13: ...click the NAS Navigator2 icon to start NAS Navigator2 2 Right click your LinkStation s icon and select Settings For macOS select the LinkStation s icon while holding down the control key then select S...

Страница 14: ...ter the username and password then click OK Notes If the time out period is set to 10 minutes you will be logged out of Settings after 10 minutes of inactivity Click Secure Connection to log in using...

Страница 15: ...change their own password To go back to Easy Admin click the home icon Opening Settings from a Mobile Device You can access your LinkStation s Settings from your iOS or Android device Download and ins...

Страница 16: ...1 Open SmartPhone Navigator on your mobile device 2 Tap Open Settings 15 Chapter 2 Configuration...

Страница 17: ...setup you ll be given a chance to change the default password correct the time zone settings and select the RAID mode Step though the wizard to change these settings If you tap any buttons you will n...

Страница 18: ...hapter 3 File Sharing Configuring Shared Folders Adding a Shared Folder 1 From Advanced Settings click File Sharing 2 Click to the right of Folder Setup 3 Click Create Folder 17 Chapter 3 File Sharing...

Страница 19: ...pported If the names of shared folders accessed via AFP and FTP connections contain multibyte characters configure the client language in Management Name Time Language to match the characters If the s...

Страница 20: ...f the Ethernet cable is disconnected or a power outage occurs while copying data the following may occur Preset data such as the LinkStation name users and groups may be erased An incomplete file may...

Страница 21: ...ot supported and may cause unexpected behavior To access a hidden folder open File Explorer in your computer and enter LinkStation name shared folder name into the address bar For example if the LinkS...

Страница 22: ...matically Do not duplicate user IDs group IDs usernames or group names Each should be distinct and unique User descriptions may contain up to 75 alphanumeric characters hyphens underscores _ and space...

Страница 23: ...into an external user If a local user is converted their user information including passwords will be removed from the LinkStation External users cannot be reverted to local users Note External authen...

Страница 24: ...3 Click Add Group 23 Chapter 3 File Sharing...

Страница 25: ...t use duplicate group IDs You may register up to 300 groups with the LinkStation If you are logged in as an administrator you can change any setting including other users passwords If you are logged...

Страница 26: ...figure access restrictions through Settings Configuring access restrictions through Windows is not supported and may cause unexpected behavior Local Users and Groups 1 From Advanced Settings click Fil...

Страница 27: ...e account information from the Active Directory domain controller to set access restrictions for LinkStation s shared folders There is no need to perform individual account management for the LinkStat...

Страница 28: ...4 Select Active Directory then click Next 5 Click Yes 6 Enter the desired settings then click OK 7 Click to the right of Folder Setup 27 Chapter 3 File Sharing...

Страница 29: ...entical If both read only and read and write permissions are given the user will have read only access The most restrictive access setting will apply If there are more than five minutes difference bet...

Страница 30: ...rver to set access restrictions for files and folders on the LinkStation There s no need to perform individual account management for the LinkStation If multiple LinkStations are installed on the netw...

Страница 31: ...o the right of Folder Setup 8 Click the shared folder that you want to set access restrictions for 9 Click Edit 10Enable Access Restrictions 11Select the level of access for the user or group Read and...

Страница 32: ...r is used for access restrictions If you do you will need to enable SMB again and reconfigure the NT domain settings from scratch Authority Delegation via External SMB Servers LinkStations on your net...

Страница 33: ...are added disable this option to limit the number of authenticated user accounts If Restrict user registration to a single folder is checked the LinkStation will automatically create a read only shar...

Страница 34: ...ct the level of access for each external user Read and write Read only No access 14Click OK Notes Users that are automatically registered belong to the hdusers group They can be added to other groups...

Страница 35: ...et for users and groups from the authentication server guest and anonymous connections will not be possible with AFP connections FTP connections do not support authentication with an external SMB serv...

Страница 36: ...he usable space is equal to the capacity of a single drive Identical data is written to each drive If a drive becomes damaged data can be recovered by replacing the damaged drive As long as one drive...

Страница 37: ...6 Click OK when completed Next create a shared folder by referring to the Adding a Shared Folder section in chapter 3 Changing RAID Mode To change the RAID mode first put the drives into JBOD by refer...

Страница 38: ...it is resynced which optimizes the array and makes it more stable The resyncing process will take about one hour per terabyte of space in the array File transfers will be slower during this period bu...

Страница 39: ...erasing the data on the drive by using RMM RAID Mode Manager You must have two drives available in JBOD not in a RAID array to build the RAID 1 array with RMM 1 From Advanced Settings click Drives 2...

Страница 40: ...peration screen will open Enter the confirmation number then click OK 10Click OK when completed RAID Scanning A RAID scan checks your RAID array for bad sectors and if it finds any it automatically re...

Страница 41: ...owing devices are supported by the LinkStation Buffalo external USB drives are recommended but DUB and DIU series drives are not supported USB storage devices Card readers except for card readers that...

Страница 42: ...ay be unplugged safely Note If you unplug your external drives without dismounting them Settings may still show usbdisk in the shared folder list Reboot your LinkStation to clear it Dismounting with t...

Страница 43: ...USB for integrity Errors are fixed automatically With large drives a drive check may run for many hours Shared folders cannot be accessed during a drive check Do not turn off the LinkStation until th...

Страница 44: ...at data is gone forever a format might not be sufficient Refer to the Erasing Data on the LinkStation Completely section below After a drive is formatted the Used and Amount Used in Settings will not...

Страница 45: ...e confirmation number then click OK 6 Depending on the size of your drive the format may take several minutes or several hours to complete The power LED will flash during the format Shared folders can...

Страница 46: ...en will open Enter the confirmation number then click OK 5 All data on the LinkStation will be permanently erased Quotas You can set a quota for each user or group as well as a threshold alert where y...

Страница 47: ...e If you change the primary group restart the LinkStation to apply the quota settings 5 Click Close 6 Click at the top right of Settings and select Restart Quotas for Groups Follow the procedure below...

Страница 48: ...g or remove drives without dismounting them first For the replacement drive use a Buffalo OP HDBST series drive The replacement drive should be the same size or larger as the original drive If a large...

Страница 49: ...s 2 Squeeze the left side of the front panel and swing it open 3 Push the failed drive s cartridge up and remove it from the LinkStation Notes Do not press hard on the top of the LinkStation Pull the...

Страница 50: ...4 Remove the drive from the cartridge 5 Install a new drive sold separately into the cartridge 6 Replace the four screws 49 Chapter 4 Storage Management...

Страница 51: ...ation Rebuilding the RAID Array Depending on the RAID mode you have configured the procedure after replacing the defective drive may vary Refer to the section of the configured RAID mode and follow th...

Страница 52: ...on number then click OK 6 From Drives RAID choose RAID 0 from the RAID mode drop down list and click Create RAID Array 7 The Confirm Operation screen will open Enter the confirmation number then click...

Страница 53: ...he shared folder available to anyone on the Internet without any access restrictions Note WebAccess supports downloading up to 60 000 files at a time Attempting to download 60 000 or more files at a t...

Страница 54: ...umeric characters underscores _ and hyphens The BuffaloNAS com name is case sensitive 5 Click Apply 6 Continue with the procedure at http buffalonas com manual setup en Configuring from Advanced Setti...

Страница 55: ...derscores _ and hyphens If Exclusive Session is enabled multiple users cannot be logged in to WebAccess at the same time Only the last login will be active Enter a time in minutes 1 to 120 or Unlimite...

Страница 56: ...inherited folder permissions R R W R W Read and write R Read only No access 11Click OK There are many ways to access WebAccess folders depending on your device From a computer supported browsers incl...

Страница 57: ...ware with the following settings for anonymous FTP access Hostname IP address of the LinkStation Username Anonymous Password any character string Port 21 Notes If the LinkStation joins a domain domain...

Страница 58: ...LinkStation excluding the info folder USB drives connected to this LinkStation Shared folders on another Buffalo NAS device The folder should have the Backup checkbox selected for LAN Protocol Support...

Страница 59: ...assword can be used on the LinkStation Folders that are configured with a different password cannot be used A backup password is not available when a new shared folder is created by a power user Confi...

Страница 60: ...4 Enter the backup password and click OK 5 Click Create New Job 59 Chapter 6 Backup...

Страница 61: ...re below to add the Buffalo NAS device on another network before selecting the backup folders a Click LinkStation and TeraStation List b Click Add enter the IP address or hostname FQDN of the destinat...

Страница 62: ...to the backup list Notes Up to eight backup jobs can be configured To back up data between Buffalo NAS devices on a network using jumbo frames make sure that both devices are configured to use identi...

Страница 63: ...d to and deleted from the backup folder The backup destination folder will always be the same size as the backup source folder Overwrite incremental The first backup job runs like a normal backup The...

Страница 64: ...ation 1 From Advanced Settings click Backup 2 Click to the right of Time Machine 3 Click Edit 4 Click Browse 5 Select the shared folder that you enabled AFP for in the previous steps then click OK 6 C...

Страница 65: ...e position to enable Time Machine 3 Configuring Time Machine on macOS 1 From the Finder menu bar navigate to Go Connect to Server 2 Enter afp and then the IP address or hostname of your LinkStation th...

Страница 66: ...tion share log in with the administrator account The default username and password for the administrator account are admin and password If access restrictions are configured log in with an account wit...

Страница 67: ...6 Click Time Machine 66 Chapter 6 Backup...

Страница 68: ...7 Click Select Backup Disk 8 Select the shared folder then click Use Disk 67 Chapter 6 Backup...

Страница 69: ...Click Connect 10Enter a username and password to be used for accessing the shared folder and click Connect 11Time Machine will count down from 120 seconds then the backup will begin 68 Chapter 6 Backu...

Страница 70: ...onnect the USB device When it mounts about 10 seconds the function LED will light up Notes Devices that don t trigger the function LED to light up are not supported When you connect PTP devices the fu...

Страница 71: ...3 When the copy operation is finished the access LED of the USB device will stop flashing Dismount the USB drive by referring to the Dismounting Drives section in chapter 4 70 Chapter 6 Backup...

Страница 72: ...k with iTunes can play music files stored on the LinkStation and transfer them to your iOS devices The iTunes server supports playback from up to five computers 1 From Advanced Settings click Services...

Страница 73: ...ot supported i e remaining ink quantities and other printer status information is not supported Don t disable the SMB protocol while the print server is enabled If you do you will need to enable SMB a...

Страница 74: ...avigator2 Double click your LinkStation s icon 6 Double click the icon of the connected printer shared name is displayed 7 Click OK 8 Select your printer then click OK 9 Register the printer 73 Chapte...

Страница 75: ...figure the events that will trigger notifications from any of the following functions quota drive error scheduled drive status report fan backup 1 From Advanced Settings click Management 2 Move the em...

Страница 76: ...il reports will be sent Click OK to send a test email Sleep Mode To save energy you can specify times to put the LinkStation into sleep standby mode during which the drives and LEDs are turned off 1 F...

Страница 77: ...five minutes of the current time the LinkStation will not change to standby mode when the configured time is reached If scheduled times in the timer overlap the operation is performed using the wides...

Страница 78: ...al operation begins at 9 00 a m and the unit goes into sleep mode at 6 00 p m On Wednesday normal operation begins at 7 30 a m and the unit goes into sleep mode at 10 00 p m To wake the LinkStation fr...

Страница 79: ...r or click Secure Connection from the login window Once you are logged in using the HTTPS connection and wish to disable SSL encryption click Normal Connection from the login window Encrypting FTP Tra...

Страница 80: ...led Note The passphrase for the private key must be removed before importing to the LinkStation Updating SSL Key Files To update a server certificate and a private key for SSL follow this procedure 1...

Страница 81: ...alization is finished the LinkStation will automatically reboot Notes The following settings will be initialized admin username and password IP address and Ethernet frame size To disable initializing...

Страница 82: ...in Management Update To clear an update notification press the function button Name Date Time and Language Configure the LinkStation s hostname date time and language as shown below 1 From Advanced Se...

Страница 83: ...r a new NTP IP address or its hostname then click OK If an NTP server is specified by name instead of IP address make sure that a DNS server is configured for the LinkStation Note The internal clocks...

Страница 84: ...splayed in Settings go to Settings and click Language from the menu bar Choose your desired language from the drop down list Jumbo Frames If your other network devices support jumbo frames you may be...

Страница 85: ...4 Select the desired Ethernet frame size and click OK 84 Chapter 8 Advanced Features...

Страница 86: ...bo frames Transfer data using jumbo frames Transmission Connection Changing the IP Address Normally the LinkStation s IP address is set automatically from a DHCP server on your network If you prefer y...

Страница 87: ...OK Note The following IP addresses are reserved and should not be used If you configure one of them by accident initialize settings with the function button on the LinkStation Local loopback address 1...

Страница 88: ...ccess your LinkStation Configure and dismount a USB device connected to your LinkStation including Direct Copy options Configure UPS synchronization For the procedure of opening Settings from your mob...

Страница 89: ...2 Tap Create User 88 Chapter 9 Configuring from Mobile Devices...

Страница 90: ...derscores _ periods and the symbols The first character should not be a symbol Passwords may contain up to 20 alphanumeric characters hyphens underscores _ commas periods semicolons vertical bars tild...

Страница 91: ...Changing the Password 1 From Settings tap Users 2 Tap an existing user from the list to change the user s password 90 Chapter 9 Configuring from Mobile Devices...

Страница 92: ...3 Enter the new password twice and click Apply 4 Tap OK when completed 91 Chapter 9 Configuring from Mobile Devices...

Страница 93: ...Deleting a User 1 From Settings tap Users 2 Tap an existing user from the list to be deleted 92 Chapter 9 Configuring from Mobile Devices...

Страница 94: ...3 Tap Delete This User 4 Tap Yes 5 The Confirm Operation screen will open Enter the confirmation number then tap OK 6 Tap OK when completed 93 Chapter 9 Configuring from Mobile Devices...

Страница 95: ...Configuring Shared Folders Adding a Shared Folder 1 From Settings tap Folder Setup 94 Chapter 9 Configuring from Mobile Devices...

Страница 96: ...2 Tap Create Folder 3 Enter the desired folder name and tap Apply 95 Chapter 9 Configuring from Mobile Devices...

Страница 97: ...4 Tap OK when completed Deleting a Shared Folder 1 From Settings tap Folder Setup 96 Chapter 9 Configuring from Mobile Devices...

Страница 98: ...2 Tap an existing folder from the list to be deleted 3 Tap Delete this Folder 97 Chapter 9 Configuring from Mobile Devices...

Страница 99: ...onfiguring WebAccess Note On your mobile device download and install the SmartPhone Navigator and WebAccess apps from the App Store iOS devices or Google Play Android devices 1 Open SmartPhone Navigat...

Страница 100: ...3 Tap NAS Setup 99 Chapter 9 Configuring from Mobile Devices...

Страница 101: ...4 Enter a username and password This will create a new user Tap Next 100 Chapter 9 Configuring from Mobile Devices...

Страница 102: ...5 Enter the password from the previous step again and tap Next 101 Chapter 9 Configuring from Mobile Devices...

Страница 103: ...ill only be able to access your LinkStation from the local network To use WebAccess from outside your home either enable UPnP on the router or open port 9000 for WebAccess in your router s settings 10...

Страница 104: ...6 Enter the BuffaloNAS com name and tap Set 103 Chapter 9 Configuring from Mobile Devices...

Страница 105: ...7 Tap Open WebAccess 8 WebAccess will launch 9 Tap OK if the following message is displayed 104 Chapter 9 Configuring from Mobile Devices...

Страница 106: ...aloNAS com Name If UPnP is disabled on your router creating the BuffaloNAS com name from SmartPhone Navigator may fail If this happens try the following procedure 1 Tap the SmartPhone Navigator icon o...

Страница 107: ...3 Tap WebAccess 4 Enter the desired BuffaloNAS com name 5 Select Configure router s port settings manually enter the router s port number and tap Apply 106 Chapter 9 Configuring from Mobile Devices...

Страница 108: ...the USB Device option in Settings you can dismount the USB drive working with Direct Copy and configuring UPS sync settings Dismounting USB Drives 1 From Settings tap USB Device 107 Chapter 9 Configu...

Страница 109: ...irect Copy With the specific USB devices you can copy the data in the USB device with your mobile device 1 Connect the USB device After it mounts about 10 seconds the function LED will light up Unsupp...

Страница 110: ...tap USB Device 3 Tap Start Direct Copy 4 If you do the function LED will flash as all the files on the USB device are copied to the Direct Copy folder to the LinkStation 109 Chapter 9 Configuring from...

Страница 111: ...ill stop flashing Safely dismount the USB device by using the dismount process Configuring UPS Sync You can enable disable UPS sync settings from your mobile device For other settings such as changing...

Страница 112: ...installer from http d buffalo jp LS220DB NAS Navigator2 will run in the system tray when the computer is on Double click the NAS Navigator2 icon to start NAS Navigator2 Click a Buffalo NAS device s ic...

Страница 113: ...IP address subnet mask and default gateway Sort by If you have multiple Buffalo NAS devices on the network you may choose to display them in order of hostname product name workgroup IP address subnet...

Страница 114: ...indow Exit Exits NAS Navigator2 The following menus may be accessed from the Buffalo NAS device s properties page Name Description Configuration Click Settings to open the configuration interface IP A...

Страница 115: ...s or check its drive To install NAS Navigator2 download the installer from http d buffalo jp LS220DB Click the NAS Navigator2 icon in the Dock to start NAS Navigator2 Click a Buffalo NAS device s icon...

Страница 116: ...rties page Name Description Configuration Click Settings to open the configuration interface IP Address Select the Use DHCP checkbox to assign an IP address from the DHCP server automatically If there...

Страница 117: ...Address 3 Clear the Use DHCP checkbox enter the desired settings and the administrator password then click Apply NovaBACKUP NovaBACKUP is a Windows utility that lets you back up data on your computer...

Страница 118: ...l support for assistance E10 The LinkStation is running on the UPS battery due to a power outage Shut down the LinkStation safely and wait until the power outage ends E11 An error occurred in the fan...

Страница 119: ...lowable safety value Move the LinkStation to a cool location Do not place objects in the area around the LinkStation I11 The drive has too many bad sectors Replace the drive by referring to the Drive...

Страница 120: ...twork and backup source and destination Amber Glowing When the power LED glows a steady amber a new firmware version is available Update the firmware to the newest version Default Settings Administrat...

Страница 121: ...Mbps Number of Ports 1 Connector Type Type A Internal Drive Number of Drive Bays 2 Drive Interface SATA 3 Gbps Supported RAID 0 1 JBOD individual drives Replacement Drive Buffalo OP HDBST series driv...

Отзывы: