background image

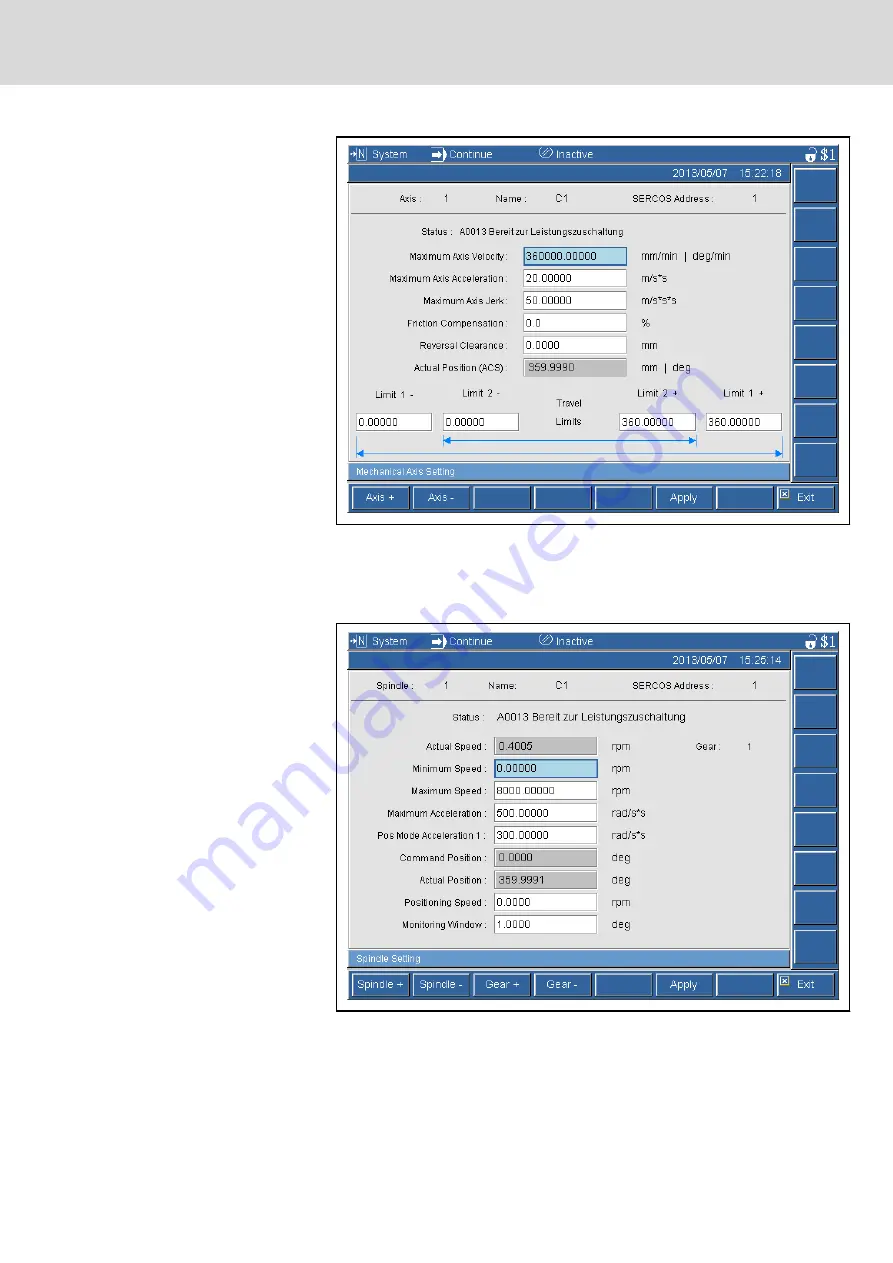
Fig. 9-34:

Setting the mechanic axis positions

9.6.3 

Screen to set spindle data

This screen displays some important parameters of available spindles. The

data in the white box is editable and the data in the gray box is not editable.

Fig. 9-35:

Setting spindle data

9.6.4 

Screen to set the reference position

The reference position can be read and set in this screen.

DOK-MTXMIC-EASY*******-CO06-EN-P 

Bosch Rexroth AG

129/177

IndraMotion MTX micro Easy Setup for Standard Turning and Milling Machines

Commissioning the drives

Содержание Rexroth IndraMotion MTX micro

Страница 1: ...The Drive Control Company IndraMotion MTX micro Easy Setup for Standard Turning and Milling Machines Edition 06 Commissioning Manual R911332281 ...

Страница 2: ...his document as well as the data specifications and other information set forth in it are the exclusive property of Bosch Rexroth AG It may not be re produced or given to third parties without its consent Liability The specified data is intended for product description purposes only and shall not be deemed to be a guaranteed characteristic unless expressly stipulated in the contract All rights are...

Страница 3: ...ical turning machine 17 3 Important instructions on use 19 3 1 Intended use 19 3 1 1 Introduction 19 3 1 2 Areas of use and application 19 3 2 Unintended use 20 4 Safety instructions for electric drives and controls 21 4 1 Definitions of terms 21 4 2 General information 22 4 2 1 Using the Safety instructions and passing them on to others 22 4 2 2 Requirements for safe use 22 4 2 3 Hazards by impro...

Страница 4: ...sic projects 59 6 1 Installing IndraWorks Engineering 59 6 1 1 Prerequisites 59 6 1 2 Installing the software 59 6 2 Creating a new project 62 6 2 1 Restoring a basic project 62 6 2 2 Creating a project with a template 63 6 3 Setting communication parameters 64 6 3 1 General 64 6 3 2 Setting the IP address of MTX micro in the IndraWorks project 64 6 3 3 Setting the IP address on the MTX micro 65 6...

Страница 5: ... drives 94 8 4 External drives and I Os 100 8 4 1 Connecting external Sercos III drives 100 8 4 2 Sercos I Os 100 9 Commissioning the drives 103 9 1 Displaying the drives 103 9 2 Initializing the drive parameters 104 9 2 1 Loading the basic parameters 104 9 3 Adjusting the basic setting of the drive 106 9 4 Optimizing the drive parameters 108 9 4 1 General information 108 9 4 2 Optimizing the velo...

Страница 6: ... 10 2 6 User management 144 11 Data backup and serial commissioning 147 11 1 Data backup 147 11 1 1 General information 147 11 1 2 Data backup with IndraWorks Engineering 147 11 1 3 Data backup with the HMI software 148 11 1 4 Serial commissioning 150 12 Block search in MTX micro 151 12 1 Description 151 12 2 Setting up the block search 151 12 2 1 System data changes 151 12 2 2 NC adjustment progr...

Страница 7: ...mpany Dismount Dispose Fig 1 1 Assigning this documentation to the target groups product phases and target group activities 1 2 General information The present manual supports you during the application activation of various control functions It focuses on the procedures required for the parameterization This requires that the hardware of CNC drives PLC and voltage supply units are already integra...

Страница 8: ...rol panel tools for the machine parameter configuration These tools can modify the control configuration Therefore you have to be familiar with all required tools Due to an incorrect or unintended use caused by insufficiently trained or untrained staff se rious damage to the machine loss of data and even personal injury can result CAUTION Thus only qualified staff that is sufficiently trained may ...

Страница 9: ...on MTX micro 14VRS Functional Description Basics DOK MTXMIC NC F BA V14 RERS EN P R911372634 This documentation describes the basic functions of the Rexroth IndraMotion MTX micro The basic commissioning steps and the control functions are provided as description and handling instruction Rexroth IndraMotion MTX micro 14VRS Functional Description Extension DOK MTXMIC NC F EX V14 RERS EN P R911372631...

Страница 10: ...operate the oscilloscope function Rexroth IndraMotion MTX 14VRS Commissioning DOK MTX STARTUP V14 CORS EN P R911342620 This documentation describes the commissioning of the IndraMotion MTX control Apart from a complete overview com missioning and configuration of the axes and the user interface as well as the PLC data are described Rexroth IndraWorks 14VRS IndraLogic 2G PLC Programming System DOK ...

Страница 11: ...achine for the end user Tab 1 4 MTX micro documentation overview Operation 1 3 5 Maintenance Documentation titles with type codes and part numbers Rexroth IndraMotion MTX 11VRS Diagnostic Messages DOK MTX DIAGMES V11 RExx EN P R911332311 This documentation provides an overview on errors warnings and messages in the Rexroth IndraMotion MTX control xx Corresponding version or edition Tab 1 5 MTX mic...

Страница 12: ...tation explains the features of the product possibilities for use operating conditions and operational limits of MSK motors contains technical data regarding available MSK motors provides information regarding product selection handling and operation xx Corresponding edition Tab 1 6 MTX micro documentation overview Drive system Commissioning and project planning 1 4 Use of the safety instructions ...

Страница 13: ... non compliance with this safety instruction death or serious injury will occur WARNING In the event of non compliance with this safety instruction death or serious injury will occur CAUTION In the event of non compliance with this safety instruction minor or moderate injury can occur NOTICE In the event of non compliance with this safety instruction material damage can occur DOK MTXMIC EASY CO06 ...

Страница 14: ...ufacturer Profibus Communication connection Sercos Communication connection MTB Machine tool builder Tab 1 7 Names and abbreviations used 1 6 Customer feedback Bosch Rexroth highly appreciates feedback or suggestions for improvement by our customers Please email your feedback about the documentations to Feedback Documentation boschrexroth de Comments can be inserted in the electronic PDF document ...

Страница 15: ...ontrol panels X5 x Fig 2 1 MTX micro summary The MTX micro can be specified as turning machine with VDP80 1FGN control panel as milling machine with VDP80 1FHN control panel or as universal machine with VDP80 1FKN control panel The panels feature special ma chine type related functions such as a built in handwheel turning machine or override switches for spindle and feed milling ma chine Display s...

Страница 16: ...al I Os on board 32 inputs 16 outputs 32 inputs 16 outputs out of which are highspeed I Os 8 inputs 8 outputs 8 inputs 8 outputs Digital I Os optional 64 inputs 32 outputs 64 inputs 32 outputs Digital I Os HMI 256 inputs 96 outputs 256 inputs 96 outputs Output current per output 24 V DC 500 mA 24 V DC 500 mA Programming IEC61131 IL LD ST FBD SFC IL LD ST FBD SFC Tab 2 2 PLC features of MTX micro D...

Страница 17: ... V Max power 25kW 25kW Regenerative no no Ext Braking resistance external external Tab 2 3 Drive features of MTX micro DOK MTXMIC EASY CO06 EN P Bosch Rexroth AG 15 177 IndraMotion MTX micro Easy Setup for Standard Turning and Milling Machines System overview ...

Страница 18: ...030 RKG4200 HCQ02 1E W0025 MAD100B0200 RKB0007 RKLxxxx MSK061C0300 MSK075D0300 MSK061 MSK075 MSK075 MSK075C0300 Axis 3 8Nm Servo motor Axis 2 17Nm Servo motor or 5KW spindle Axis 4 12Nm Servo motor 2 Spindle encoder Axis 1 11KW Main spindle 11KW Frequency converter Fig 2 2 Components of a 4 axis configuration Bosch Rexroth AG DOK MTXMIC EASY CO06 EN P 16 177 IndraMotion MTX micro Easy Setup for St...

Страница 19: ...M1468 VDP80 1FGN EN RKB0030 RKG4200 HCQ02 1E W0025 MAD100B0200 RKB0007 MSK061 RKLxxxx MSK061C0300 MSK075 MSK075C0300 Axis 3 8Nm Servo motor Axis 4 12Nm Servo motor Axis 1 11KW Main spindle 11KW Frequency converter 2 Spindle encoder Fig 2 3 Components of a 3 axis configuration DOK MTXMIC EASY CO06 EN P Bosch Rexroth AG 17 177 IndraMotion MTX micro Easy Setup for Standard Turning and Milling Machine...

Страница 20: ...Bosch Rexroth AG DOK MTXMIC EASY CO06 EN P 18 177 IndraMotion MTX micro Easy Setup for Standard Turning and Milling Machines ...

Страница 21: ...red and have to remain in their origi nal state i e no structural changes are permitted The decompilation of software products or the alteration of source codes is not permitted Do not install or operate damaged or faulty products It has to be ensured that the products have been installed as described in the relevant documentation Ensure that the data present in the control or entered or read in b...

Страница 22: ...ication areas other than those specified or described in the documentation and technical data is con sidered as unintended The Rexroth IndraMotion MTX must not be used if it is subjected to operating conditions not corresponding to the specified ambient conditions Operation under water under extreme temperature fluctuations or under extreme maximum temperatures is prohibited the intended applicati...

Страница 23: ...s Installation An installation consists of several devices or systems interconnected for a defined purpose and on a defined site which however are not intended to be placed on the market as a single functional unit Machine A machine is the entirety of interconnected parts or units at least one of which is movable Thus a machine consists of the appropriate machine drive elements as well as control ...

Страница 24: ...y de vices could result in property damage injury electric shock or even death 4 2 2 Requirements for safe use Read the following instructions before initial commissioning of the compo nents of the electric drive and control system in order to eliminate the risk of injury and or property damage You must follow these safety instructions Bosch Rexroth is not liable for damages resulting from failure...

Страница 25: ...ion are met The instructions for installation in accordance with EMC requirements can be found in the section on EMC in the respective application docu mentation The machine or installation manufacturer is responsible for compliance with the limit values as prescribed in the national regulations The technical data connection and installation conditions of the compo nents are specified in the respe...

Страница 26: ... have been permanently connected to all electric components in accordance with the connection diagram Even for brief measurements or tests operation is only allowed if the equipment grounding conductor has been permanently connected to the points of the components provided for this purpose Before accessing electrical parts with voltage potentials higher than 50 V you must disconnect electric compo...

Страница 27: ...ctor Minimum cross section equipment grounding conductor Leakage current 3 5 mA 1 equipment grounding conductor 2 equipment grounding conductors 1 5 mm2 16 AWG 10 mm2 8 AWG 2 1 5 mm2 16 AWG 2 5 mm2 14 AWG 2 2 5 mm2 14 AWG 4 mm2 12 AWG 2 4 mm2 12 AWG 6 mm2 10 AWG 2 6 mm2 10 AWG 10 mm2 8 AWG 16 mm2 6 AWG 16 mm2 6 AWG 25 mm2 4 AWG 35 mm2 2 AWG 50 mm2 1 0 AWG 25 mm2 4 AWG 70 mm2 2 0 AWG 35 mm2 2 AWG T...

Страница 28: ...l occur The extent of faulty drive movements depends upon the type of control and the state of opera tion Dangerous movements Danger to life risk of injury serious injury or property damage A risk assessment must be prepared for the installation or machine with its specific conditions in which the components of the electric drive and control system are installed As a result of the risk assessment ...

Страница 29: ...or possible malfunctions when operating such high fre quency remote control and radio equipment in its possible positions of normal use It might possibly be necessary to perform a special electro magnetic compatibility EMC test 4 3 4 Protection against electromagnetic and magnetic fields during opera tion and mounting Electromagnetic and magnetic fields Hazards for persons with active medical impl...

Страница 30: ...on These measures can be for example Warnings at the machine or in stallation guards shieldings or barriers or safety instructions in the ap plication documentation 4 3 6 Protection during handling and mounting Risk of injury by improper handling Injury by crushing shearing cutting hit ting Observe the relevant statutory regulations of accident prevention Use suitable equipment for mounting and tr...

Страница 31: ...ling liquids and cooling lubricants Improper handling of the connected supply systems supply lines or connections can cause injuries or property damage Risk of injury by improper handling of pressurized lines Do not attempt to disconnect open or cut pressurized lines risk of ex plosion Observe the respective manufacturer s operating instructions Before dismounting lines relieve pressure and empty ...

Страница 32: ...the signal words DANGER WARNING and CAUTION is used to alert the reader to personal injury hazards DANGER In case of non compliance with this safety instruction death or serious injury will occur WARNING In case of non compliance with this safety instruction death or serious injury could occur CAUTION In case of non compliance with this safety instruction minor or moderate in jury could occur NOTI...

Страница 33: ...ardware 5 1 HCT02 HCQ02 Fig 5 1 Technical data of HCx02 hardware units DOK MTXMIC EASY CO06 EN P Bosch Rexroth AG 31 177 IndraMotion MTX micro Easy Setup for Standard Turning and Milling Machines Selecting and connecting the hardware ...

Страница 34: ...Cx02 pin assignments and DEA40 1 optional module Bosch Rexroth AG DOK MTXMIC EASY CO06 EN P 32 177 IndraMotion MTX micro Easy Setup for Standard Turning and Milling Machines Selecting and connecting the hardware ...

Страница 35: ...evices may only be materials which are incombustible and are insensitive to the high temperature that occur 5 2 Motors 5 2 1 MSK Fig 5 3 Mechanical data of MSK servo motors DOK MTXMIC EASY CO06 EN P Bosch Rexroth AG 33 177 IndraMotion MTX micro Easy Setup for Standard Turning and Milling Machines Selecting and connecting the hardware ...

Страница 36: ... data and ordering information of the MSK servo motors Bosch Rexroth AG DOK MTXMIC EASY CO06 EN P 34 177 IndraMotion MTX micro Easy Setup for Standard Turning and Milling Machines Selecting and connecting the hardware ...

Страница 37: ...D Fig 5 5 Technical data of MAD spindle motors DOK MTXMIC EASY CO06 EN P Bosch Rexroth AG 35 177 IndraMotion MTX micro Easy Setup for Standard Turning and Milling Machines Selecting and connecting the hardware ...

Страница 38: ...bles Fig 5 6 Motor cable assignment for power connection Bosch Rexroth AG DOK MTXMIC EASY CO06 EN P 36 177 IndraMotion MTX micro Easy Setup for Standard Turning and Milling Machines Selecting and connecting the hardware ...

Страница 39: ...N for milling machines Fig 5 7 Technical data of the VDP80 1FHN C1 NN EN control panel DOK MTXMIC EASY CO06 EN P Bosch Rexroth AG 37 177 IndraMotion MTX micro Easy Setup for Standard Turning and Milling Machines Selecting and connecting the hardware ...

Страница 40: ...g machines Fig 5 8 Technical data of the VDP80 1FGN C1 NN EN control panel Bosch Rexroth AG DOK MTXMIC EASY CO06 EN P 38 177 IndraMotion MTX micro Easy Setup for Standard Turning and Milling Machines Selecting and connecting the hardware ...

Страница 41: ...DP80 1FKN C1 NN EN control panel Additionally two external handwheels can be connected Use labeling strips to label the keys DOK MTXMIC EASY CO06 EN P Bosch Rexroth AG 39 177 IndraMotion MTX micro Easy Setup for Standard Turning and Milling Machines Selecting and connecting the hardware ...

Страница 42: ...r supply 24V DC 0 3 A 640x480px Display resolution 10 4 Screen size Fig 5 10 Technical data of the VDP81 1FKN C1 NN EN control panel The corresponding control panel can be found under chapter 5 4 HMI con trol panels on page 37 Bosch Rexroth AG DOK MTXMIC EASY CO06 EN P 40 177 IndraMotion MTX micro Easy Setup for Standard Turning and Milling Machines Selecting and connecting the hardware ...

Страница 43: ...otection type Connection and supply USB 36 Spindle and feed IP 54 front side IP 20 back side Fig 5 11 Technical data of the VAM81 1 USB control panel DOK MTXMIC EASY CO06 EN P Bosch Rexroth AG 41 177 IndraMotion MTX micro Easy Setup for Standard Turning and Milling Machines Selecting and connecting the hardware ...

Страница 44: ...4 front side IP20 back side Power supply 24V DC 0 3 A 10 4 Fig 5 12 Technical data of the VDP82 1FKN C1 NN EN control panel The corresponding control panel can be found under chapter 5 4 HMI con trol panels on page 37 Bosch Rexroth AG DOK MTXMIC EASY CO06 EN P 42 177 IndraMotion MTX micro Easy Setup for Standard Turning and Milling Machines Selecting and connecting the hardware ...

Страница 45: ...tection type Connection and supply USB 36 Spindle and feed IP 54 front side IP 20 back side Fig 5 13 Technical data of the VAM82 1 USB control panel DOK MTXMIC EASY CO06 EN P Bosch Rexroth AG 43 177 IndraMotion MTX micro Easy Setup for Standard Turning and Milling Machines Selecting and connecting the hardware ...

Страница 46: ...ctions Power connection The HCQ02 or HCT02 is directly connected to the external power supply via terminal X3 The allowed line voltage range is 200 500 V ULN The allowed line frequency range is 50 60 Hz Any other values specified below refer to the typical case of connection to a power supply network of 3 AC 400 V 50 Hz Bosch Rexroth AG DOK MTXMIC EASY CO06 EN P 44 177 IndraMotion MTX micro Easy S...

Страница 47: ...with 63 A gL for each phase We recommend that you use a motor pro tecting switch with a tripping current of 65 A The HNL01 1E0400N0051A480 line reactor must be used to protect the power supply The line contactor must be designed for a rated current of AC1 65 A Network types Direct three phase connection of the HCQ02 and HCT02 devices is allowed to the following network types TN S TN C Under certai...

Страница 48: ... TN S network type TN C network This network type is characterized by a common neutral and protective con ductor C The HCQ and HCT devices can be directly connected to the TN C network T Direct grounding of a point signal ground N Body directly connected to the signal ground C Functions of neutral and protective conductors in the entire net work combined in a single conductor i e the PEN conductor...

Страница 49: ...refer to the configuration in formation about IndraDrive DOK INDRV SYSTEM PR04 EN P Grounding concept In order to prevent faults in the electronic circuits and to ensure protection against contact the MTX micro system may only be operated if it is grounded as described here DOK MTXMIC EASY CO06 EN P Bosch Rexroth AG 47 177 IndraMotion MTX micro Easy Setup for Standard Turning and Milling Machines ...

Страница 50: ...ablish a conductive connection of the mounting surface to the protective conductor system C D Only use shielded motor and encoder cables for the MTX micro We strongly recommend that you use Rexroth RKL and RKG cables A E PE Connect all grounds and protective conductors to a common star point in the control cabinet along routes that are as short as possible Fig 5 18 MTX micro grounding concept Exte...

Страница 51: ... must be ensured that the line voltage is turned off after the drives have stopped if there is a DC bus short circuit 24 V drop at input X19 1 DC bus voltage Otherwise the exter nal resistor may be destroyed This is ensured by the circuit examples shown herein 24 V control voltage supply When dimensioning the control voltage supply for the MTX micro please ob serve the power consumption figures of...

Страница 52: ...e supply Overvoltages exceeding 33 V must be discharged by means of measures in the electrical equipment of the machine or plant Such measures include AC adaptors and overvoltage limiters which are provided at the input of the control cabinet and limit incoming overvoltages This also applies to longer 24 V lines which are placed in parallel to power and line sup ply cables and are able to receive ...

Страница 53: ...the 24 V voltage is removed from X83 2 or X86 1 the drives are turned off In this process the CNC con trols the drives to decelerate them to standstill thereafter the K1 power con tactor is turned off The power contactor is additionally switched via a time delayed contact of the E stop relay The E stop relay also activates the DC bus short circuit with a time delay These measures are intended to e...

Страница 54: ...d that you use the Rexroth mo tor cable RKL for connecting the motors The shield is con nected via the shield connection points XS2 tube clips The maximum length of the connecting cables is 40 m The maximum length of the connecting cables must not be ex ceeded Contacts 3 and 4 of terminal X6 are provided for activating an external spindle brake Please comply with the instruc tions in chapter Activ...

Страница 55: ...l spindle brake Please comply with the instruc tions in chapter Activating an external holding brake on page 55 Motor activation faults may result in material damage CAUTION The standard motors must meet the requirements for the rate of voltage rise at the motor output in converter mode Otherwise the motor insulation may be damaged Connecting an optional encoder X8 The encoder connection point X8 ...

Страница 56: ...mend that you use encoders of type Rexroth GDS02 1 2048 14V H12 0 and GDM02 1 2048 14V H12 0 each with a resolution of 2048 pixels as spindle encoders for turning machines The required encoder cable is RKG0036 Wrong handling may result in material dam age CAUTION Only connect and disconnect the plugs to and from the encoder and connec tion point X8 while the supply voltage is turned off Connecting...

Страница 57: ...ly available The descent of a vertical axis may result in fatal injuries DANGER The maximum holding torque that can be applied by the optional holding brake of the MSK motors is the nominal motor torque The motor holding brake alone cannot be used as a holding brake for the purpose of personal protection If the holding torque is higher use must be made of a suitable external brake Activating an ex...

Страница 58: ...l holding brake of the MSK motors is the nominal motor torque The motor holding brake alone cannot be used as a holding brake for the purpose of personal protection If the holding torque is higher use must be made of a suitable external brake Digital input and output signals In the basic device the MTX micro features 32 digital inputs 24 V DC and 16 digital outputs 24 V DC 500 mA The number of I O...

Страница 59: ...X86 2 and X86 3 should be kept free for the use of touch probes even if the machine is not equipped with touch probes Control cabinet design The following instructions on setting up the control cabinet should be followed to ensure smooth operation of the MTX micro The arrangement of the com ponents was based on the discharge of the developing power losses on the prevention of faults due to electro...

Страница 60: ...you use a low resistance protective conductor connection It is only allowed to install the HC 02 in a vertical position G1 Hot parts with temperatures higher than 105 C may result in material damage DANGER Keep the specified minimum distances from other components Materials present above the devices may only be materials which are in combustible and insensitive to the high temperatures that occur ...

Страница 61: ...r 64 bit operating systems Graphics resolution 1024x768 pixels Color depth 24 bits Software requirements The following operating systems are supported Microsoft Windows 7 32 bit or 64 bit Microsoft Windows 8 1 Bosch Rexroth equipped and pre installed industrial PCs are equipped with Windows 7 These PCs contain a service pack re leased by Bosch Rexroth for the respective operating system at the tim...

Страница 62: ...our name and company 10 If necessary select a different installation folder 11 Click on Install to start installing the files 12 After the installation has been completed successfully click on Finish This will open a window prompting you to restart the PC After the PC has been restarted system files will be updated and the registrations required will be made This completes the installation You can...

Страница 63: ... 6 2 Installing IndraWorks Engineering DOK MTXMIC EASY CO06 EN P Bosch Rexroth AG 61 177 IndraMotion MTX micro Easy Setup for Standard Turning and Milling Machines Software installation and basic projects ...

Страница 64: ...he main menu 2 Select Restore from file system and click on Next 3 Select the archive on the next page The button allows you to browse for the archive The basic projects available during installation are filed in the C Program Files Rexroth IndraWorks Projects directo ry After having selected the archive click on Next 4 Select the directory where you want to create the project and click on Next 5 ...

Страница 65: ...rrently 4 project templates are available for MTX micro For milling machines Basic project Milling For turning machines Basic project Turning 1 spindle For turning centers Basic project Turning 2 spindles For Automation Basic project Automation To create a new machine project proceed as follows 1 To create a basic project from a template select File New Project in the main menu DOK MTXMIC EASY CO0...

Страница 66: ...C and the MTX micro can be estab lished in various ways The settings required for your particular case may be different from the settings shown here This is particularly applicable if you operate the MTX micro on a network In such a case please consult your network administrator The further description following below is based on a direct connection be tween the PC and the MTX micro e g via an Eth...

Страница 67: ...lect MTB or Developer F3 or F4 4 Enter the correct password for the user default setting in the basic proj ect no password 5 After having pressed Enter to confirm the current MTB or Develop er user is displayed 6 Switch to the System operating area Setting the IP address The IP address of the MTX micro must be identical with the IP address in the project Select the following settings IP Address 19...

Страница 68: ...ter the system has been restarted the configured IP address is dis played in the System operating area 6 3 4 Setting the IP address of the PC The PC must have its IP address in the same network segment as the MTX micro To achieve this a fixed address is set The first 3 digits always corre spond to the IP address of the MTX micro The subnet mask is the same as that of the MTX micro We recommend the...

Страница 69: ...sses have been configured The following description shows the steps required for testing communication between the system and the PC 1 After a project has been opened communication mode initially is set to offline For example the NC configuration and NC file system no des are gray i e inactive 2 Click on the icon blue to switch communication with the MTX micro to online 3 Communication with the MT...

Страница 70: ...the PC and the MTX micro off and on again 6 4 Downloading the CNC configuration data After communication has been successfully established the CNC parameters of the basic project must be downloaded to the MTX micro To do this extract these parameters from an archive TAR File which is an integral part of the basic project Proceed as shown in the description below From version 12 1 Select the IndraM...

Страница 71: ...e drive archives can be selected under Edit The drive archives are filed in the default project in the Project Directory PAR directory 6 Check your entries and start restoration by clicking on Finish 7 Restoration comprises 3 phases and the control repeatedly restarts ac cordingly 8 This dialog shows the successful restoration of the CNC configuration data DOK MTXMIC EASY CO06 EN P Bosch Rexroth A...

Страница 72: ...estored the MTX micro must be turned off and on again twice This initializes the parame ters of the NC and the connected drives Bosch Rexroth AG DOK MTXMIC EASY CO06 EN P 70 177 IndraMotion MTX micro Easy Setup for Standard Turning and Milling Machines Software installation and basic projects ...

Страница 73: ...in the final step The system program is now running Fig 7 1 Downloading the PLC system program 7 2 PLC system program structure 7 2 1 Overview The PLC system program has a clear structure The most essential elements are the following 1 The _OEM folder is provided for the programs and function blocks of the machine manufacturer This folder is empty on delivery 2 The _System folder is reserved for i...

Страница 74: ...ost important program of the system program is the main program prMAIN The main program is used to call all other programs and function blocks On delivery power supply activation and the interfaces to the CNC the axes and the HMI are already programmed ready for turn on The main program is also used to call system program extensions We rec ommend that appropriate subroutines are created which can ...

Страница 75: ...prMAIN for the various basic projects The function blocks are delivered along with the sys tem program in the MT_MTXmicro _Tech library Fig 7 4 prMAIN function blocks DOK MTXMIC EASY CO06 EN P Bosch Rexroth AG 73 177 IndraMotion MTX micro Easy Setup for Standard Turning and Milling Machines PLC commissioning ...

Страница 76: ...on types are defined with the basic project In the following M0 M299 bit auxiliary functions for switching functions T integer auxiliary function for tool commands S1 S2 float auxiliary functions for spindle commands H1 H5 integer auxiliary function for any use desired The exchange of information with the PLC is achieved via flags The bit auxil iary functions have exactly one bit in the PLC progra...

Страница 77: ...Fig 7 5 Auxiliary function types DOK MTXMIC EASY CO06 EN P Bosch Rexroth AG 75 177 IndraMotion MTX micro Easy Setup for Standard Turning and Milling Machines PLC commissioning ...

Страница 78: ...e following NC blocks are to be processed N100 G01 X200 F2000 N101 M10 G01 X220 M11 H1 10 N102 G01 X200 1 The NC moves the X axis to position X 200 in block N100 2 Then block N101 is activated and the NC outputs all auxiliary functions In the PLC program bits Ch1_M010 Ch1_M011 and H1_Ack are set to True and H1_Val is set to value 10 3 Then the X axis is moved to position X 220 4 Once position X 20...

Страница 79: ...trols the swiveling motion of the de vice The auxiliary function M80 is acknowledged in network 2 To achieve this the PLC evaluates the iPotDown input signal with a TON delay Once the signal for 100 ms is set to True M80 is acknowledged by resetting bit Ch1_M80 Flag mToolPotDown is also reset at the same time The device swivels out via the qPotDown output The qPotDown output receives the control s...

Страница 80: ... is written to the PLC variable CMD_PRESSURE INT Network 2 serves to acknowledge the auxiliary function In the example the system is to wait after the output until the pressure has reached the required value of 50 Once this value has been reached the auxiliary function is ac knowledged by resetting bit H1_Ack Bosch Rexroth AG DOK MTXMIC EASY CO06 EN P 78 177 IndraMotion MTX micro Easy Setup for St...

Страница 81: ... to 64 auxiliary function groups and assign ing up to 15 auxiliary functions to each of these groups The basic projects are configured as shown in the figure below Groups 1 14 should not be changed Fig 7 9 Default assignment of auxiliary function groups If you wish to have the auxiliary functions M80 and M86 and therefore the previously programmed state of the swiveling device displayed on the HMI...

Страница 82: ...ode and cannot be changed Fig 7 10 Special functions with M codes In addition to the special M codes there are the following defined auxiliary functions T The T function starts the tool search and the preparation in the PLC Bosch Rexroth AG DOK MTXMIC EASY CO06 EN P 80 177 IndraMotion MTX micro Easy Setup for Standard Turning and Milling Machines PLC commissioning ...

Страница 83: ...stics to the user in plaintext Each diagnostics message is controlled by a separate message bit in the PLC program The MTX micro saves the displayed MZA diagnostic messages in a logbook in the CNC A diagnostics message can be displayed as an error red a warning yellow or a note green on the user interface 7 4 2 MZA message display Currently existing messages are displayed in the diagnostics bar on...

Страница 84: ...ge display on the HMI 7 4 3 Message classification If a specific machine status occurs there should also be a specific reaction The MTX micro features an option of classifying the MZA messages The number of the message 1 2048 defines the reaction of the CNC to this message Bosch Rexroth AG DOK MTXMIC EASY CO06 EN P 82 177 IndraMotion MTX micro Easy Setup for Standard Turning and Milling Machines P...

Страница 85: ...MTXmicro_DIAG function block The PLC program allows read access to the flags of the MTXmicro_DIAG function block e g _mEStop Write access is not allowed 7 4 4 Programming the messages An MZA message is active as long as the corresponding message bit of the MZA interface is set to TRUE The following figure shows several options of programming a message DOK MTXMIC EASY CO06 EN P Bosch Rexroth AG 83 ...

Страница 86: ...g the message 7 4 5 Managing the message texts Message texts are saved in ASCII files in the file system of the CNC One file is created for each language The file name is mzatexte xxx with xxx stand ing for the language of the message file The file storage location is usrfep Fig 7 15 MZA file names A total of 2048 messages can be defined Each message is assigned a serial number from 1 to 2048 The ...

Страница 87: ... the text length is shorter for up to 2 3 of the displayable characters corresponding to the coding effort UTF 8 files are saved to the notepad Select UTF 8 as cod ing in the Save As dialog The characters will then be saved in UTF 8 format Caution The NC editor can only edit ASCII files These files must be edited externally via the notepad and then be copied to the system DOK MTXMIC EASY CO06 EN P...

Страница 88: ...gineering 1 Double click on the NC file system to open it 2 Select the usrfep directory and double click on Import 3 Select an mzatexte xxx file to be imported to the hard disk 4 Click on Import Fig 7 17 Importing the mzatexte 044 message file Bosch Rexroth AG DOK MTXMIC EASY CO06 EN P 86 177 IndraMotion MTX micro Easy Setup for Standard Turning and Milling Machines PLC commissioning ...

Страница 89: ...heck and if necessary adjust the NC parameters mentioned in this chapter 8 2 NC configurator Parameter editor 8 2 1 Introduction The NC is parameterized via the NC configurator This requires that the NC be switched to online mode This is indicated by IndraMotion_MTX_micro being displayed in blue along with the online icon Proceed as follows 1 Open the IndraMotion_MTX_micro node in the active Indra...

Страница 90: ...rameter editor 4 Quick editor Fig 8 2 Basic screen NC configuration If you wish to restore the basic NC configuration layout proceed as follows 1 Window 2 Reset Windows Layout 3 View 4 Selection window Fig 8 3 Restoring the basic setting of the IndraWorks layout for parameteriz ing the NC Bosch Rexroth AG DOK MTXMIC EASY CO06 EN P 88 177 IndraMotion MTX micro Easy Setup for Standard Turning and Mi...

Страница 91: ...erview and the ed iting process Proceed as follows 1 Select Physical Drive Name The selected line is highlighted with bor ders and blue coloring 2 All drives for this parameter are listed in the bottom area The selected parameter can be edited for all axes in this window DOK MTXMIC EASY CO06 EN P Bosch Rexroth AG 89 177 IndraMotion MTX micro Easy Setup for Standard Turning and Milling Machines NC ...

Страница 92: ...arameterization window This procedure applies to all NC parameters Bosch Rexroth AG DOK MTXMIC EASY CO06 EN P 90 177 IndraMotion MTX micro Easy Setup for Standard Turning and Milling Machines NC parameterization ...

Страница 93: ... Basic NC configuration MAIN Checking the drive assignment Open nodes Dr 1 to Dr 4 Check the assignment of the drives to the machine see fig 4 2 1 Number of NofCh channels usually one channel 2 Number of NofDr NC axes 4 in case of HCQ and 3 in case of HCT con trollers 3 Number of NofDrNodes drives 4 Node SpFunc indicates that this drive is a spindle DOK MTXMIC EASY CO06 EN P Bosch Rexroth AG 91 17...

Страница 94: ...g 8 8 Basic configuration Basic setting Check the basic setting of the machine Name Path Number of channels MAIN NofCh Number of NC controlled drives MAIN NofDr Number of configurable drives MAIN NofDrNodes Physical drive name MAIN Dr i SysDrName Bosch Rexroth AG DOK MTXMIC EASY CO06 EN P 92 177 IndraMotion MTX micro Easy Setup for Standard Turning and Milling Machines NC parameterization ...

Страница 95: ...N Dr i Scs ScsAddr Tab 8 1 Basic parameter setting Most of these parameters are already set if you use the basic projects DOK MTXMIC EASY CO06 EN P Bosch Rexroth AG 93 177 IndraMotion MTX micro Easy Setup for Standard Turning and Milling Machines NC parameterization ...

Страница 96: ...elation between drive connection and Sercos address The following axis configurations are defined in the basic projects Milling machine HCQ Milling System axis Phys Name Sercos address Connection Dr 1 C1 1 X5 1 Dr 2 X 3 X5 3 Dr 3 Y 4 X5 4 Dr 4 Z 2 X5 2 Lathe HCQ Turning with two spindles System axis Phys Name Sercos address Connection Dr 1 C1 1 X5 1 Dr 2 C2 2 X5 2 Dr 3 X 3 X5 3 Dr 4 Z 4 X5 4 Lathe...

Страница 97: ...nt The axis is assigned to a specific connection by changing the Sercos address MAIN Dr i Scs ScsAddr Parameters for linear axes Now set the traversing range limits the velocity and the acceleration Relations are shown in the following figures Fig 8 10 Schematic diagram 1 DOK MTXMIC EASY CO06 EN P Bosch Rexroth AG 95 177 IndraMotion MTX micro Easy Setup for Standard Turning and Milling Machines NC...

Страница 98: ... 8 12 Parameter setting for axes Traversing range velocity acceleration Two traversing range limits TrvLim 1 and TrvLim 2 can be defined for each axis Switching between these two traversing ranges can be controlled via the PLC If only one traversing range is required it is recommended to set the two traversing ranges to the same limits Bosch Rexroth AG DOK MTXMIC EASY CO06 EN P 96 177 IndraMotion ...

Страница 99: ...ndle of a turning machine for the following functions Tapping without compensating chuck G63 Selecting the spindle To select the spindle the drive type must be changed in the NC configuration under SpFunc Select the appropriate drive for configuration right click on the drive select Modify into from the context menu and continue with SpFunc Selecting the spindle C axis If a spindle is to be change...

Страница 100: ...ation between axis index and spindle index The table shows the relation for the example with spindle index Sp 1 being automatically assigned to the system axis Dr 3 and index Sp 2 to Dr 4 Parameterizing spindle functions First parameterize the spindle functions for each spindle in the SP data group Fig 8 14 Basic spindle function settings Set the following parameters 1 NofGears number of the gear ...

Страница 101: ...ously defined gear stage GearStep The following applies GearStep 1 ParSet 1 GearStep 2 ParSet 2 Configuring gear switching in the drive Gear switching must also be configured in the drive itself This can be ach ieved in the Parameter Set Switching dialog in the IndraWorks Drive The number of parameter blocks 1 and the parameter groups 2 are directly specified by the CNC The parameter block can be ...

Страница 102: ...s topology For the line structure the Sercos socket X24 can be connected to the Sercos connection of the external drive via Ethernet cable If required another Sercos drive can be connected to the second Sercos III connection For the ring structure the second Sercos connection of the last drive can be additionally connected to the Sercos socket X25 of the MTX micro control and drive system IndraMot...

Страница 103: ...nd on again The address is assigned automati cally after switching MTX micro on Sporadically MTX micro is started multiple times After the start up the I O device is detected Extend the PLC program to contact the I O addresses of the device MTX micro automatically assigns Sercos addresses upon start up Physically connect the I O device in the same order they have been created in IWE Query the stat...

Страница 104: ...Bosch Rexroth AG DOK MTXMIC EASY CO06 EN P 102 177 IndraMotion MTX micro Easy Setup for Standard Turning and Milling Machines ...

Страница 105: ... the Project Ex plorer double click and select Show Drives from the context menu that is displayed 2 The drives are displayed in the Drives node of the Project Explorer Fig 9 1 Displaying the drive DOK MTXMIC EASY CO06 EN P Bosch Rexroth AG 103 177 IndraMotion MTX micro Easy Setup for Standard Turning and Milling Machines Commissioning the drives ...

Страница 106: ... You can now load the basic parameter block of the drive Execute the following steps in IndraWorks Engineering 1 Set the focus on the IndraMotion_MTX_micro node of the Project Ex plorer double click and select Show online from the context menu that is displayed 2 If the HCQ or HCT drive is shown on a blue or red background the drives are switched to online mode 3 Set the focus on the node of an ax...

Страница 107: ...quired for each axis Currently wait for approx 1 minute before loading the basic parameters of the next axis After the basic parameters have been loaded for all axes switch the machine off and on again DOK MTXMIC EASY CO06 EN P Bosch Rexroth AG 105 177 IndraMotion MTX micro Easy Setup for Standard Turning and Milling Machines Commissioning the drives ...

Страница 108: ...d gear n1 and Output revolutions of load gear n2 Fig 9 4 Basic setting of the axis linear axis Rotary axis spindle There is no feed constant for rotary axes and spindles so that only one load gear must be defined 1 Input revolutions of load gear n1 and Output revolutions of load gear n2 2 Please note that the gear stages must each be entered separately for spindles with gearshift unit Fig 9 5 Basi...

Страница 109: ...otation of the motor If an axis moves in the direction while it is jogged in direction yes must be selected here Fig 9 6 Basic setting of the axis and spindle scaling units DOK MTXMIC EASY CO06 EN P Bosch Rexroth AG 107 177 IndraMotion MTX micro Easy Setup for Standard Turning and Milling Machines Commissioning the drives ...

Страница 110: ...up mode of the drive 3 Optimize the velocity control loop Measure the possible bandwidth Set the Kp and Tn parameters Check the settings of the velocity control loop 4 Exit the Easy startup mode of the drive 5 Optimize the position control loop Set the Kv parameter Setting the acceleration feedforward Set the jerk limitation After the drive has been optimized switch the machine off and on again Ax...

Страница 111: ...roceed as follows to determine the resonances 1 Set the value of Speed loop smoothing time constant in the Velocity control loop filter dialog to 0 Fig 9 7 Entering the value of Speed loop smoothing time constant 2 Start the Easy startup mode 1 Select Engineering port TCP IP 2 Select Jogging 3 Select Start Easy startup mode DOK MTXMIC EASY CO06 EN P Bosch Rexroth AG 109 177 IndraMotion MTX micro E...

Страница 112: ...lick on Start measurement 4 3 6 After completed measurement click on Display result graphical ly 5 Fig 9 9 Frequency response analysis 4 The following figure shows the amplitude and phase responses deter mined after the measurement of the frequency response Two reso nance points have been determined at 63 Hz and 899 Hz Bosch Rexroth AG DOK MTXMIC EASY CO06 EN P 110 177 IndraMotion MTX micro Easy S...

Страница 113: ...er of independent filters that can be set for each axis is 4 Typical filter types are band pass for filtering a frequency range and low pass for filtering all frequencies below a blocking frequency Proceed as follows to set a filter 1 Select band rejection or low pass 2 Enter the resonance frequency determined in the measurement in the Center frequency box here 900 Hz The value entered in the Band...

Страница 114: ...nd the integral action time Tn Enter these parameters in the Axis control settings dialog The Frequency response analysis has to be started after each change as described above until the optimal settings have been found Fig 9 12 Setting Kp and Tn Proceed as follows to set the parameters 1 First set the integral action time Tn 0 Then slowly increase the gain Kp Repeat the measurement of the frequen...

Страница 115: ...s We rec ommend that you set the amplitude characteristic between 0 dB and no more than 3 dB overshoot Greater oscillations in the system if any can be corrected by changing Tn Fig 9 14 Stable system depending on Tn DOK MTXMIC EASY CO06 EN P Bosch Rexroth AG 113 177 IndraMotion MTX micro Easy Setup for Standard Turning and Milling Machines Commissioning the drives ...

Страница 116: ...riodic signal generation Fig 9 15 Drive integrated command value generator Open the Oscilloscope on the Engineering Desktop under Diagnostics Then configure the Recording time and the Memory depth according to the values in the Drive integrated command value generator Select Con figure and set Trigger Trigger signal Threshold value and Edge ac cordingly Select the signals to be measured by clickin...

Страница 117: ... checkbox in the Drive integrated command value genera tor dialog see fig 9 15 Drive integrated command value generator on page 114 The axis now moves at a defined velocity and period All selected signals are automatically measured by the oscilloscope DOK MTXMIC EASY CO06 EN P Bosch Rexroth AG 115 177 IndraMotion MTX micro Easy Setup for Standard Turning and Milling Machines Commissioning the driv...

Страница 118: ...k value is not higher than 40 the system is stable If the overshoot is higher the Kp and Tn parameters must be changed once more Bosch Rexroth AG DOK MTXMIC EASY CO06 EN P 116 177 IndraMotion MTX micro Easy Setup for Standard Turning and Milling Machines Commissioning the drives ...

Страница 119: ... forward parameters To optimize the position control loop oscillate the axis cyclically between two positions using an NC program Change the Kv and feed forward parameters during the traversing motion of the axis and observe its behavior with the os cilloscope Ensure that the jerk limitation is switched off with the JKC 0 com mand and that the feed forward is switched on with the FFW 1 command Exa...

Страница 120: ...following distance is measured from 0 07 mm to 0 03 mm 1 Kv 1 max following distance S 0 0189 0 07 mm 2 Kv 2 max following distance S 0 0189 0 06 mm 3 Kv 4 max following distance S 0 0189 0 04 mm 4 Kv 6 max following distance S 0 0189 0 03 mm 5 Kv 8 max following distance S 0 0189 0 03 mm Since the torque signal S 0 0084 shows an oscillation with a setting of Kv 8 the Kv value is set to 50 of the ...

Страница 121: ...ge in the following lag distance while the value of the acceleration feedforward is slowly increased 1 S 0 0348 2 max lag distance S 0 0189 0 034 mm 2 S 0 0348 4 max following distance S 0 0189 0 028 mm 3 S 0 0348 6 max following distance S 0 0189 0 022 mm 4 S 0 0348 8 max following distance S 0 0189 0 016 mm 5 S 0 0348 10 max following distance S 0 0189 0 013 mm The effect of the acceleration fee...

Страница 122: ...Fig 9 22 Setting the acceleration feedforward Bosch Rexroth AG DOK MTXMIC EASY CO06 EN P 120 177 IndraMotion MTX micro Easy Setup for Standard Turning and Milling Machines Commissioning the drives ...

Страница 123: ...sure the time T from stand still to the point in time when the velocity changes linearly Determine the ve locity V that is reached at this time The maximum axis jerk is calculated us ing the formula J V T The following figure explains the procedure Fig 9 23 Determining the axis jerk The value set in the CNC should be 10 higher than the calcula ted value If e g a value of 60 was calculated 66 shoul...

Страница 124: ...s now completed The operation must be repeated for the other axes and spindles 9 5 Automatic setting of the axis control 9 5 1 General information From drive firmware version 18 there is the option to optimize the drive con trol automatically Check the following points prior to the start of the Automatic setting of the axis control Test power on off Test E Stop Jog axis Move the axis to the approx...

Страница 125: ...e axis control In the Project Explorer select the axis to be optimized Open the entry Opti mization Commissioning under the axis node Subsequently start the Auto matic setting of the axis control Determining and optimizing Fig 9 27 Selecting the optimization method DOK MTXMIC EASY CO06 EN P Bosch Rexroth AG 123 177 IndraMotion MTX micro Easy Setup for Standard Turning and Milling Machines Commissi...

Страница 126: ...on without axis motion The parameters are calculated An axis motion does not take place Fig 9 28 Determining and optimizing with axis motion We describe the path with axis motions In the next screen enter the travers ing range for which the axis is to be optimized Bosch Rexroth AG DOK MTXMIC EASY CO06 EN P 124 177 IndraMotion MTX micro Easy Setup for Standard Turning and Milling Machines Commissio...

Страница 127: ...e left of the image select which settings to optimize Optimize all data simultaneously or if required only individual data 9 5 3 Determining and optimizing Easy startup mode In the next step the measurement to calculate the optimum settings is execu ted DOK MTXMIC EASY CO06 EN P Bosch Rexroth AG 125 177 IndraMotion MTX micro Easy Setup for Standard Turning and Milling Machines Commissioning the dr...

Страница 128: ...is transferred to the drive Switch the drive to parameterization mode The axis enable might have to be disabled In the NC select the operating mode Manual The axis can be enabled for movement via the button Drive enable Bosch Rexroth AG DOK MTXMIC EASY CO06 EN P 126 177 IndraMotion MTX micro Easy Setup for Standard Turning and Milling Machines Commissioning the drives ...

Страница 129: ...d drive values for the previously selected areas By pressing the Complete key the values are applied to the drive Exit the easy startup mode either directly by pressing the Com plete button or in the Project Navigator by calling the Easy start up mode dialog Oscilloscope In the oscilloscope view the optimization here optimization of the frequency response DOK MTXMIC EASY CO06 EN P Bosch Rexroth AG...

Страница 130: ...creens to set important drive parameters can be found under System Para 9 6 2 Screen for mechanic axis setting This screen displays some important parameters of available axes The data in the white box is editable and the data in the gray box is not editable Bosch Rexroth AG DOK MTXMIC EASY CO06 EN P 128 177 IndraMotion MTX micro Easy Setup for Standard Turning and Milling Machines Commissioning t...

Страница 131: ... in the white box is editable and the data in the gray box is not editable Fig 9 35 Setting spindle data 9 6 4 Screen to set the reference position The reference position can be read and set in this screen DOK MTXMIC EASY CO06 EN P Bosch Rexroth AG 129 177 IndraMotion MTX micro Easy Setup for Standard Turning and Milling Machines Commissioning the drives ...

Страница 132: ...ute encoders and the drive has to be disabled Power has to be on for incremental encoders and the drive has to be enabled Bosch Rexroth AG DOK MTXMIC EASY CO06 EN P 130 177 IndraMotion MTX micro Easy Setup for Standard Turning and Milling Machines Commissioning the drives ...

Страница 133: ...or executing the standard functions of a machine The HMI software the PLC functions and the elements of the control panel are harmonized with each other such that the machine can be operated intuitively The control panels differ in screen size and in some operating elements Fig 10 1 VDP80 control panel milling machine DOK MTXMIC EASY CO06 EN P Bosch Rexroth AG 131 177 IndraMotion MTX micro Easy Se...

Страница 134: ... There are 4 main groups with red borders Groups 1 to 3 are used to operate the HMI software and group 4 serves to execute the PLC functions of the ma chine Bosch Rexroth AG DOK MTXMIC EASY CO06 EN P 132 177 IndraMotion MTX micro Easy Setup for Standard Turning and Milling Machines Operating the IndraMotion MTX micro ...

Страница 135: ...may have up to three assignments To activate the second key level press the Shift key together with the key to be pressed To activate the third key level press the Alt key together with the key to be pressed Example Pressing key 1 together with Shift will produce Pressing key 1 together with Alt will produce Selecting the operating area 3 The operating area keys allow you to quickly switch between...

Страница 136: ... Displaying the log of the diagnostic messages Displaying the state of the CNC PLC interface Displaying the state of the digital PLC inputs and outputs Tab 10 1 Operating areas Machine control panel 4 The machine control panel provides the E stop pushbutton the override switches the PLC control keys and the USB interface The control panel for the turning machine additionally incorporates a handwhe...

Страница 137: ...ls only affect the spindle speed in all operation modes The over ride can be set within a range from 45 to 120 The central key is used to set the override to 100 Feed override 5 The Feed override switch has several functions It allows setting the over ride for feed and rapid traverse in all operation modes and selecting the step size for jog mode and handwheel in manual mode Handwheel 6 The integr...

Страница 138: ...e diagnostic bar shows the messages in plaintext scrolling across the screen It additionally displays the current date and time Working area 3 The working area displays the current screen In the example this is the basic Automation screen with axis position display tool display as well as program and technology display Status bar 4 The status bar shows status messages of the operating software Add...

Страница 139: ... pressing the Enter key 3 Enter or change the value 4 Apply the value with Enter Edit mode is exited automatically If tables extend beyond the screen page shown use the Page and Page keys to move to the desired page of the table Text editor The text editor is used to create edit and save ASCII text files and above all NC programs Fig 10 7 Text editor DOK MTXMIC EASY CO06 EN P Bosch Rexroth AG 137 ...

Страница 140: ...ams and other user data e g diagnostic texts are stored in ASCII files in the file system of the IndraMotion MTX micro Fig 10 8 File system navigator 13VRS Open the Program operating area to create new files or edit existing files The navigator is opened automatically as shown in the previous figure Oper ation of the navigator is similar to that known from the PC programs The left hand window show...

Страница 141: ...4 Important operating screens Operation mode manual Fig 10 9 Manual screen The screen is opened by selecting the Manual key It features the jog move to reference point and handwheel mode functions To select the functions press the corresponding machine keys DOK MTXMIC EASY CO06 EN P Bosch Rexroth AG 139 177 IndraMotion MTX micro Easy Setup for Standard Turning and Milling Machines Operating the In...

Страница 142: ...eration mode Fig 10 11 Automation screen Press the Auto key to switch to automatic mode and activate the screen Press F2 to start the NC program selection After having selected the de sired program with the cursor keys and TAB if necessary press Bosch Rexroth AG DOK MTXMIC EASY CO06 EN P 140 177 IndraMotion MTX micro Easy Setup for Standard Turning and Milling Machines Operating the IndraMotion MT...

Страница 143: ...data is available for no more than two edges of each tool and status data is also displayed The tool data can be quickly edited in the list To do this select the desired field using the cursor keys and press Enter to switch to edit mode Edit the value and press Enter to apply the value The tool editor which can be opened with F3 provides an overview of all tool data for a selected tool DOK MTXMIC ...

Страница 144: ... 14 Diagnostic messages The diagnostic screen displays a list of current diagnostic messages It also shows the number time of appearance and the message text for each mes sage The lower area shows the cause and the recovery text for each mes sage that has been selected with the cursor keys Bosch Rexroth AG DOK MTXMIC EASY CO06 EN P 142 177 IndraMotion MTX micro Easy Setup for Standard Turning and ...

Страница 145: ...ser 2 Switch to the System operating area 3 From Version 12 Press F2 Para Press F5 MachPara Version 10 Press F2 Para 4 Select the parameter type e g AX for axis parameter using the ma chine keys 5 Select the desired parameter using the cursor keys 6 Press Enter to switch to edit mode 7 Restart the system after having made your changes DOK MTXMIC EASY CO06 EN P Bosch Rexroth AG 143 177 IndraMotion ...

Страница 146: ...8 Switch the drive phase back to Phase4 10 2 6 User management The HMI software features a user management which can be used to control the rights to operation and the rights to edit data There are 4 user levels Guest Can select and start NC programs but cannot be used to edit programs or parameters Operator Same as Guest but is additionally allowed to edit programs and tools OEM Same as operator ...

Страница 147: ...sword log in as user as described above open the Sys tem operating area select F9 and press F6 to start the modification When prompted to do so enter the old password and then twice the new password By default passwords are not assigned to the operator OEM and developer machine setter user levels By default or following a firmware update the default password for operators and machine setters is 12...

Страница 148: ...Bosch Rexroth AG DOK MTXMIC EASY CO06 EN P 146 177 IndraMotion MTX micro Easy Setup for Standard Turning and Milling Machines ...

Страница 149: ...orks Engineering Proceed as follows to back up the project data 1 In the main menu select Project Archive 2 Define a name for the archive and if necessary a comment and a pass word continue with Next 3 Select a storage location for the archive by activating the Store Archive on File System checkbox Deactivate the Store Archive on FTP Serv er checkbox 4 4 In the next step define the data to be file...

Страница 150: ...tered by the system an appropriate message is dis played Omit step 1 if data is only to be backed up on the CF card 2 Switch to the Maintain operating area 3 Press the F8 Backup key 4 Select F7 Operator UserBackup or F8 OEM Backup when log ged in as MTB or Developer otherwise the query is not displayed 5 Press F8 Yes to start the data backup 6 Wait until the Backup done message is displayed which ...

Страница 151: ...CNC and drive parameters CNC programs except for cf and mnt directories PLC program zero points and CNC vari ables as well as tool data Any data backup already filed on the USB flash drive will be over written without any prompt Restoring data from the USB flash drive CF card From version 13 Proceed as follows to restore data from a USB flash drive 1 Insert an USB flash drive containing the data b...

Страница 152: ...ime until all parameters are ac tive and the control starts without error message The data of the control is completely overwritten during the re store procedure Please check beforehand whether there is data that is still required 11 1 4 Serial commissioning The data backup and restore operations are perfectly compatible with a serial commissioning of machines After the prototype machine has been ...

Страница 153: ... NC program from start block to the selected target block with out generating axis motions or auxiliary functions is called computation It can be queried in the NC program if a program is processed or if a computation is currently executed The computation generally ends with the last NC block before the selected target block Thus the preconditions to start the interrup ted program with the target ...

Страница 154: ...med coupling number in pre run ConstCutStatus Adjust G function group G96 97 SpeedStr Speed syntax of a spindle MoveStr Movement syntax of a spindle GearStr Gear syntax of a spindle SpConfNotAdjusted Spindle configuration adjustment required Tab 12 2 Overview on structure elements SysChSpSRun general data Data channel spindles SysChSpSRun Sp channel spindle number Structure element Description Sys...

Страница 155: ... on structure elements SysChSpSRun data for channel spindles Data for spindle couplings SysChSpSRun Cp coupling number Structure element Description IsProg Couple link programmed in pre run NotAdjusted Adjustment status of spindle coupling CoupleOn Switch on couple link Master Channel spindle number of the master spindle Slave 1 8 Channel spindle number of the slave spindle Tab 12 4 Overview on st...

Страница 156: ...cks locked Tab 12 5 Overview on structure elements SysChSRun Data of the repositioning logic SysReentry Structure element Description FeedVal Individual return to path velocity OptFeedVal Optional velocity if no feed was programmed TangCircleRadius Return to path radius NameOfAsup Adjustment program name of the return to path logic ReentryAsup Approach Return to contour FeedMode Return to path vel...

Страница 157: ...ement BQ3 of the active tool PreTool K1 Tool data element K1 of the prepared tool PreTool K2 Tool data element K2 of the prepared tool PreTool SKQ Tool data element SKQ of the prepared tool PreTool IKQ1 Tool data element IKQ1 of the prepared tool PreTool IKQ2 Tool data element IKQ2 of the prepared tool PreTool IKQ3 Tool data element IKQ3 of the prepared tool PreTool IQ1 Tool data element IQ1 of th...

Страница 158: ...city It becomes active if the value 2 is entered in SysReentry FeedMode The value can be modified in the part program Path SysReentry FeedVal Description of the variable values Approaching velocity Optional return to path velocity OptFeedVal Indicates an optional return to path velocity It becomes effective if a value of 1 is entered in SysReentry FeedMode and no valid F value becomes effec tive i...

Страница 159: ...proaching movement Name of the Init adjustment program NameOfInitAdjPrg For each channel defines the path and name of the subroutine that is to be called as the initialization adjustment program If no subroutine is specified no Init adjustment program is called before the approaching movement Path SysSRun Channel NameOfInitAdjPrg Description of the variable values EmptyString No Init adjustment pr...

Страница 160: ...er and tool list ActTool K2 ActTool K2 Tool data element K2 of the active tool Path SysTool Channel ActTool K2 The date can be freely assigned Usually the date is used to se lect the position It is used to divide the sectors into positions Number of the active edge in the target block TargEd Number of the active edge in the target block Path SysToolSRun Channel TargEd Description of the variable v...

Страница 161: ...output as long as the program is processed during computation up to the abort block target block 1 0 The signal is active if no computation is started in the pro gram Re entry active iCh_SRunReEnter The signal has an effect together with the block pre run functionality DOK MTXMIC EASY CO06 EN P Bosch Rexroth AG 159 177 IndraMotion MTX micro Easy Setup for Standard Turning and Milling Machines Bloc...

Страница 162: ...ating mode Overwrite the operator has to ensure the corre sponding state Adjustment programs are machine specific The machine manu facturer is responsible for creating the adjustment program The elements specified above are only a reference point but do not have to be complete Example Program InitAdjPrg 1 Automatic adjust program milling machines MTX micro 13V12 Version 1 0 02 JULY 2014 do not cha...

Страница 163: ... Speed limits IF SD SysChSpSRun Sp SP LimitNotAdj 0 THEN N231 SMX SADR SD SysChSpSRun Sp SP ProgMaxSpeed N232 SMN SADR SD SysChSpSRun Sp SP ProgMinSpeed 2033 ENDIF Spindle speed 2040 IF SD SysChSpSRun Sp SP SpeedNotAdj 0 THEN N241 SADR SD SysChSpSRun Sp SP ProgSpeed 2042 ENDIF Spindle direction orientation M3 M103 M19 2050 IF SD SysChSpSRun Sp SP MoveNotAdj 0 THEN 2051 IF MOVE 19 THEN N252 MADR SA...

Страница 164: ...Select program 2 Start the block search screen via the M keys Program functions and Block search Fig 12 2 Block search screen 3 Select the target block By default the block search with computation is active 4 Activate the block search using the F key Go to 5 Start the NC program by pressing Start First the adjustment program is processed The NC program is subsequently started with the target block...

Страница 165: ...Wiring diagrams Fig 13 1 Wiring diagram for MTX micro with HCQ 4 axis configuration DOK MTXMIC EASY CO06 EN P Bosch Rexroth AG 163 177 IndraMotion MTX micro Easy Setup for Standard Turning and Milling Machines Annex ...

Страница 166: ...Fig 13 2 Wiring diagram for MTX micro with HCT 3 axis configuration Bosch Rexroth AG DOK MTXMIC EASY CO06 EN P 164 177 IndraMotion MTX micro Easy Setup for Standard Turning and Milling Machines Annex ...

Страница 167: ...3 2 Parameter lists 13 2 1 NC configuration Fig 13 3 NC parameter list DOK MTXMIC EASY CO06 EN P Bosch Rexroth AG 165 177 IndraMotion MTX micro Easy Setup for Standard Turning and Milling Machines Annex ...

Страница 168: ...Fig 13 4 NC parameter list Bosch Rexroth AG DOK MTXMIC EASY CO06 EN P 166 177 IndraMotion MTX micro Easy Setup for Standard Turning and Milling Machines Annex ...

Страница 169: ...13 2 2 PLC CNC interfaces Start addresses Fig 13 5 PLC start addresses DOK MTXMIC EASY CO06 EN P Bosch Rexroth AG 167 177 IndraMotion MTX micro Easy Setup for Standard Turning and Milling Machines Annex ...

Страница 170: ...I O addresses Fig 13 6 Inputs and outputs Bosch Rexroth AG DOK MTXMIC EASY CO06 EN P 168 177 IndraMotion MTX micro Easy Setup for Standard Turning and Milling Machines Annex ...

Страница 171: ...Auxiliary functions Fig 13 7 M functions DOK MTXMIC EASY CO06 EN P Bosch Rexroth AG 169 177 IndraMotion MTX micro Easy Setup for Standard Turning and Milling Machines Annex ...

Страница 172: ...Fig 13 8 Additional auxiliary functions Bosch Rexroth AG DOK MTXMIC EASY CO06 EN P 170 177 IndraMotion MTX micro Easy Setup for Standard Turning and Milling Machines Annex ...

Страница 173: ...ormation on service repair e g delivery addresses and training can be found on our internet sites Service worldwide Outside Germany please contact your local service office first For hotline numbers refer to the sales office addresses on the internet Preparing information To be able to help you more quickly and efficiently please have the following information ready Detailed description of malfunc...

Страница 174: ...Bosch Rexroth AG DOK MTXMIC EASY CO06 EN P 172 177 IndraMotion MTX micro Easy Setup for Standard Turning and Milling Machines ...

Страница 175: ...Complete backup 147 HMI software 148 Individual files 147 IndraWorks 147 Diagnostics machine status display 81 Importing the message file 86 Managing the message texts 84 Message classification 82 MZA message display 81 Programming the messages 83 Digital input and output signals 56 Displaying the drives 103 Downloading the CNC configuration data 68 Downloading the PLC system program 71 Drive syst...

Страница 176: ...eOfInitAdjPrg 157 NC configuration parameter editor Quick editor 89 NC configurator configuration parameter editor Basic layout 88 Parameter groups 89 NC configurator Parameter editor 87 NC Configurator Parameter editor Help 91 NC parameterization 87 Basic configuration 91 NC configurator Parameter editor 87 Network types 45 TN C network 46 TN S network 46 O Operating the IndraMotion MTX micro 131...

Страница 177: ...tting the IP address on the MTX micro 65 Signal words 10 Software installation 59 Suggestions 12 Support 171 Symbols used 12 System overview 13 Performance 14 T TargDNr 158 TargEd 158 Target groups 5 Testing the communication 67 Timeout 157 U Unintended use 20 Unintended Use Consequences non liability 19 V VDP80 1FGN C1 NN EN for turning machines 38 VDP80 1FHN C1 NN EN for milling machines 37 W Wa...

Страница 178: ...Notes Bosch Rexroth AG DOK MTXMIC EASY CO06 EN P 176 177 IndraMotion MTX micro Easy Setup for Standard Turning and Milling Machines ...

Страница 179: ...Notes DOK MTXMIC EASY CO06 EN P Bosch Rexroth AG 177 177 IndraMotion MTX micro Easy Setup for Standard Turning and Milling Machines ...

Страница 180: ... Company Bosch Rexroth AG Electric Drives and Controls P O Box 13 57 97803 Lohr Germany Bgm Dr Nebel Str 2 97816 Lohr Germany Tel 49 9352 18 0 Fax 49 9352 18 8400 www boschrexroth com electrics DOK MTXMIC EASY CO06 EN P ...

Отзывы: