25
CHAPTER 3: Installation
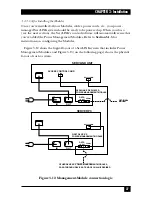
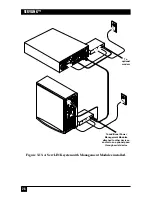
3.1.7.B Installing the Modules Controlling Power to the Attached Devices
Take these steps to install each of the Power Management Modules you’ll be using
to control power to the ServLINK’s attached PC CPUs, routers, and other devices:
1. Power down the device that the Module will be power-controlling.
2. Plug one of the included RJ-45 cables into the “DATA IN” port on the
Management Module.
3a.
If this is the first Management Module in the daisychain:
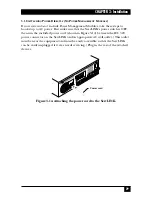
Use RJ-45F-to-DB9F
adapter included with the Module to connect the other end of this cable to
one of the ServLINK’s serial ports, as shown in Figure 3-11.
Figure 3-11. Attaching the cable from the first PC’s Module to the
ServLINK.
3b.
If this is not the first Management Module in the chain:
Connect the other end of
the RJ-45 cable to the “DATA OUT” port on the previous Module in the
chain.
NOTE
Make careful notes of which devices you attach to which Modules, so
that you can associate the two in the ServLINK’s software later, and
have accurate remote control. (The ServLINK’s software will refer to the
first Module in the daisychain as “001,” the second as “002,” and so
forth.) See Section 6.1.2.
Serial control cable
from first Module
RJ-45 to DB9
adapter
Содержание ServLink ACR3500A
Страница 111: ...NOTES ...
Страница 112: ...NOTES ...
Страница 113: ...NOTES ...
Страница 114: ...NOTES ...
Страница 115: ...NOTES ...


