Chapter 4 Installation and Setup
22
Avaya P130 User’s Guide
Rack Mounting
The P130 case fits in most standard 19-inch racks. P130 is 2U (88mm, 3.5”) high.
Place the P130 in the rack as follows:
1
Snap open the hinged ends of the front panel to reveal the fixing holes.
2
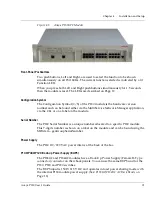
Insert the unit into the rack. Ensure that the four P130 screw holes are aligned
with the rack hole positions as shown in Figure 4.6.
Figure 4.6
Avaya P130 Rack Mounting
3
Secure the unit in the rack using the screws. Use two screws on each side. Do
not overtighten the screws.
4
Snap closed the hinged ends of the front panel.
5
Ensure that ventilation holes are not obstructed.
Содержание P130 SMON
Страница 1: ...Avaya User s Guide AVAYA P130 WORKGROUP SWITCH SOFTWARE VERSION 2 9 July 2002 ...
Страница 2: ......
Страница 12: ...List of Figures x P130 User s Guide ...
Страница 14: ...List of Tables xii P130 User s Guide ...
Страница 22: ...Chapter 1 Overview 8 Avaya P130 User s Guide Note You need to purchase one SMON License per Avaya P130 stack ...
Страница 24: ...Chapter 1 Overview 10 Avaya P130 User s Guide ...
Страница 28: ...Chapter 2 P130 Front and Back Panels 14 Avaya P130 User s Guide ...
Страница 30: ...Chapter 3 Applications 16 Avaya P130 User s Guide ...
Страница 50: ...Chapter 5 Avaya P130 CLI Architecture Access Conventions 36 Avaya P130 User s Guide ...
Страница 94: ...Chapter 6 Avaya P130 CLI 80 Avaya P130 User s Guide ...
Страница 146: ...132 Avaya P130 User s Guide ...
Страница 156: ...Appendix C Index of all CLI Commands 142 Avaya P130 User s Guide ...


