Protected Setup Pages
69
MVP-5200i Modero® ViewPoint® Touch Panel with Intercom - Instruction Manual
SIP Settings Page
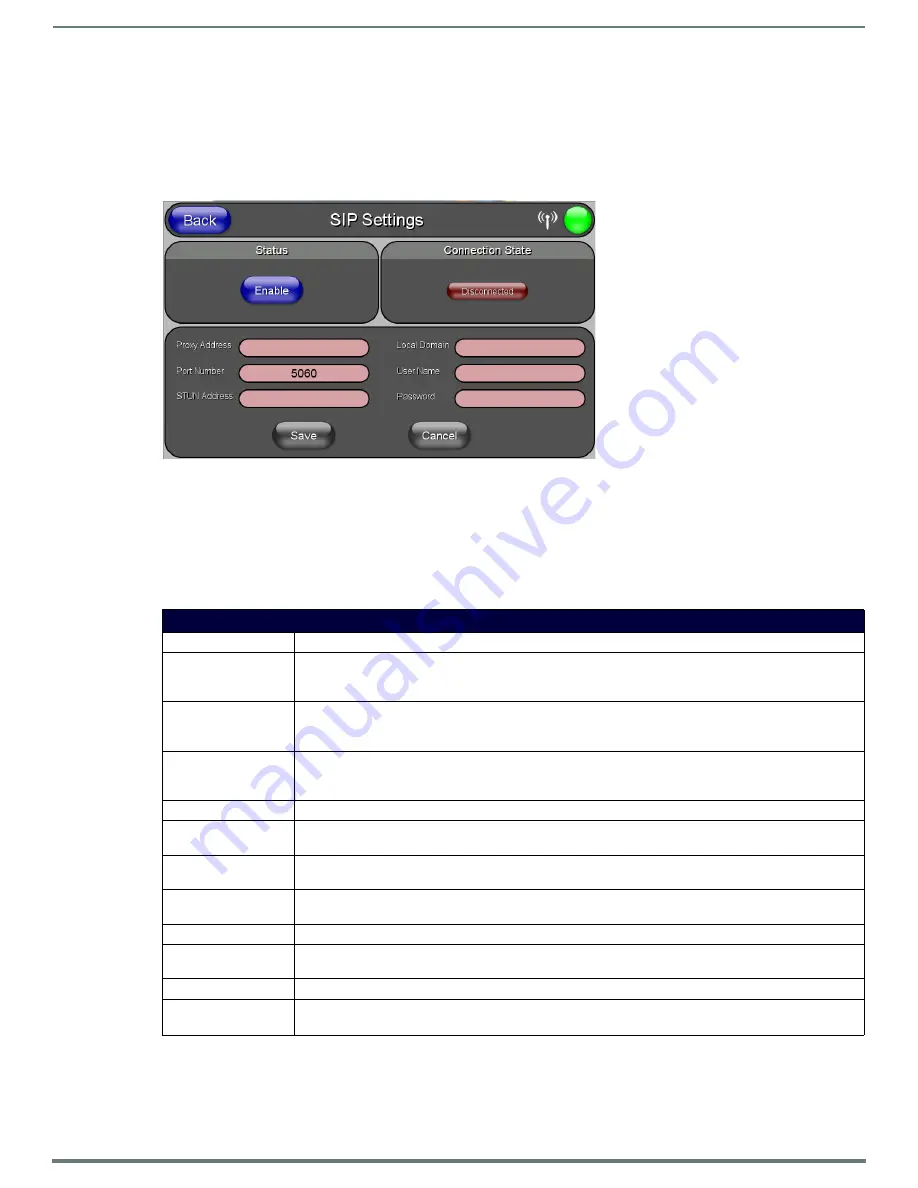
The options on the SIP Settings page (FIG. 69) enable you to establish network settings for using your touch panel as an IP phone.
With a CSG SIP Communications Gateway (
FG2182-01, -02, -03
), you can use your touch panel to make and receive local, long
distance, and international phone calls, and have access to phone features like call waiting, caller ID, call forwarding, call queuing,
and voice mail. Setting up your touch panel as a telephone requires that you set it up as one in the CSG SIP Communications
Gateway. Refer to the
CSG SIP Communications Gateway Operation/Reference Guide
for information on setting up your touch panel
to work as a telephone.
You may need to load a Duet module to enable the touch panel to receive SIP calls. The Duet module translates between the
standard interface and the device protocol. It parses the buffer for responses from the device, sends strings to control the device,
and receives commands from the UI module or telnet sessions. Refer to the documentation supplied with the Duet Module for more
details.
NOTE:
A sample UI module is provided in the module package. It is not intended to cover every possible application, but can be
expanded as needed by a dealer to meet the requirements of a particular installation.
Features on this page include:
FIG. 69
SIP Settings page
SIP Settings Page
Back:
Saves all changes and returns to the previous page.
WiFi/Wired/USB Icon:
The icon to the left of the Connection Status Icon displays whether the current connection to the Master is
Wireless
(image of a radio antenna),
Wired
(image of three networked computers), or
USB
(USB connection
symbol).
Connection Status Icon: The icon in the upper-right corner of each Protected Setup page provides a constant visual indication of current
connection status.
Note: a Lock appears on the icon if the panel is connected to a secured NetLinx Master.
Status:
This option enables the SIP Stack on startup. If you disable this option, the panel will not attempt to read the
rest of the configuration and will not register with a proxy server. However, point-to-point SIP will still be
enabled allowing for existing intercom functionality.
Connection State:
This option displays whether you are connected to the proxy server.
Proxy Address:
This option enables you to enter the IP address or DNS name of the proxy server that you want to use to
register.
Port Number:
The option displays the port you use to connect to the proxy server. The standard SIP port is 5060, but some
providers use different ports.
STUN Address:
This option enables you to enter the IP address or DNS name of the Simple Traversal of UDP through NATs
(STUN) server. This field is optional.
Local Domain:
This is the realm used for authentication. This field is optional.
User Name:
This option enables you to enter the user name used for authentication to the proxy server. Normally, the user
name is the same as the phone number assigned to the extension you are using. This field is optional.
Password:
This option enables you to enter the password for the user at the proxy server. This field is optional.
Save/Cancel:
•
Save
- store the new security information, apply changes, and return to the previous page.
• Cancel - discard changes and return to the previous page.


