Chapter 3 – Maintenance
Service manual AJP PR3/PR4 3 - 32
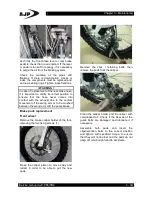
Enter the retaining pin and make sure that
the inner stainless plate is pressing the pads.
Tighten the retaining bolt followed the stopper
(if it exists).
After installation of the pads in the brake
caliper, assemble rear wheel.
Make sure that the brake disc is inserted
between the two pads on the rear brake
caliper when placing the wheel or the disc
may be damaged.
Repeatedly press the brake pedal to restore
the pressure in the system and check if the
wheel rotates correctly.
Note:
In the case of PR4 EXTREME removal
of the rear wheel is not required, since there
is sufficient space between the wheel hub
and the disc to be possible to remove the
brake pads.
Tightening torque:
Rear caliper brake pads retention bolt:
20N.m
(2,0Kgf.m)
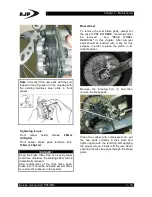
Rear brake pedal
Adjustment
Loosen the lock nut (2).
Turn the adjuster stud (3) to increase or
decrease the pedal height.
Measure the distance between the ball and
the pump fixing bolt (4).
If you have the correct measure (5), tighten
the locknut.
STANDARD: 93,0mm
Standard regulation of the distance between
the locknut of the adjustment stud and
locknut on the kneecap of the brake pedal
(6):
12,5mm.
STOP LIGHT SWITCH
Note:
There is no regulation of the brake light
switch for the rear brake because it is a
hydraulic switch.
By acting the front brake lever, check if the
brake light of the taillight illuminates before
there was effective braking.
If the light does not turn on properly, adjust
the adjuster in the lever to turn on the switch
at the correct height, if not possible it must be
replaced.
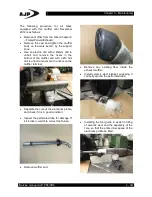
Adjustment
Loosen the lock nut (1);
Turn the adjuster (2) clockwise to advance
the switch or in the counterclockwise
direction to delay the switch performance.
Tighten the locknut.


