background image


Chapter 2: Installation 

ZP2 Series Installation Manual 

17 

Cabinet and PCB layout 

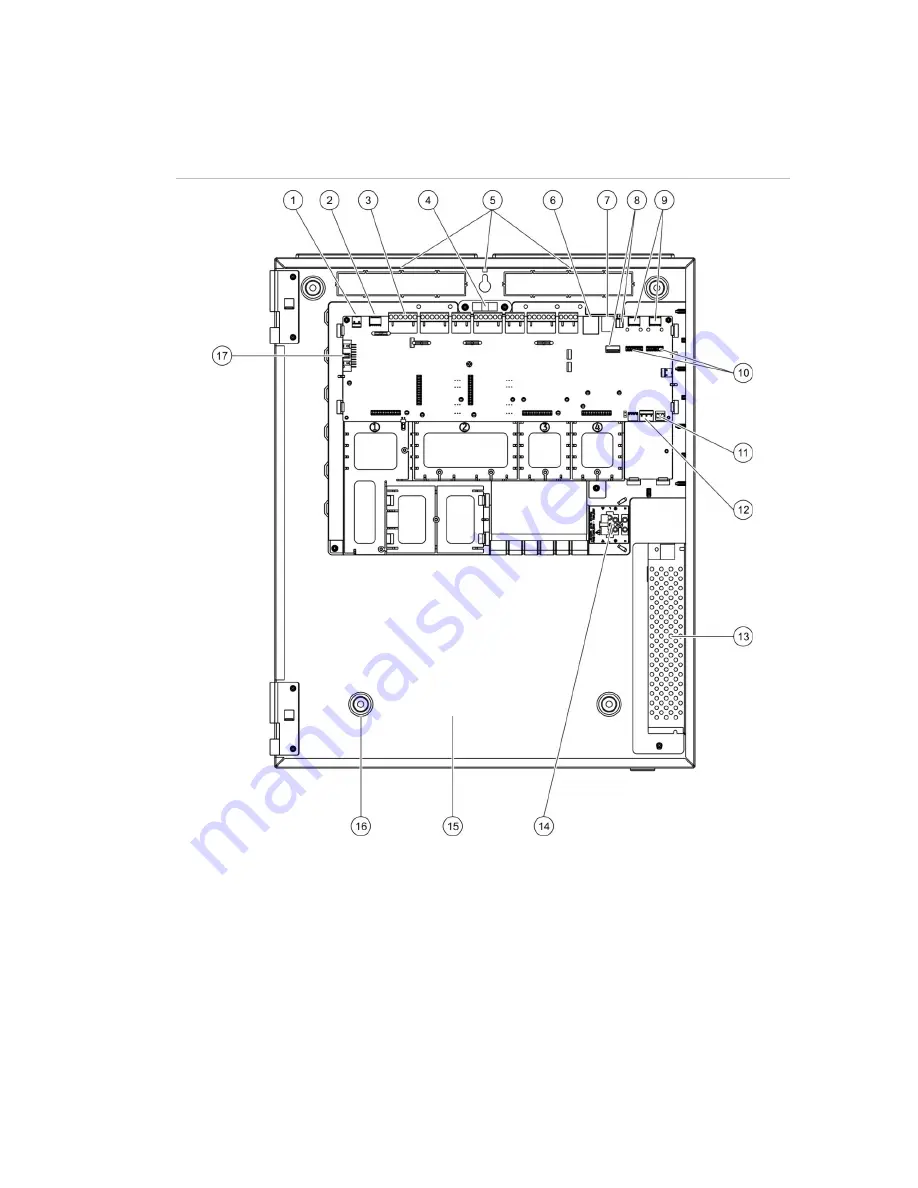
Figure 4: Large cabinet and PCB layout (two-loop control panel) 


1.  24V connector 
2.  COM2 serial port 
3.  Loop and fire system connectors 
4.  Spirit level 
5.  Earth studs 
6.  Ethernet connector 
7.  USB type B connector 
8.  USB type A connectors 
 

9.  COM0 and COM1 serial ports 
10. COM0 and COM1 interface connectors 
11. Battery connector 
12. Power supply connector 
13. Power supply 
14. Mains terminal block and fuse 
15. Battery area 
16. Mounting holes 
17. User interface connector 

Summary of Contents for ZP2 Series

Page 1: ...ZP2 Series Installation Manual P N 00 3251 501 0003 04 ISS 04MAY15...

Page 2: ...other relevant provisions of Directive 2004 108 EC 2012 19 EU WEEE directive Products marked with this symbol cannot be disposed of as unsorted municipal waste in the European Union For proper recycl...

Page 3: ...ctions 24 Chapter 3 Configuration and commissioning 35 Introduction 36 Maintenance level operation and configuration 39 Installer level operation and configuration 53 Commissioning 107 Chapter 4 Maint...

Page 4: ...or otherwise Because some jurisdictions do not allow the exclusion or limitation of liability for consequential or incidental damages the preceding limitation may not apply to you In any event the tot...

Page 5: ...le equipment damage They tell you which actions to take or to avoid in order to prevent the damage Note Note messages advise you of the possible loss of time or effort They describe how to avoid the l...

Page 6: ...iv ZP2 Series Installation Manual...

Page 7: ...provides an introduction to your control panel the main controls and the indicators Content Product range 2 Product compatibility 3 Product overview 4 The user interface 4 Front panel controls and ind...

Page 8: ...arm control panel with fire routing and fire protection controls and internal printer ZP2 F2 SCFB S Two loop addressable SS 3654 fire alarm control panel with fire routing and fire protection controls...

Page 9: ...mpatibility Products compatible with these control panels are listed in the supplied compatibility list Only those products specified in the compatibility list are guaranteed to be compatible with the...

Page 10: ...er Delay button and LED 8 Sounder Fault Disabled Test LED 9 Programmable output group start stop button and LED 10 Jog dial and function buttons 11 Reset button and LED 12 Panel Silence button and LED...

Page 11: ...og dial and function buttons 13 Reset button and LED 14 Panel Silence button and LED 15 Sounder Start Stop Button and LED 16 System Fault LED 17 Low Battery LED 18 Earth Fault LED 19 Supply Fault LED...

Page 12: ...ors The table below includes information for the common controls and indicators available for fire repeater and evacuation panels Table 3 Common controls and indicators Control LED LED colour Descript...

Page 13: ...and activates fire protection A flashing LED indicates that fire protection has been activated A steady LED indicates that the fire protection signal has been acknowledged by the remote monitoring eq...

Page 14: ...ounders If the LED is off pressing the button activates the sounders if the control panel status and operating mode allow manual activation of sounders The LED also indicates the status of the sounder...

Page 15: ...es or when the delay is cancelled Programmable start stop buttons and LEDs Red Yellow Starts or stops the the output group associated with the programmable button when pressed with the Confirm button...

Page 16: ...on output groups see Output groups on page 89 LCD controls and indicators Figure 3 LCD controls and indicators 1 Day night mode indicator 2 System date and time and active fire routing delay or exten...

Page 17: ...arm information for the first and last zones to report an alarm is displayed in the LCD message area Faults The number beside this icon indicates the number of active faults Additional information is...

Page 18: ...ion The buzzer sounds continuously Indicates a fire alarm or a system fault The buzzer sounds intermittently long tone 1 Indicates all other faults The buzzer sounds intermittently short tone 1 Indica...

Page 19: ...ng panel is included in the fire network In addition to the above the following system status events are also added to the event log but are not included in the control panel current events report Tab...

Page 20: ...Chapter 1 Introduction 14 ZP2 Series Installation Manual...

Page 21: ...binet and PCB layout 17 Cabinet installation 19 Where to install the control panel 19 Fixing the cabinet to the wall 19 Adding the menu inserts 20 Connecting the user interface cable 21 Connecting the...

Page 22: ...To avoid personal injury or death from electrocution remove all sources of power and allow stored energy to discharge before installing or removing equipment Caution Equipment damage hazard This prod...

Page 23: ...rial port 3 Loop and fire system connectors 4 Spirit level 5 Earth studs 6 Ethernet connector 7 USB type B connector 8 USB type A connectors 9 COM0 and COM1 serial ports 10 COM0 and COM1 interface con...

Page 24: ...3 Earth studs 4 Ethernet connector 5 USB type B connector 6 USB type A connectors 7 COM0 and COM1 serial ports 8 COM0 and COM1 interface connectors 9 Battery connector 10 Power supply connector 11 Mai...

Page 25: ...e enough floor and wall space to allow the control panel to be installed and serviced without any obstructions The cabinet should be mounted so that the user interface is at eye level Note This produc...

Page 26: ...n spirit level and mark drill points on the wall 3 Drill all required holes and insert a 6 mm wall plug into each 4 Insert a screw in position 1 and hang the cabinet onto this screw 5 Insert screws in...

Page 27: ...scriptions for any output groups assigned to the programmable buttons to insert 3 Note Different versions of insert 3 are provided for fire panels and for evacuation panels and each is marked with the...

Page 28: ...nal printer and load the printer with paper See Printer configuration on page 70 for printer configuration options The internal printer is only available on selected models Connecting the internal pri...

Page 29: ...Chapter 2 Installation ZP2 Series Installation Manual 23 Loading paper Load the paper for the internal printer as shown below Figure 11 Loading the paper for the internal printer...

Page 30: ...cable may be used subject to site specific electromagnetic interference EMI conditions and installation testing Using shielded loop cable In most installations shielded loop cable is not required and...

Page 31: ...d devices Securing cables Use 20 mm cable glands to ensure clean and secure connections All cables should be fed through the cable guides in the cabinet housing to eliminate movement Overview of fire...

Page 32: ...necting loops Loop guidelines For best results follow these guidelines when connecting loops Install at least one isolator per loop we recommend one for every 32 devices Keep loop cabling away from hi...

Page 33: ...shown in Figure 12 on page 25 Class A loop connection Connect Class A loops as shown in Figure 12 on page 25 Class A loops are supervised for open and short circuits Terminate unused Class A loops A...

Page 34: ...fault on the input Input activation characteristics Input activation characteristics are shown in the table below Table 10 Input activation characteristics State Activation value Active 60 2 active v...

Page 35: ...ions on page 113 Output termination All outputs except the 24V AUX output must be terminated Termination requirements are shown in the table below Table 12 Termination requirements Output Class Output...

Page 36: ...onnect Class B configurable outputs as shown in Figure 12 on page 25 Connect Class A configurable outputs as shown in Figure 13 on page 26 When connecting sounders or beacons use only those included i...

Page 37: ...proper operation Figure 15 Connecting the mains power supply 1 Mains fuse 2 Live 3 Earth 4 Neutral For fuse specifications see Chapter 5 Technical specifications on page 113 Selecting 115 or 230 VAC o...

Page 38: ...trol panel indicates a Supply Fault then the batteries may need to be replaced Connecting expansion boards Caution Always disconnect the control panel from the mains power supply before installing an...

Page 39: ...18 Fire network ring configuration Bus configuration Caution Use bus network configuration only in cases where the detection zones and mandatory EN 54 2 output functions sounder and fire routing outpu...

Page 40: ...2 232 KIT not supplied The kit contains a 3 m cable and the 2010 2 232 IB isolation board required for external RS 232 device connections Serial port connections for each output type are shown below...

Page 41: ...assword setup menu 52 Installer level operation and configuration 53 The Main menu 53 Panel configuration 53 ID configuration 54 Regional options 55 Firenet configuration 56 Communications configurati...

Page 42: ...are described in the product operation manual Maintenance The maintenance level allows routine maintenance tasks and is reserved for authorized users who have been trained to operate and maintain the...

Page 43: ...1 Press F3 Logout from the Main menu Configuration overview PC based configuration For best results we recommend that the control panel and fire system is configured using our Configuration Utility s...

Page 44: ...ion fire network and communications For more information see Panel configuration on page 53 2 Field configuration loop devices zones and control panel inputs and outputs For more information see Field...

Page 45: ...cess without storing or applying the current configuration change Note When updating multiple configuration settings we recommend that you save after each change and then apply all changes from the Ma...

Page 46: ...is reached The default test timeout value is 60 minutes This value must be set to 000 to disable the timeout and to force the manual cessation of zone test operations By default no disable timeout val...

Page 47: ...de to change selected day night fire detection and response criteria based on preconfigured time settings as shown below Note This option is not available on repeater panels Table 17 Day night mode se...

Page 48: ...art night mode at 22 00 and end at midnight set the night mode start time for the day to 22 00 and the day mode start time for the following day to 00 00 Setting the holiday calendar Select Holiday ca...

Page 49: ...NO to process mode change commands from the day night mode schedule and holiday calendar or YES to override mode change commands from the day night mode schedule and holiday calendar The default setti...

Page 50: ...nu to set up email accounts for event notifications and to safely remove a USB device connected to the control panel Managing email accounts Select Email accounts to manage the email accounts for remo...

Page 51: ...his menu Zones Devices individually or by device type Control panel inputs and outputs Output groups sounder fire routing fire protection or program Disabling a system feature or device To disable a f...

Page 52: ...l panel and loop output activation Output group activation Device LED activation Remote features and devices Batteries Note Tests for outputs and output groups local or remote continue for as long as...

Page 53: ...est activation of an input 1 Determine the input functionality consult your fire system installation details 2 Select Service mode from the Test menu and then select Local or Global Service mode ensur...

Page 54: ...op number and device address when prompted A list of all the devices on the selected loops is displayed 3 Select the corresponding device and then press the jog dial to activate the device LED To turn...

Page 55: ...d then select Service mode 2 Select Activate service mode and then select YES to activate service mode or NO to deactivate service mode 3 Select Global and then select YES to activate service mode acr...

Page 56: ...using the configuration utility Firenet status Displays the current status for all control panels in the fire network Save Print reports Saves or prints reports PAK List Displays details of all PAKs...

Page 57: ...ifferent flash drive Figure 21 USB connectors on the control panel PCB 1 USB connectors Saving reports Select Save report to save a report Reports are saved to a USB flash drive not supplied in XML fo...

Page 58: ...ows for a maximum of 20 user accounts all user levels combined To edit an operator user account 1 Select Password setup from the Main menu and then select Manage users A list of the user accounts that...

Page 59: ...entify user session activity in the event log 4 Press F4 Enter and then press F1 Back 5 Press F1 Save F3 Apply F4 Discard or F2 Exit Remember to apply saved settings from the Main menu Installer level...

Page 60: ...s the previous configuration or restores the default factory settings Expansion boards Configures any installed expansion boards Load auxiliary files Loads auxiliary files from a USB flash drive Auxil...

Page 61: ...fault European Union EN 54 2 Evacuation European Union Spain NBN S 21 100 1 European Union Belgium NEN 2535 2575 2 European Union Holland VdS 2540 1 European Union Germany British Standard 3 European...

Page 62: ...the types of events to repeat from other control panels in the fire network Command filter Configures the types of commands sent to the fire network in control panels with the corresponding global co...

Page 63: ...f the control panel event filter has condition and fault reporting disabled the repeater repeats only alarm prealarm alert and technical alarm conditions Therefore in Repeater mode the panel uses the...

Page 64: ...s 3 Select the control panel from the list and then select YES to allow global control or NO to stop global control 4 Press F4 Enter and then press F1 Back 5 Press F1 Save F3 Apply F4 Discard or F2 Ex...

Page 65: ...nels within the network to have locally defined day night mode settings If this setting is not activated the control panel does not send the day night mode change and does not process these commands w...

Page 66: ...Configures the gateway 0 0 0 0 Port Configures the port 2505 1 Direct 2 If checked enables direct email support Disabled DNS Configures the DNS server IP address used for direct email support 000 000...

Page 67: ...count 5 Press F4 Enter and then press F1 Back 6 Press F1 Save F3 Apply F4 Discard or F2 Exit Remember to apply saved settings from the Main menu Email server Note These settings have no effect if dire...

Page 68: ...ted To change the configuration 1 Select Panel setup from the Main menu 2 Select Other settings and then select 24V AUX config 3 Select YES or NO for deactivation during reset 4 Select YES or NO for d...

Page 69: ...own below The default setting is YES sounders re sound for new zone alarms Note By default sounders only re sound for a new alarm in the same zone if a manual call point alarm is reported following a...

Page 70: ...gs and then select School bells 3 Select Activate school bells while input is ON and then select YES or NO Select YES for the school bells to sound only while the input is active or NO if the bells sh...

Page 71: ...lseT and then enter the pulse time value in milliseconds 0 to 10000 If the PulseT value is 0 the output activation is continuous 5 Press F4 Enter and then press F1 Back 6 Press F1 Save F3 Apply F4 Dis...

Page 72: ...tore configuration to restore the previous system configuration To restore the system configuration 1 Select Panel setup from the Main menu and then select Configuration 2 Select Restore configuration...

Page 73: ...mat 4 Press F4 Enter and then press F1 Back 5 Press F1 Save F3 Apply F4 Discard or F2 Exit Remember to apply saved settings from the Main menu 6 Remove the USB flash drive as described in Removing a U...

Page 74: ...Discard or F2 Exit Remember to apply saved settings from the Main menu If an installed expansion board is not detected by the control panel a system fault is indicated Load auxiliary files Select Loa...

Page 75: ...he manufacturer To add language files or fonts 1 Open the control panel door and insert the USB flash drive with the required files into either of the USB type A connectors see Figure 4 on page 17 Clo...

Page 76: ...he USB flash drive as described in Removing a USB device on page 44 Figure 23 USB and JP4 connectors on the control panel PCB 1 USB connectors 2 JP4 Printer configuration Select Printer configuration...

Page 77: ...heck box for the options that you want to enable 4 Press F4 Enter and then press F1 Back 5 Press F1 Save F3 Apply F4 Discard or F2 Exit Remember to apply saved settings from the Main menu DACT configu...

Page 78: ...uration 1 Select Panel setup from the Main menu 2 Select DACT config and then select General config 3 Select and check the check box for the options that you want to enable 4 Press F4 Enter and then p...

Page 79: ...S B1 first backup CMS B2 second backup CMS etc 1 NO Enabled Enables or disables communication with the CMS NO Account Configures the account information that identifies the control panel Maximum 6 dig...

Page 80: ...edgement time 48 x 10 ms 1 See Appendix B PSTN country codes on page 125 for a complete list of country codes 2 These correspond to the line 1 and line 2 connectors on the installed DACT board To chan...

Page 81: ...e details on how to register or unregister purchased PAKs Select Panel Activ Key to register or unregister panel activation keys PAKs PAKs are used to extend the default functionality of the control p...

Page 82: ...at which to poll the SNTP server 00 00 1 See SNTP server on page 61 for SNTP server configuration To change the configuration 1 Select Panel setup from the Main menu 2 Select Auto date and time 3 Con...

Page 83: ...le 39 Field configuration options Option Description Autosetup Automatically configures installed loop devices to their default settings Loop device configuration Configures installed loop devices or...

Page 84: ...oup number 971 Assign all fire protection outputs where available to the default fire protection output group output group number 981 Assign the default initial zone to zone 1 Indicate the number of n...

Page 85: ...12 for all control panels The zone number range is 01 to 9999 Note For 2010 2GUI application compatibility assigned zone numbers must be in the range 1 to 4095 zones with higher numbers will be discar...

Page 86: ...nitial zone for the fire system See Initial zone below for more information 1 Assign first ZI LED to zone Configures the initial zone LED for an installed zone LED indicator board See First zone indic...

Page 87: ...ge of the zones repeated by the control panel Number of global zones Note This feature is not available if the initial zone is 0 Configures the number of global zones available when the control panel...

Page 88: ...mode Mixed Manual Auto MSP or MHA See Zone operating modes on page 84 for more information Mixed ZnCoinc 3 Configures MCP double detection for the zone If checked when two automatic devices indicate a...

Page 89: ...oint and a single detector in the same local zone irrespective of which device first reports the alarm event aIMsZ The alarm is confirmed by a single manual call point and a single initiating device i...

Page 90: ...nitiating device for confirmation types aDaZ dDaZ aDMaz aIMaz and dMaZ Zone operating modes All zones must be configured as Mixed Manual Auto MSP or MHA Information for each of these zone operating mo...

Page 91: ...not included in the confirmation area 5 Press F1 Save F3 Apply F4 Discard or F2 Exit Remember to apply saved settings from the Main menu Note When configuring a confirmed zone remember that remote zon...

Page 92: ...put disables all the technical alarm inputs latched and unlatched DET Detector alarm This input type can be used for connecting to aspirating detector Fire1 outputs MCP Manual call point alarm This in...

Page 93: ...input receives acknowledgement from remote fire protection equipment If the acknowledgement is not received within 240 seconds of fire protection activation the control panel reports a fire protection...

Page 94: ...ct the output type See Table 50 below for a list of available output types The default setting for all outputs is SND sounder output 5 Assign the output to an output group See Output groups on page 89...

Page 95: ...put are applied to all output pairs used to create the Class A output OUT1 OUT2 etc This includes enable disable configuration options For example if the OUT1 type is changed to PRG and Group n change...

Page 96: ...n the control panel is in fault status 993 DIS 2 Outputs activated when the control panel is in disable status 994 TEST 2 Outputs activated when the control panel is in test status 1 Extinguishing out...

Page 97: ...description for the output group 7 Press F4 Enter and then press F1 Back 8 Press F1 Save F3 Apply F4 Discard or F2 Exit Remember to apply saved settings from the Main menu Output group activation Outp...

Page 98: ...econd alarm To configure delayed output group activation 1 Select Field setup from the Main menu and then select Output groups 2 Select Confirmations and then select the output group to configure A li...

Page 99: ...or the location of the programmable buttons and LEDs By default all programmable buttons are set to sounder group 1 Note Evacuation panels operating in NEN 2575 mode can only assign sounder output gro...

Page 100: ...activation of output groups for each individual zone in alarm For each zone a different output group activation delay including no activation can be assigned for each configured output group General d...

Page 101: ...rning delay is only observed if the corresponding warning time is also configured see Warning time on page 100 for more information on this option The maximum warning delay value is 10 minutes 7 Press...

Page 102: ...fire protection or program with a delay of 10 seconds for a detector alarm in zone 1 and with a delay of 2 minutes for a detector alarm in zone 5 To configure per zone delay options 1 Select Field set...

Page 103: ...delay options Configurable options for general delays are shown in the table below Table 56 Configurable options for general delays Field Description InvMode Investigation mode Enables regional invest...

Page 104: ...one only if a manual call point alarm is detected If a delay is required before the warning tone begins configure the warning delay for the corresponding output group See Warning time on page 100 for...

Page 105: ...ay If the alarm is not acknowledged during the configured fire routing delay by pressing the Panel Silence button then the extended fire routing delay is not activated FREXT_SND 1 Extended fire routin...

Page 106: ...k is not enabled any configured investigation time starts when the alarm is detected If Inv_Ack is enabled the maximum investigation time is 600 seconds less the configured investigation time and the...

Page 107: ...y starts to count down Warning delay 1 The optional delay before the sounders activate the warning tone Delay 1 The optional delay before the sounders activate the evacuation tone 1 To configure these...

Page 108: ...LED is off and the sounders cannot be silenced before activation by pressing the Sounder Start Stop button In the time between the end of the configured disable time and the end of the configured sou...

Page 109: ...rrent consumption values for the control panel loops 1 Includes VIN1 and VIN2 values for compact repeaters To activate a diagnostics test 1 Select Test in the Main menu and then select Diagnostics 2 S...

Page 110: ...e slot 2 Val3 Third type value slot 3 Val4 Analogue value 1 slot 5 1 2 Val5 Analogue value 2 slot 6 1 1 The analogue values displayed are the raw binary values received from the device 2 In the event...

Page 111: ...y F4 Discard or F2 Exit Remember to apply saved settings from the Main menu To delete a user account 1 Select Password setup from the Main menu and then select Manage users A list of all user accounts...

Page 112: ...ccess is selected the control panel automatically prefills the last username and password combination entered for login If secure access is selected all username and password information must be enter...

Page 113: ...nd that all cabling complies with the recommendations outlined in Recommended cables on page 24 That all software functions are correctly programmed That all installed detectors are appropriate for in...

Page 114: ...Chapter 3 Configuration and commissioning 108 ZP2 Series Installation Manual...

Page 115: ...eries Installation Manual 109 Chapter 4 Maintenance Summary This chapter includes information on fire alarm system and battery maintenance Content Fire alarm system maintenance 110 Battery maintenance...

Page 116: ...ult and alarm events The control panel power supply should be checked and the batteries tested using the Battery test menu option see Battery test fault indications on page 111 Annual maintenance Cont...

Page 117: ...ashing Supply Fault LED indicates a battery fault or a battery cable fault Additional information for the fault is displayed on the LCD as shown below Table 64 Battery fault messages LCD message Descr...

Page 118: ...sting batteries from the cabinet 3 Install and connect the replacement batteries using the bridge provided Observe the correct polarity 4 Dispose of the battery as required by local ordinances or regu...

Page 119: ...ntrol panel Content Loop specifications 114 Power supply specifications 114 Battery and battery charger specifications 115 LCD specifications 115 Communication port specifications 116 Fire network spe...

Page 120: ...0 VAC 10 15 Mains frequency 50 60 Hz 5 Mains current Maximum Average 1 5 A at 240 VAC 3 15 A at 110 VAC 0 6 A at 240 VAC 1 3 A at 110 VAC CIE input voltage and current mains on 24 VDC 4 A Power mains...

Page 121: ...m output current which can be supplied continuously 3 Imax b is the rated maximum output current which can be supplied for a short duration in which battery charging is not required Battery and batter...

Page 122: ...erview Configurable outputs General fire outputs General fault outputs 24V AUX output Configurable inputs One loop panel 2 Class B 1 Class A 2 see note 2 see note 1 2 Two loop panel 4 Class B 2 Class...

Page 123: ...tput cable length restrictions may apply see Calculating the maximum output current as a function of the cable length on page 118 2 Up to a maximum system consumption of 4 A Imax b Fire and fault outp...

Page 124: ...t current as a function of the length of the cable IL VC RC Where IL is the maximum allowable current VC is the maximum voltage loss in the cable see note below RC is the overall measured resistance o...

Page 125: ...8 mm 450 x 173 x 550 mm Weight without batteries Small cabinet Large cabinet 5 2 kg 7 4 kg Number of cable knockouts Small cabinet Large cabinet 9 x 20 mm at top of cabinet 2 x 20 mm at bottom of cabi...

Page 126: ...Chapter 5 Technical specifications 120 ZP2 Series Installation Manual Figure 27 Large cabinet dimensions and views...

Page 127: ...Chapter 5 Technical specifications ZP2 Series Installation Manual 121 Figure 28 Small cabinet dimensions and views...

Page 128: ...Chapter 5 Technical specifications 122 ZP2 Series Installation Manual...

Page 129: ...Repeater Repeater mask All panels repeated IP address 192 168 104 140 Subnet mask 255 255 255 0 Gateway 0 0 0 0 Port 2505 24V auxiliary Not deactivated during reset not deactivated when running on bat...

Page 130: ...ctivated by fire alarms in all zones Fault output Follows the General Fault LED and is activated when there is no fault fail to safe IN1 and IN2 Technical alarm latched T_AL Delays All delays to 0 in...

Page 131: ...7 Bahrain 6 Ireland 42 Reunion 78 Belarus 7 Israel 43 Romania 79 Belgium 8 Italy 44 Russia 80 Bermuda 9 Japan 45 Saudi Arabia 81 Brazil 10 Jordan 46 Singapore 82 Brunei 11 Kazakhstan 47 Slovakia 83 Bu...

Page 132: ...96 Equador 25 Mexico 61 UK 97 Egypt 26 Moldova 62 Uruguay 98 El Salvador 27 Morocco 63 USA 99 Estonia 28 Netherlands 64 Uzbekistan 100 Finland 29 New Zealand 65 Venezuela 101 France 30 Nigeria 66 Yem...

Page 133: ..._out Panel setup Date and time Day Night mode Day Night schedule Holiday calendar Day Night setup Communications Email accounts Remove USB device Disable Enable Zones Devices Panel outputs Panel input...

Page 134: ...ice status Panel I O status Output groups status Rules status Firenet status Save Print reports All Current events Event log Attention required Zone status Device status Panel I O status Output groups...

Page 135: ...unders Fire routing Fire protection Program Per zone General delays Loop Class Panel setup ID configuration Date and time Day Night mode Day Night schedule Holiday calendar Day Night setup Regional op...

Page 136: ...screens Languages Language fonts System update Printer configuration Int printer configuration Ext printer configuration Terminal configuration DACT configuration General configuration Ethernet config...

Page 137: ...t Battery test Reports Event log View all Clear Attention required Revision Firmware revision Configuration revision Serial numbers Contact details Zone status Zone mapping Device status Panel I O sta...

Page 138: ...Night schedule Holiday calendar Day Night setup Communications Email accounts Remove USB device Disable enable Panel outputs Panel inputs Remote disable Test Output test Panel outputs Service mode Re...

Page 139: ...General configuration Panel I O configuration Panel inputs Panel outputs Output groups Programmable controls Activation configuration General delays Panel setup ID configuration Date and time Day Nig...

Page 140: ...ion Int printer configuration Ext printer configuration Terminal configuration DACT configuration General configuration Ethernet configuration CMS configuration PSTN configuration GPRS configuration D...

Page 141: ...ion Firmware revision Configuration revision Serial numbers Contact details Panel I O status Firenet status Rules status Save Print reports All Current events Event log Attention required Panel I O st...

Page 142: ...Appendix C Menu maps 136 ZP2 Series Installation Manual...

Page 143: ...ation input from fire alarm routing equipment 2 7 10 Output to fire protection equipment type A B and C 3 7 11 Delays to outputs 4 7 12 Dependencies on more than one alarm signal types A B and C 4 7 1...

Page 144: ...002 A2 2006 Product identification See model number on product identification label Intended use See DoP point 3 Essential characteristics See DoP point 9 EN 54 13 European compatibility assessment of...

Page 145: ...k 31 outputs 28 UI cable 21 control panel configuration load 66 restore default 67 restore previous 66 save 67 custom screens adding 68 D DACT CMS configuration 73 Ethernet configuration 72 GPRS confi...

Page 146: ...cs 28 activation test 47 configuration 85 connections 28 types 86 installer user level 36 internal printer configuration 70 connection 22 loading paper 23 L language files 69 LCD controls 10 icons 11...

Page 147: ...pdate 69 T TCP IP settings 60 U USB device removing 44 user account create new 53 105 delete 52 105 edit 52 105 user levels 36 Z ZI initial zone LED 81 zone add 79 alarm confirmation 82 alarm confirma...

Page 148: ......

Reviews: