


100
selecting the right hour according to the time of
day: AM – morning hours, PM – afternoon hours.
To set minutes, press and hold the
“M”
button.
The clock will automatically start displaying the
time after releasing any of the buttons.
Notice
: Pressing buttons
“H”
and
“M”
together for
longer enables to change the time more quickly.
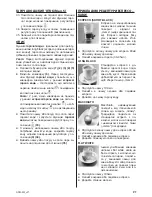
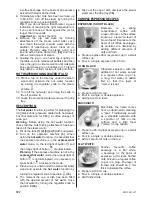
BREWING ESPRESSO (Fig. 3)
13. Turn the regulator knob to the espresso
position
run about 0.5 l water through.
Set the knob in position
0
again –
to turn off
pouring (the pump).
14. Choose a suitable filter and place it in the filter
holder.
15. Hold the filter holder and rinse it with water to
pre-heat it.
16. Pour finely ground coffee into the filter.
17. Tamp the coffee.
18. Clean the rim of the filter holder to remove
any excess ground coffee.
19. Place the filer holder in the brew head.
Notice:
Projections on the holder must fit in
the slots of the brew head.
20. Turn the filter holder all the way to the right.
21. Place cups under the outlets of the holder.
22. Press button .
After reaching the right temperature, symbol
and an inscription saying
“READY”
will
show on the display.
Turn the regulator knob towards
to start or
towards position
0
to stop pouring espresso.
Warning
: Remember that if an inscription
saying
“READY”
does not show on the
display, it means that the espresso machine
has not reached the right temperature for the
selected function.
To turn off the espresso machine, simply
press button .
23. Remove the filter holder by turning it to the left
and pulling it down.
24. Remove the used coffee from the filter.
DESCRIPTION
Before starting preparations for brewing coffee,
check that the espresso machine is in the
espresso/hot water
mode, i.e. that the red light
on the power button and the orange light on
button
are illuminated.
Notice
: If the espresso machine is not in the
espresso/hot water
mode (the orange light of
button
is not illuminated), it is necessary to
press button to activate this mode.
To obtain a flavour-rich coffee, we recommend
that the cups, the filter holder and the filter are
pre-heated in the following manner:
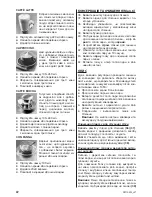
Pre-heating the filter holder
●
Fill up the water tank
(1)
(2)
(3)
(4)
(5)
with
cold water and turn on the appliance
(6)
.
●
Choose a suitable filter and place it in the
holder
(9) (14) (10) (11)
.
Tip
: Use a smaller filter (for one cup) for one
coffee, and a bigger one for two coffees.
●
Take the filter holder, hold it under the brew
head and rinse it with water by turning the
regulator knob anticlockwise to the espresso
position to start the flow of water. Turn it
back to position
0
to turn off the appliance
(15)
.
●
Allow the filter holder to dry.
Pre-heating cups
●
If the appliance has been on for a longer time,
pre-heat cups/glassware on the plate – it will
help keep the froth on the brewed coffee
(8)
.
●
Cups can also be pre-heated by filling them
with hot water
(12) (13)
. Turn the regulator knob
to the espresso position
to start the flow
of water. To stop the process, set the knob in
position
0
. Pour the hot water out of the cups.
Brewing coffee
●
Check if there is cold water in the tank. If there
is no or little water, fill up the tank
(1)
(2)
(3)
(4)
(5)
with cold water and turn the appliance on
(6)
.
●
Using the measure provided, put finely ground
coffee in the filter
(16)
.
●
Using the other end (the flat end) of the
measure, press the coffee down lightly
(17)
making a 90 degree turn, to fill the bottom.
It tightens the tamped coffee.
●
Remove any excess coffee so it is level with
the rim of the filter
(18)
.
Important
: Ensure there is not too much
coffee in the filter.
Tip:
Doses of coffee and the degree to which
coffee is tamped should be the same each time.
The pouring time of brewed coffee depends on
the coarseness of ground coffee. The finer the
coffee, the lower the pouring speed.
Tip
: Check that the flat end of the measure is
dry when tamping coffee. If it is damp, coffee
particles may stick together.
Warning:
Too finely ground coffee
may block
the holes of the filter and stop the coffee flow.
●
Place the filter holder in the brew head and
turn it all the way to the right
(19) (20)
.
●
Place cups under the pouring outlets of the
holder
(21)
.
Warning
: Check that the espresso machine is
ready to use. Remember that if an inscription
saying
„READY
does not show on the display,
it means that the espresso machine is not in
the ready to use mode yet.
●
To resume the coffee pouring process, turn the
regulator mode anticlockwise to the espresso
position. To stop the process, turn the knob
back to position
0
(22)
.
GW13-023_v07


